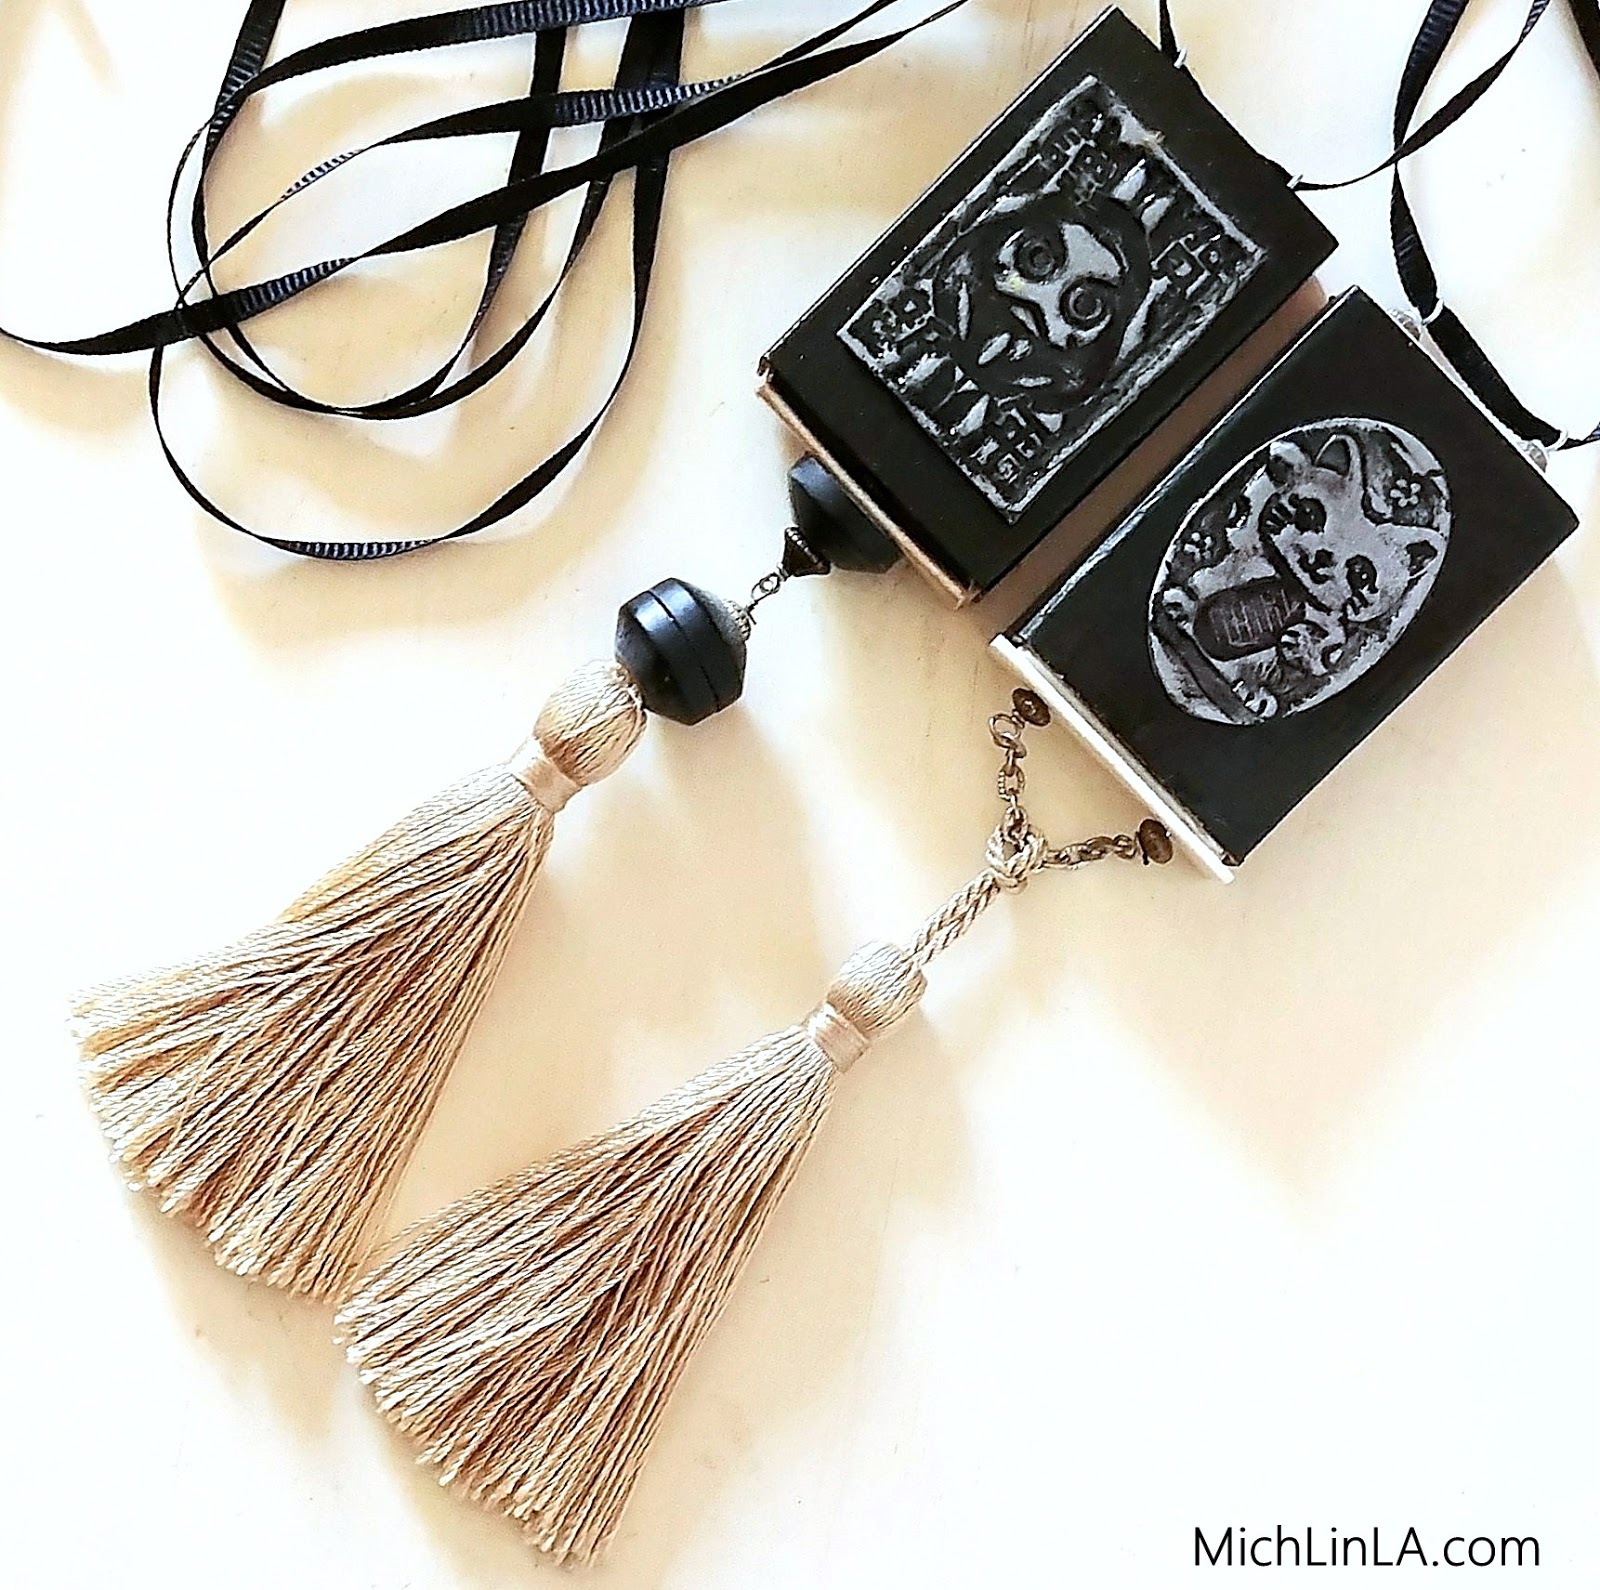
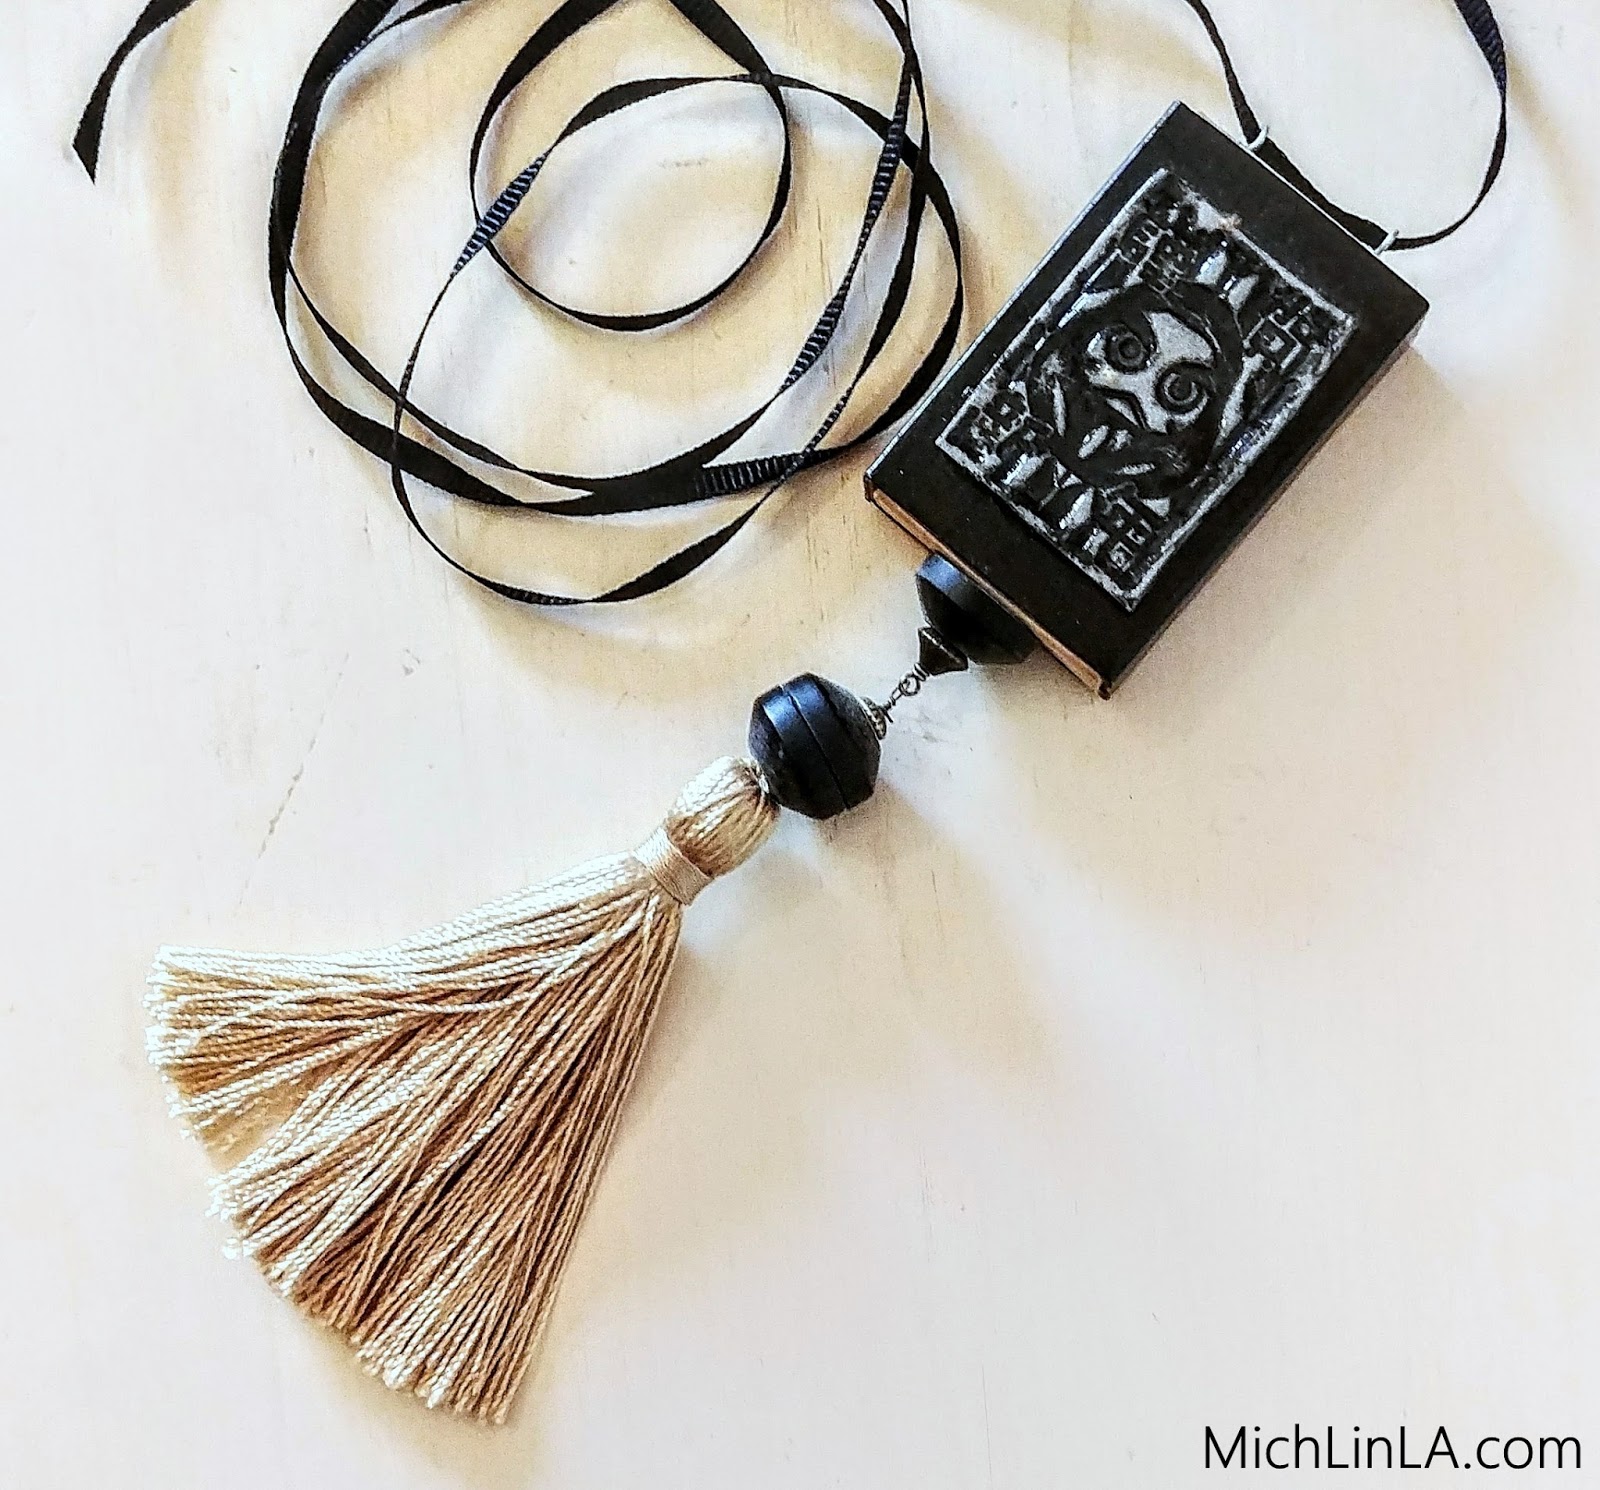
Greetings, friends! I propose that it's time to start thinking about handmade gifts. This recycled necklace gift can charm nearly anyone: a simple matchbox turned into a secret-compartment pendant.
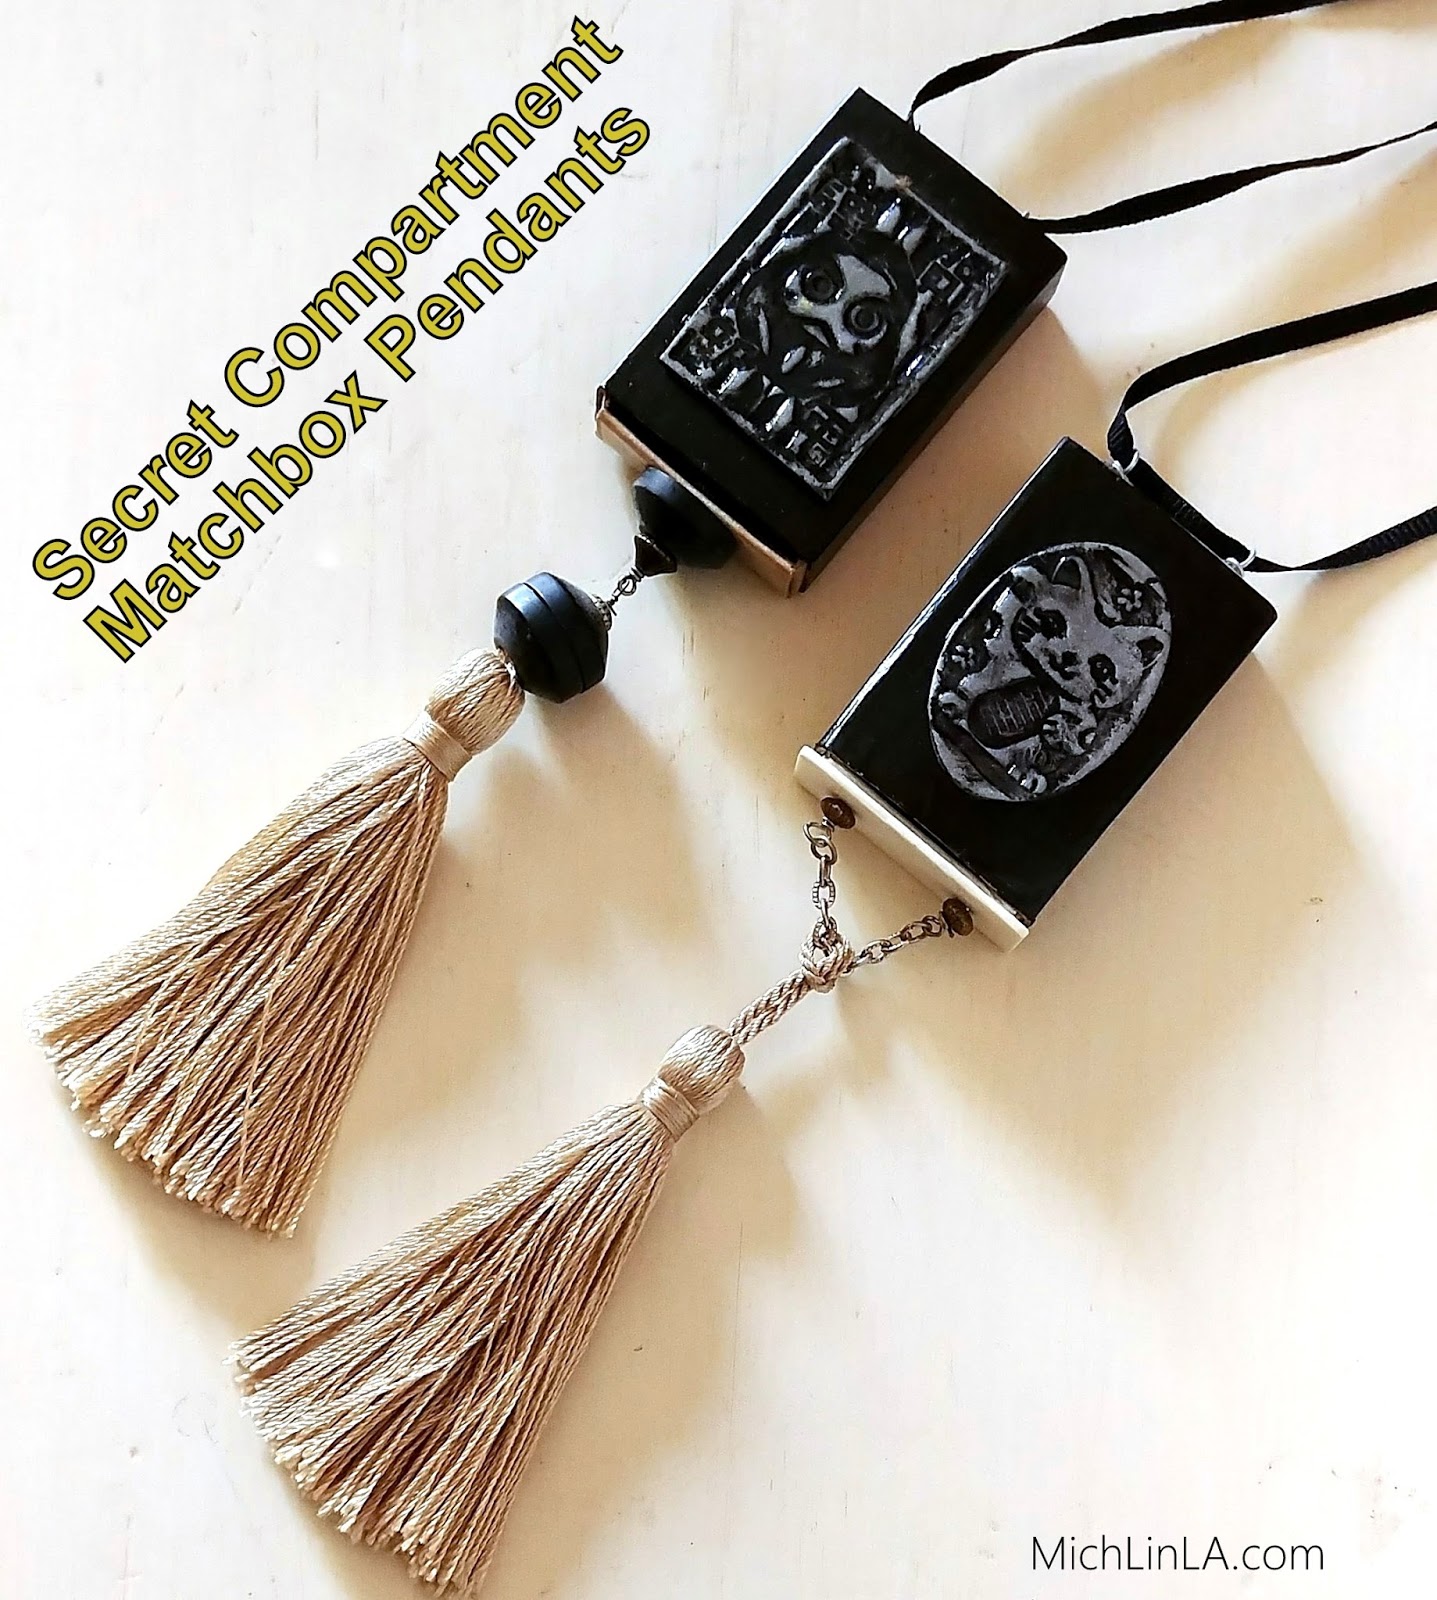
The awesomeness is threefold. 1.) It's simple and eco friendly. 2.) Customize the art to your loved one's style and interest. 3.) Because there's a tiny secret compartment, you can include an additional mini-gift inside! Here's the secret drawer:
Aren't they fun? Want to make one? Here's how.
Tools:
jewelry pliers
wire cutters
something pointy for poking holes
Materials:
a matchbox
clear packing tape
acrylic craft paint
craft wire
1 or 2 headpins
a tassel
glue or mod podge
1 or 2 accent beads OR a strip of recycled plastic
spacer beads
optional: a bit of chain
The DIY
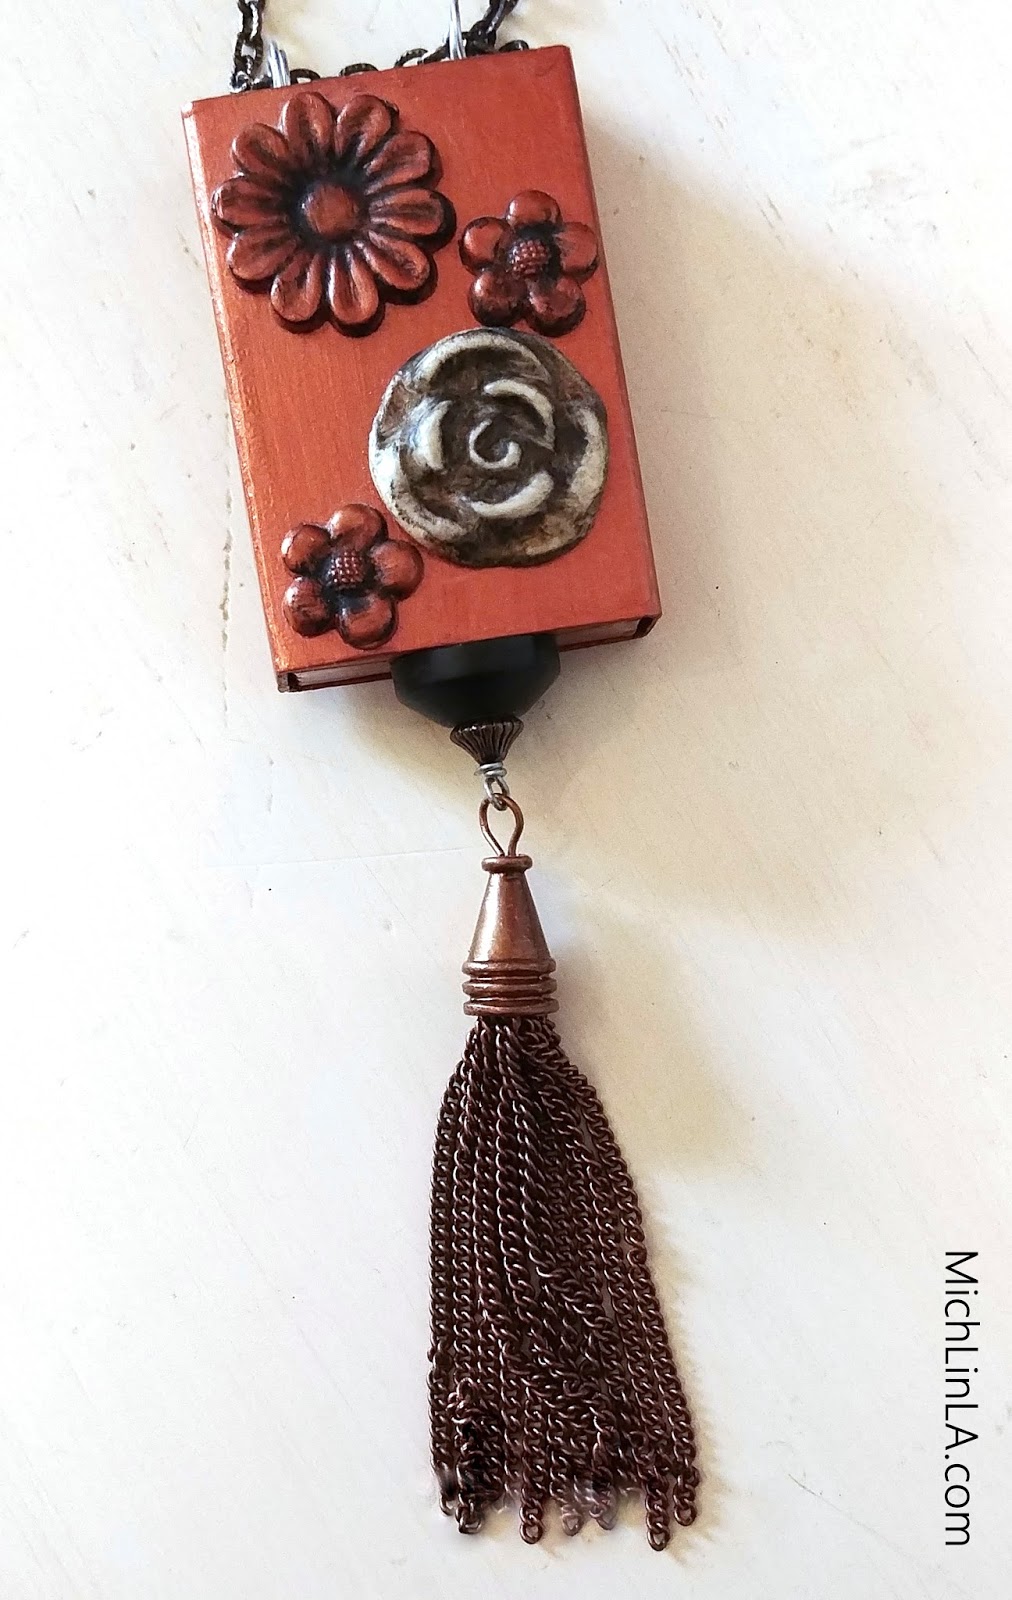
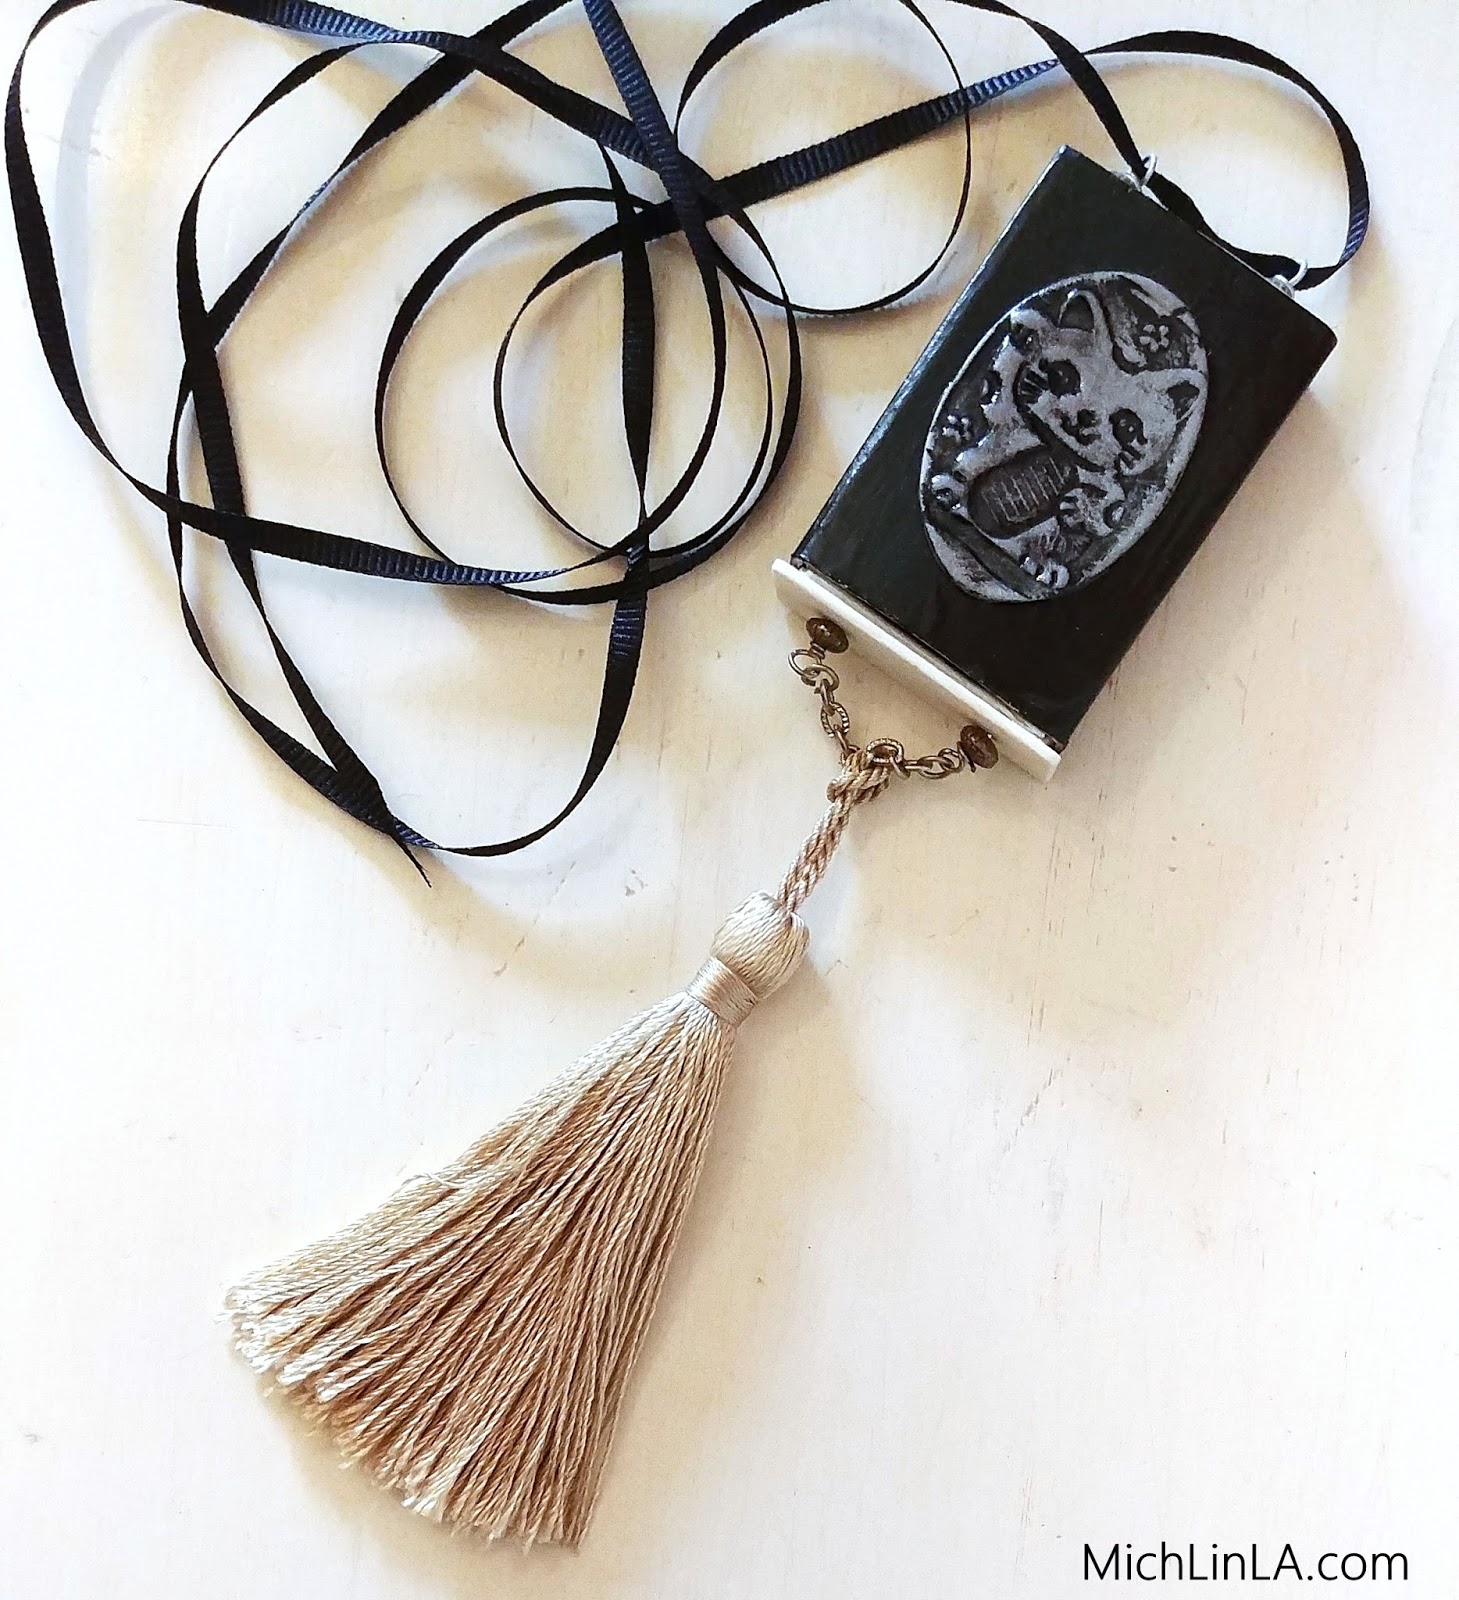
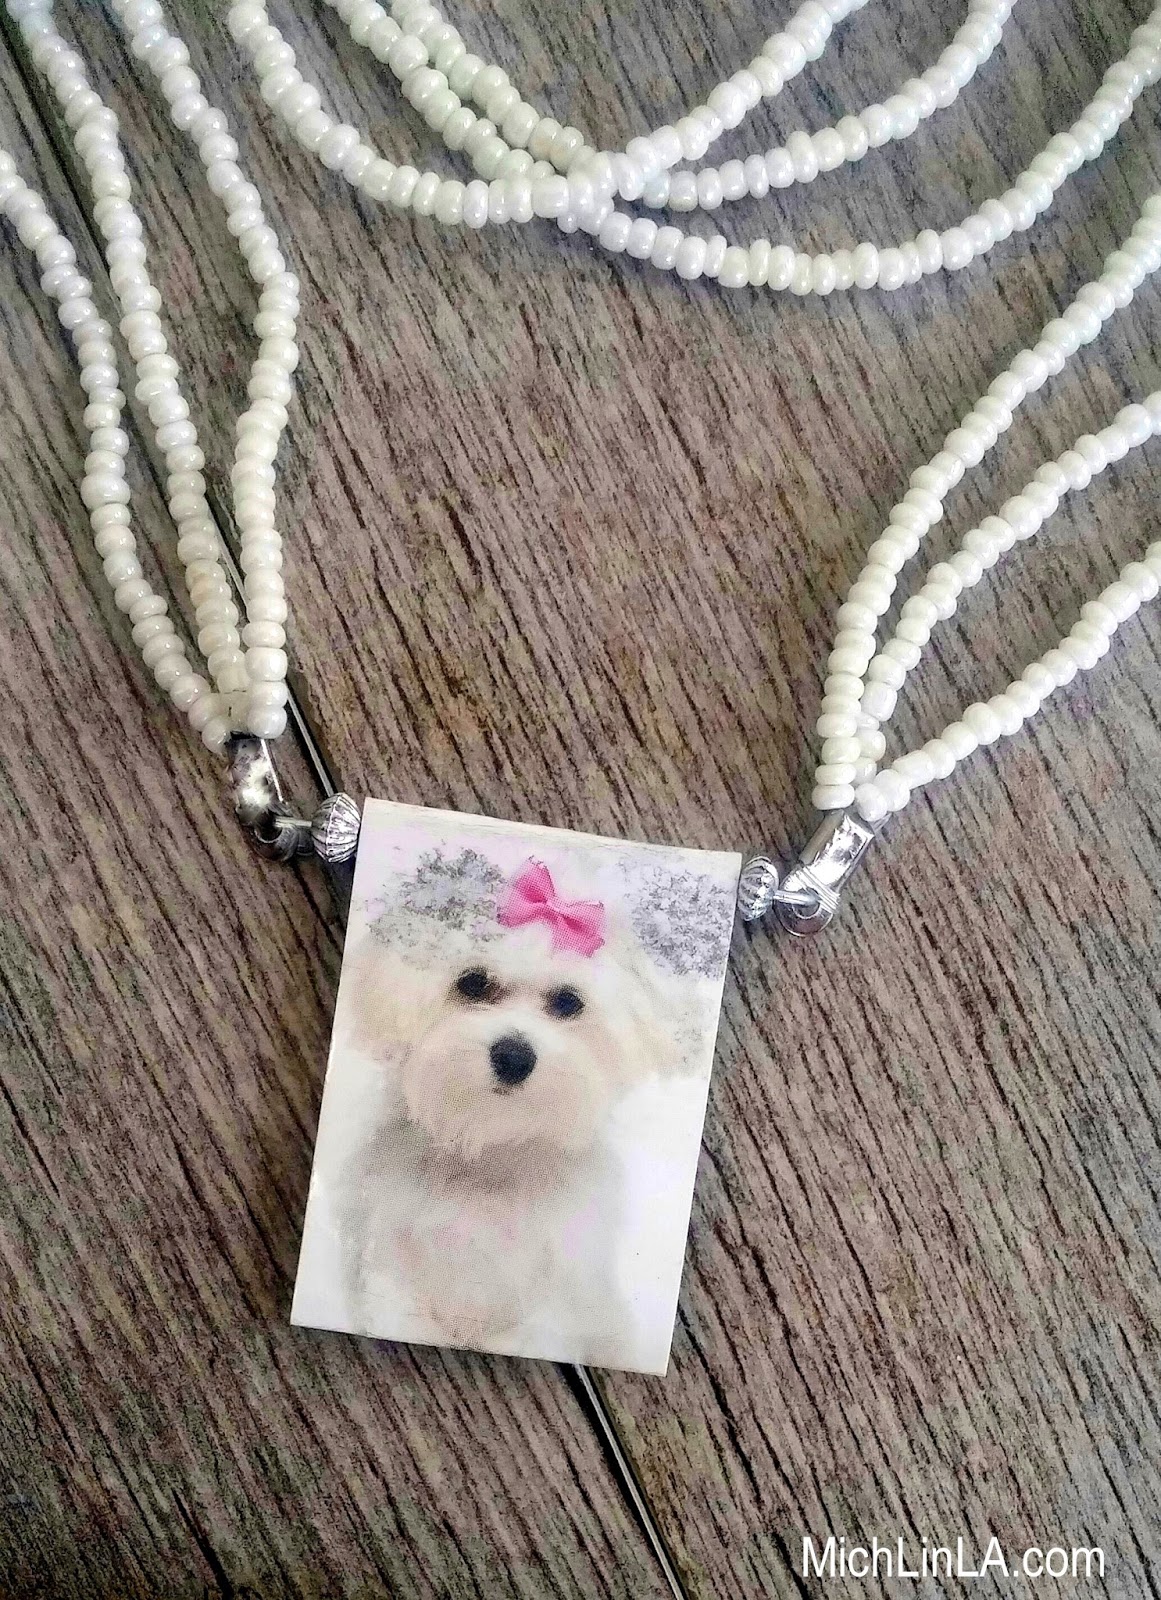
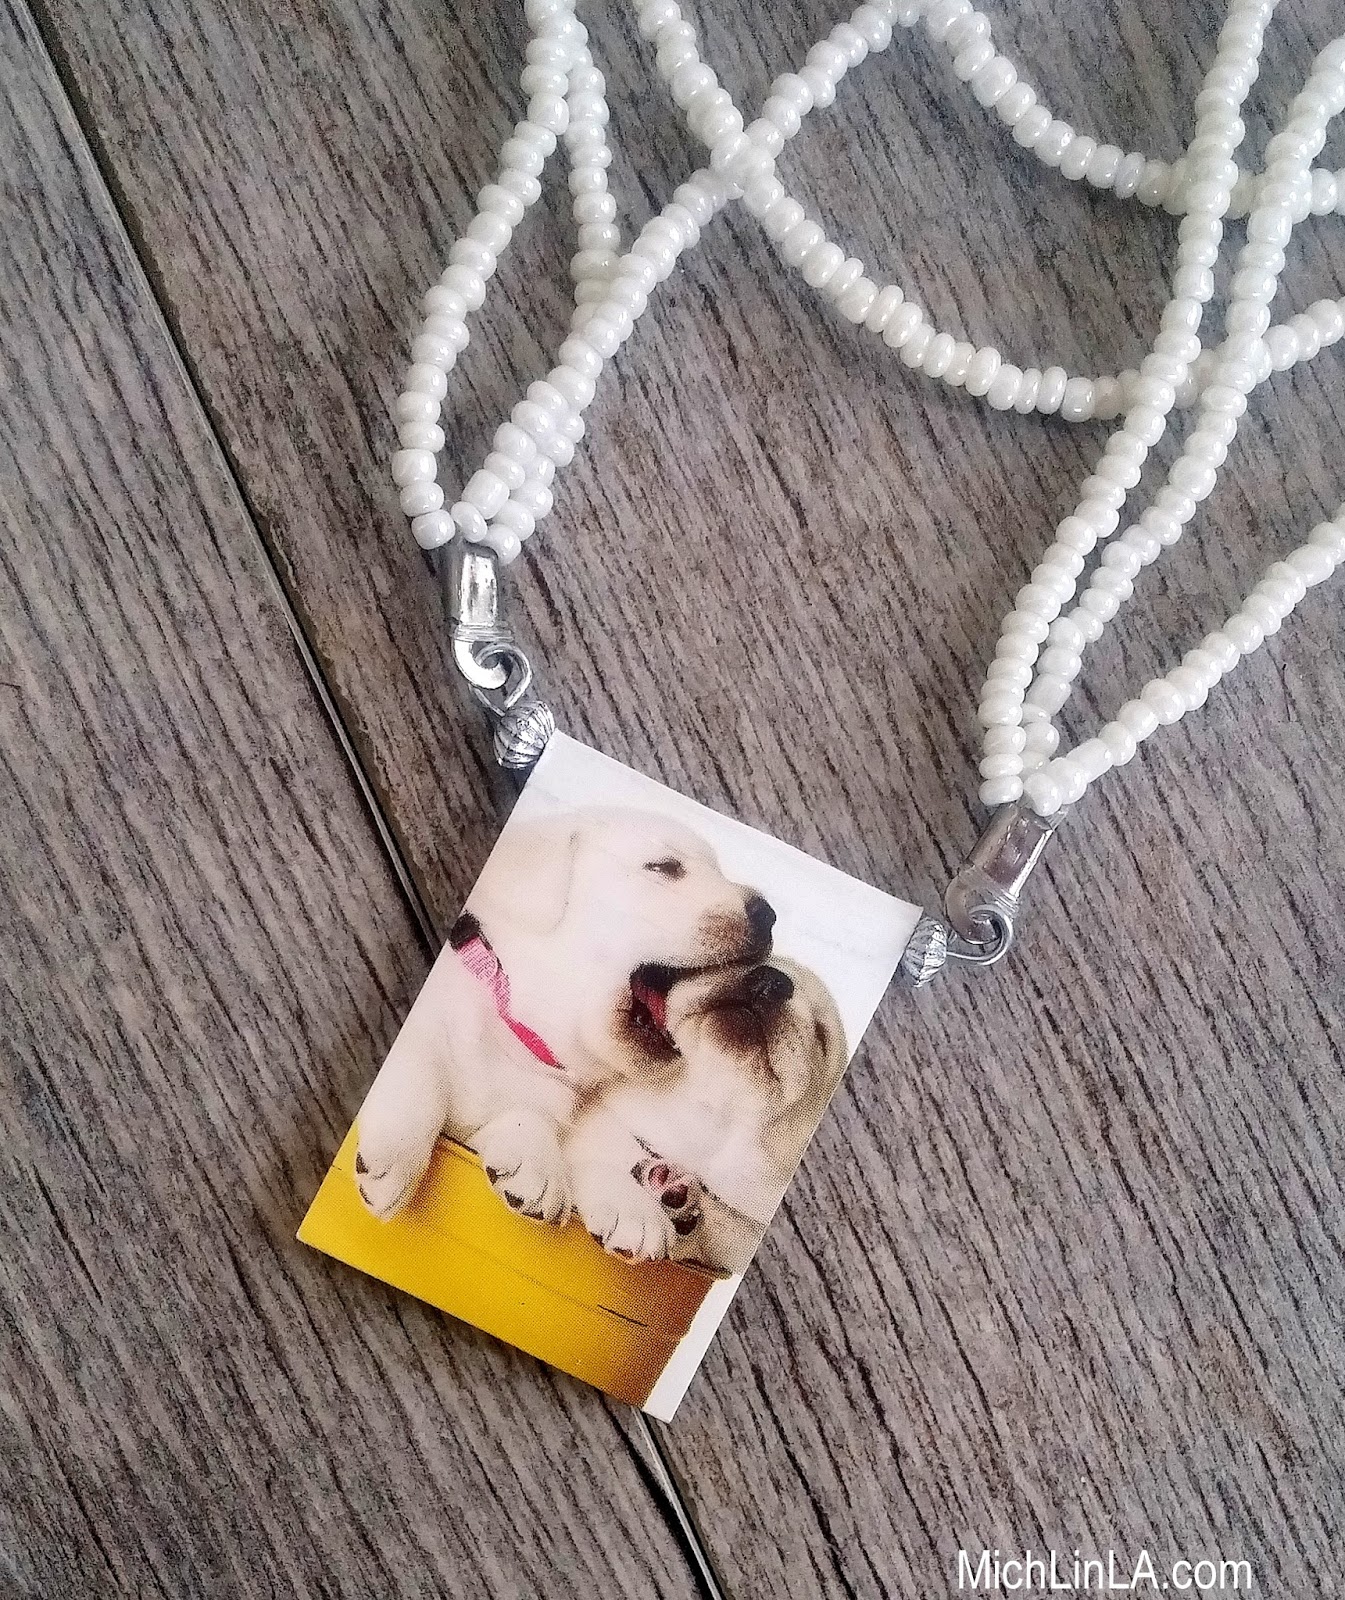
1. Embellish. Paint the matchbox's outer sleeve. If you like, paint the inner drawer as well. Then embellish! Adhere something delightful to the top of the matchbox - anything you like. (A few ideas at the end of the post.)
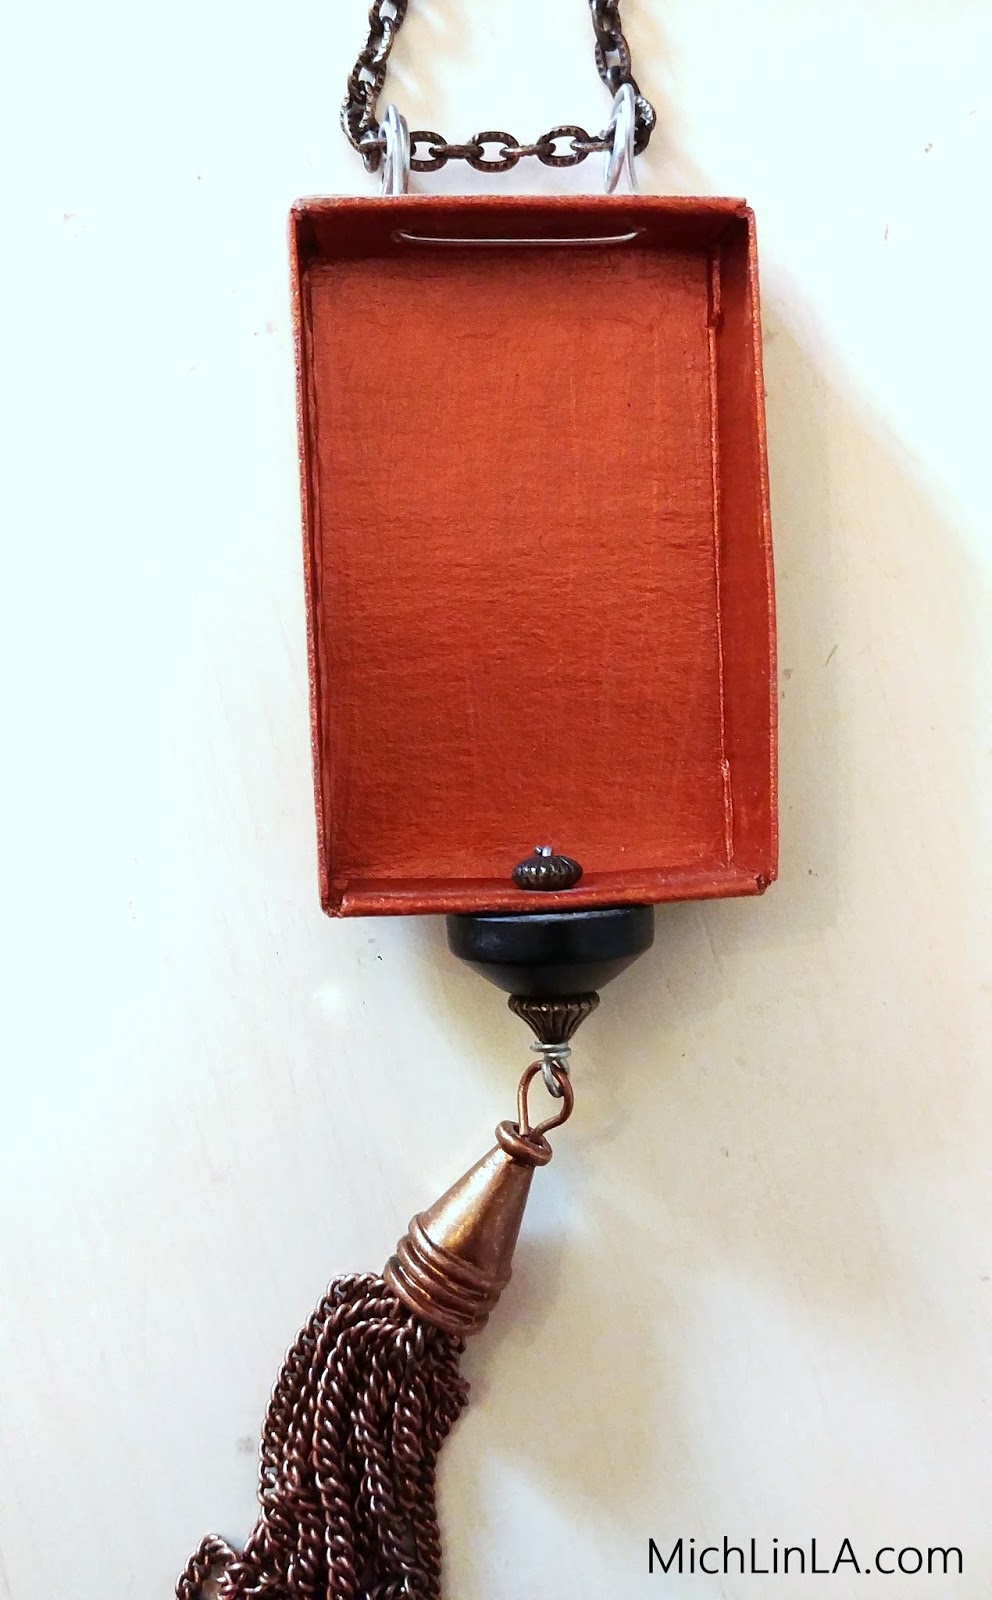
2. Reinforce. Reinforce the matchbox drawer with clear packing tape: cut 2 strips and crisscross them in the back, wrapping the tape over the edges and into the inside of the drawer. Reinforce the inside of the matchbox sleeve with a bit more hidden tape (that you tuck inside and smooth down).
3. Turn it into a pendant. First, poke two holes in the top of the inner drawer. Thread craft wire through the two holes and make two loops at the top. It's easy! Like this:
To finish the bottom, there are two versions.
ONE HOLE VERSION: At the bottom of the inner drawer, poke one hole in the center. Add a spacer bead to a headpin, thread it through the hole, add an accent bead and make a loop. Add a tassel. It will look like this:
TWO HOLE VERSION: At the bottom of the drawer, poke two holes. Using the same headpin method as above, add either two accents beads or, as in the Lucky Cat version seen below, a rectangle of plastic with two matching holes. Make two loops underneath. Add a bit of chain, with a tassel suspended in the center. Like this:
Functional Note: the accent beads or plastic strip should be just a bit wider than the matchbox. This prevents the sleeve from sliding off. (My accent beads in these examples were repurposed rubber washers, because I liked how they looked. But any bead is just fine.)
Ideas for how to embellish the pendant:
Modpodge some original or found art.
Paint it, glitter it, doodle it.
Glue stuff on, like charms or buttons.
Add a polymer clay panel. (I made my Japanese-themed panels from polymer clay, impressed with rubber stamps I bought at a 100 yen store in Tokyo.)
Ideas for mini gifts inside the matchbox:
Photos
Love notes
Funny coupons to be redeemed
Candy
3 carat diamond earrings
Ca$h
Who can suggest some more tiny gifts for inside?
Alrighty, you guys - thanks for visiting, hope you enjoyed this one!
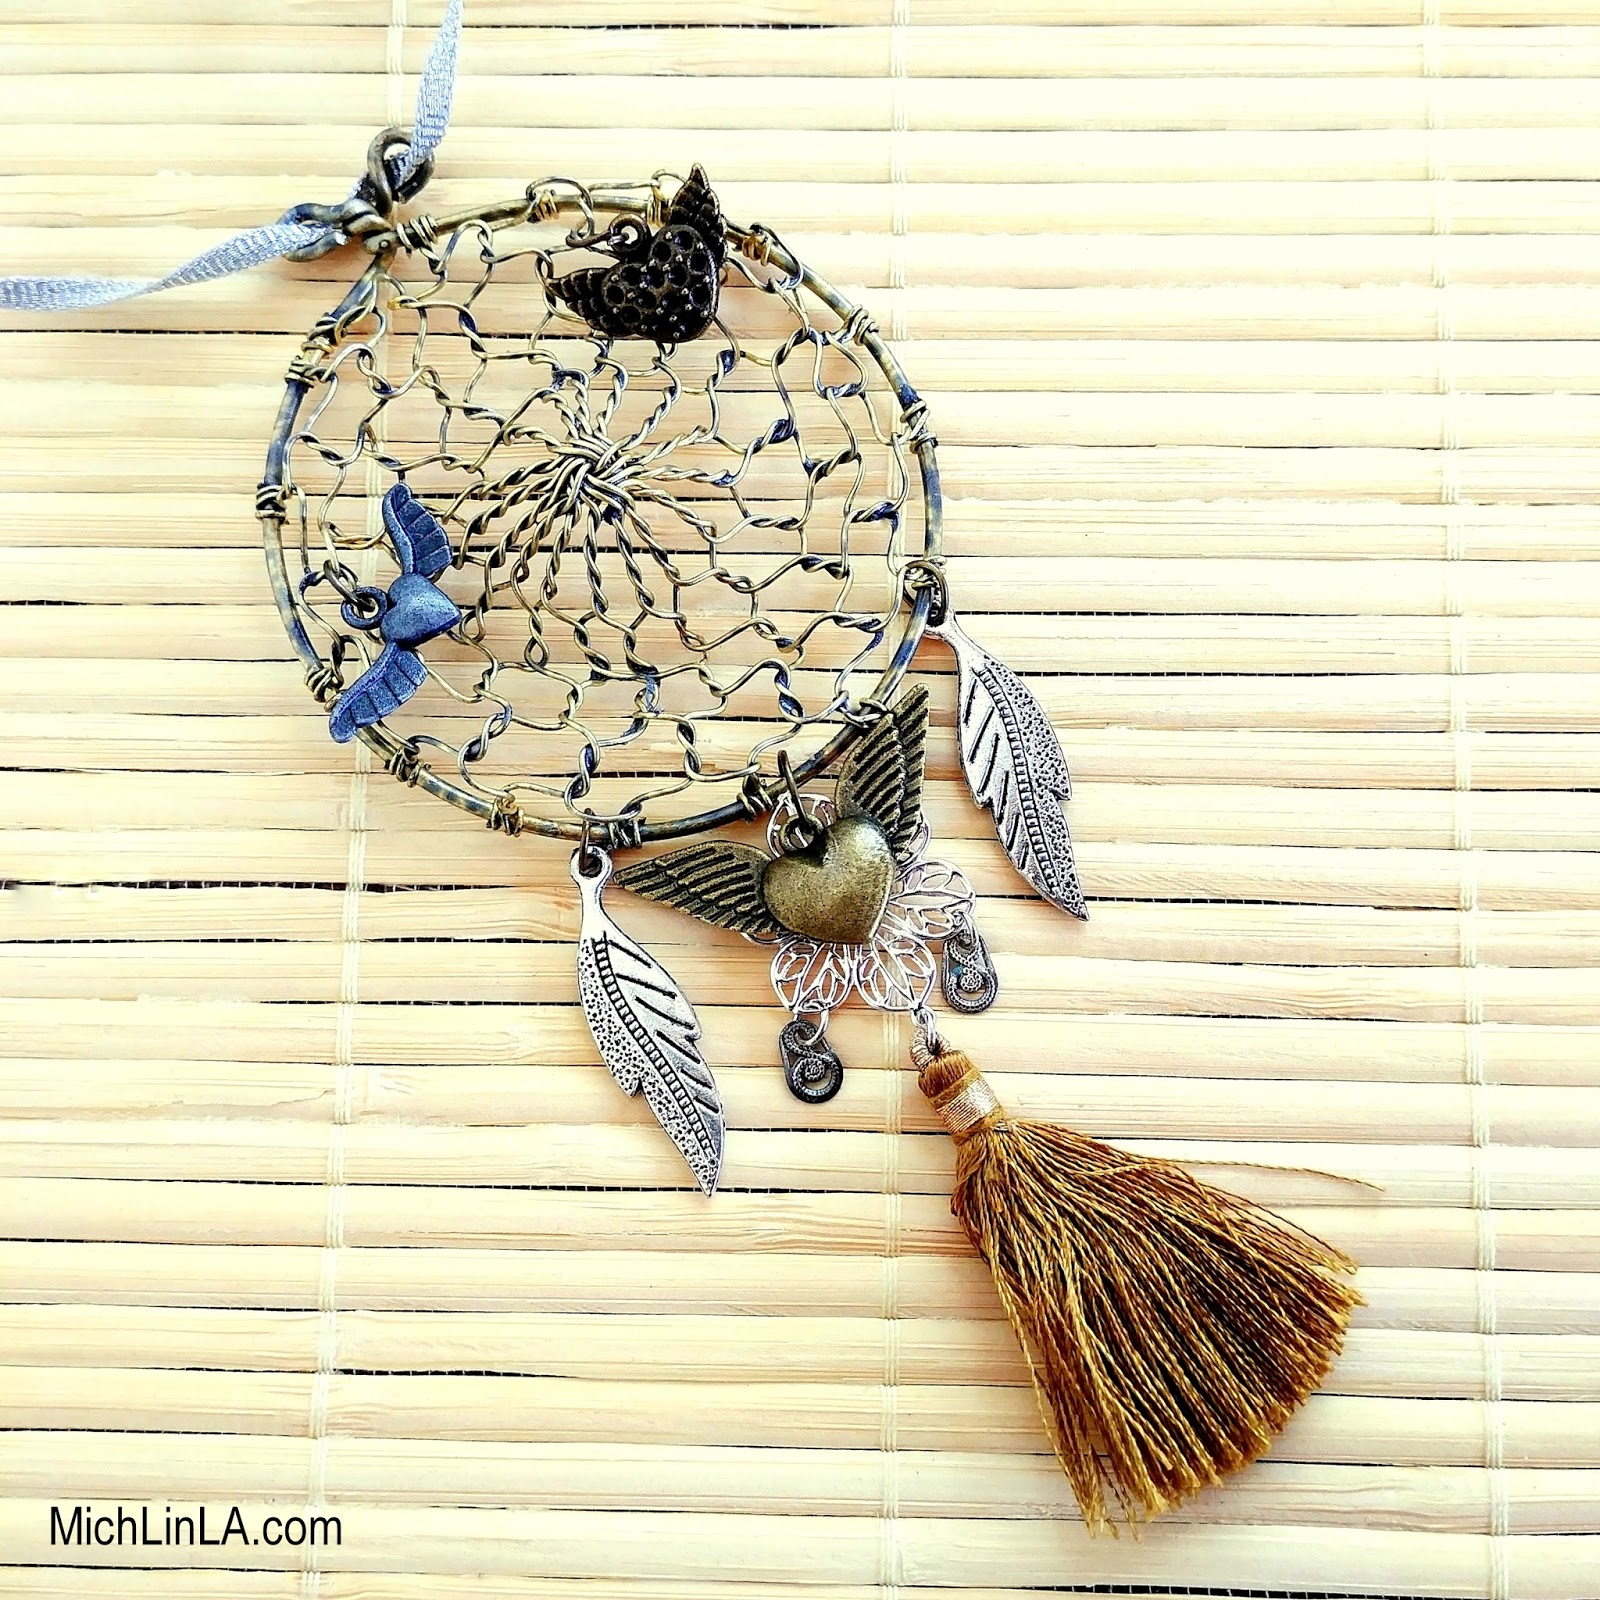
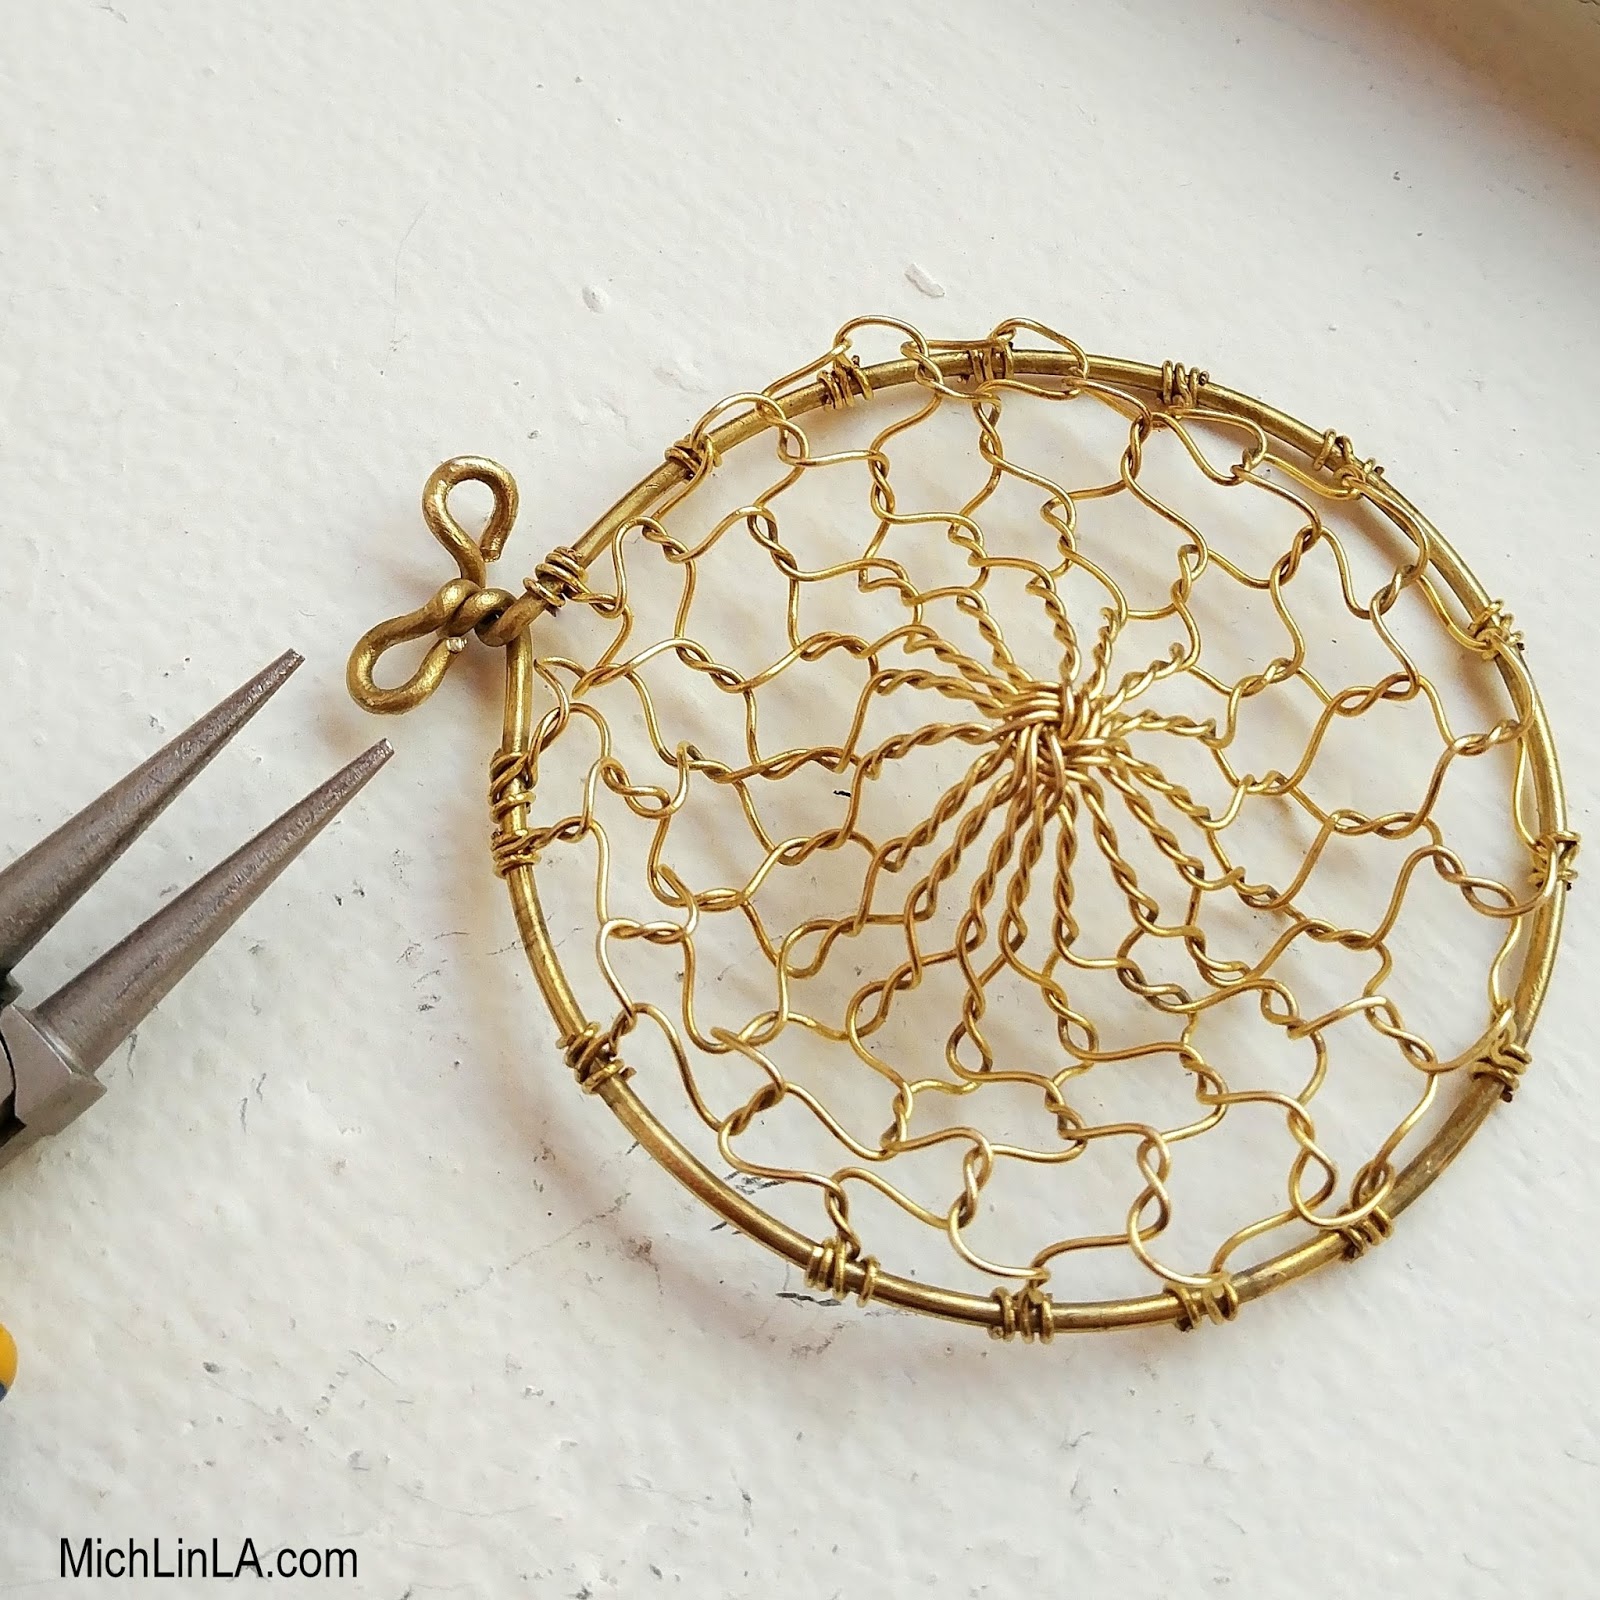
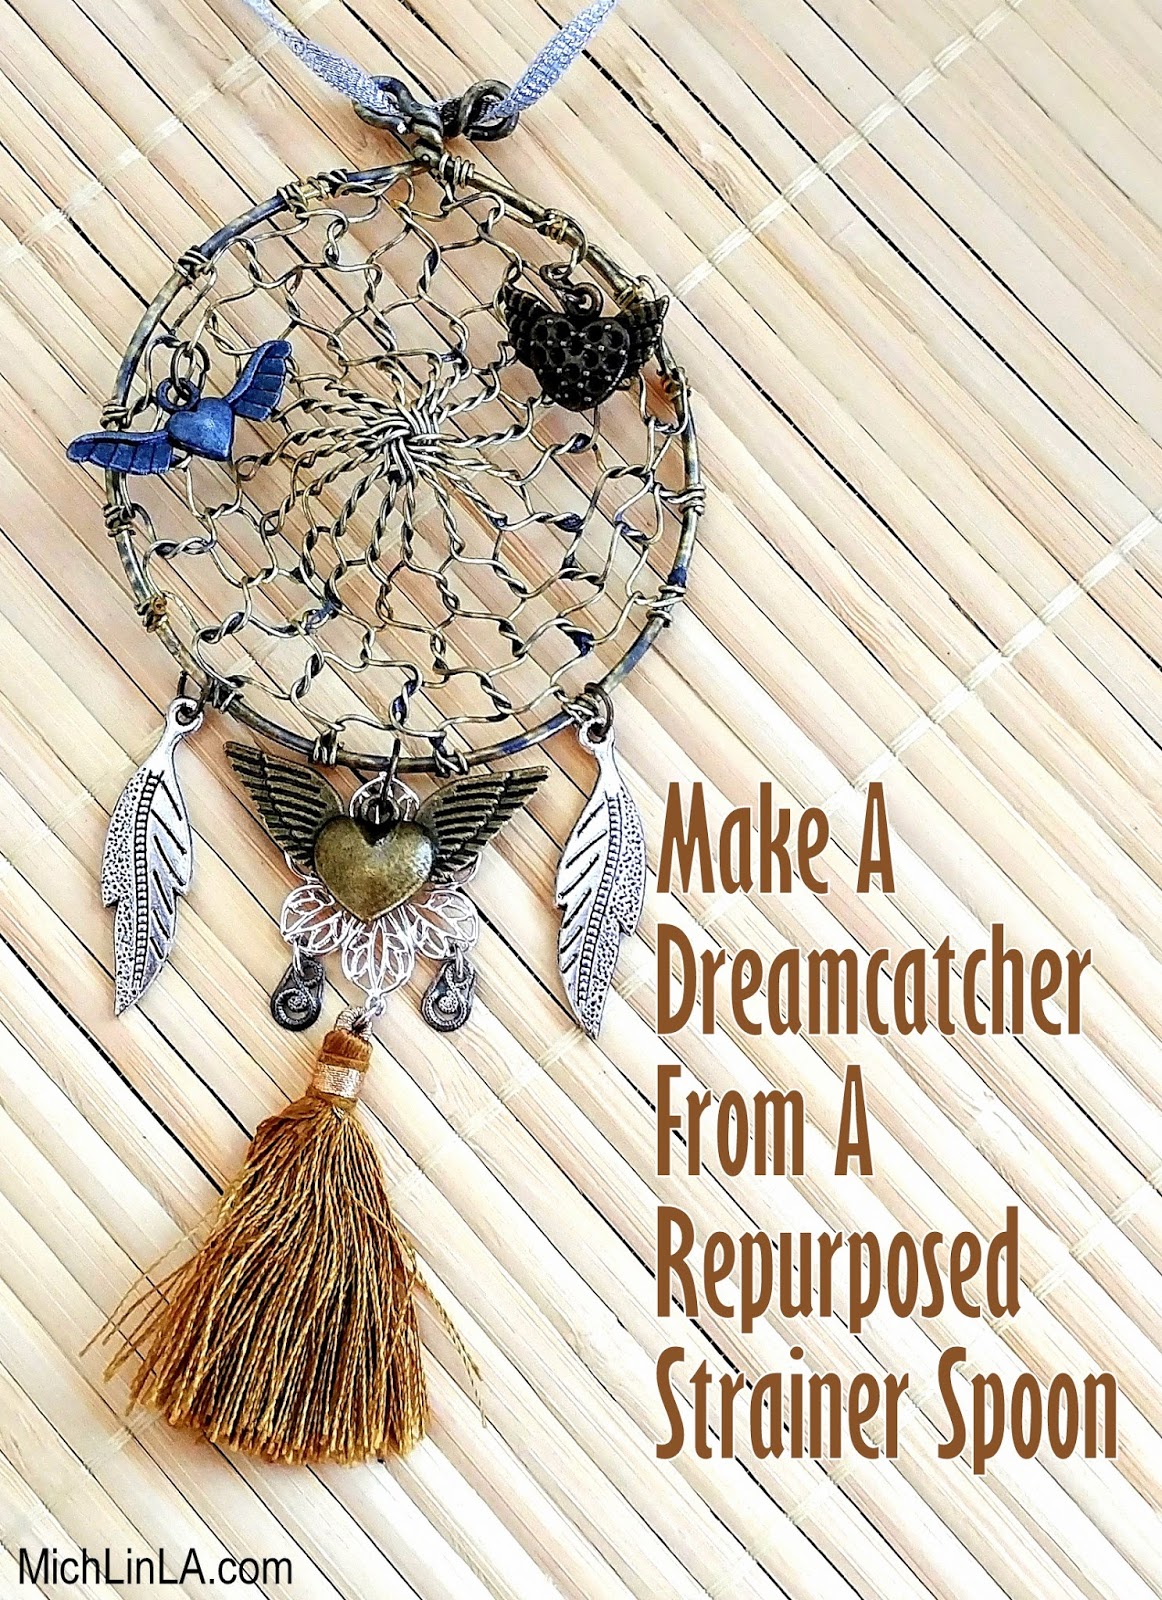
Check out my latest little brainwave! A cool metallic dreamcatcher that looks it's woven with wire.
I've always loved dreamcatchers, but never tried one before. Probably because I didn't want to figure out the knotwork involved. (Q: is there an award for laziest crafter?)
So I came up with a simple five minute hack for the 'web' part of the dreamcatcher. After that, it was all embellishment - the part of crafting I really enjoy.
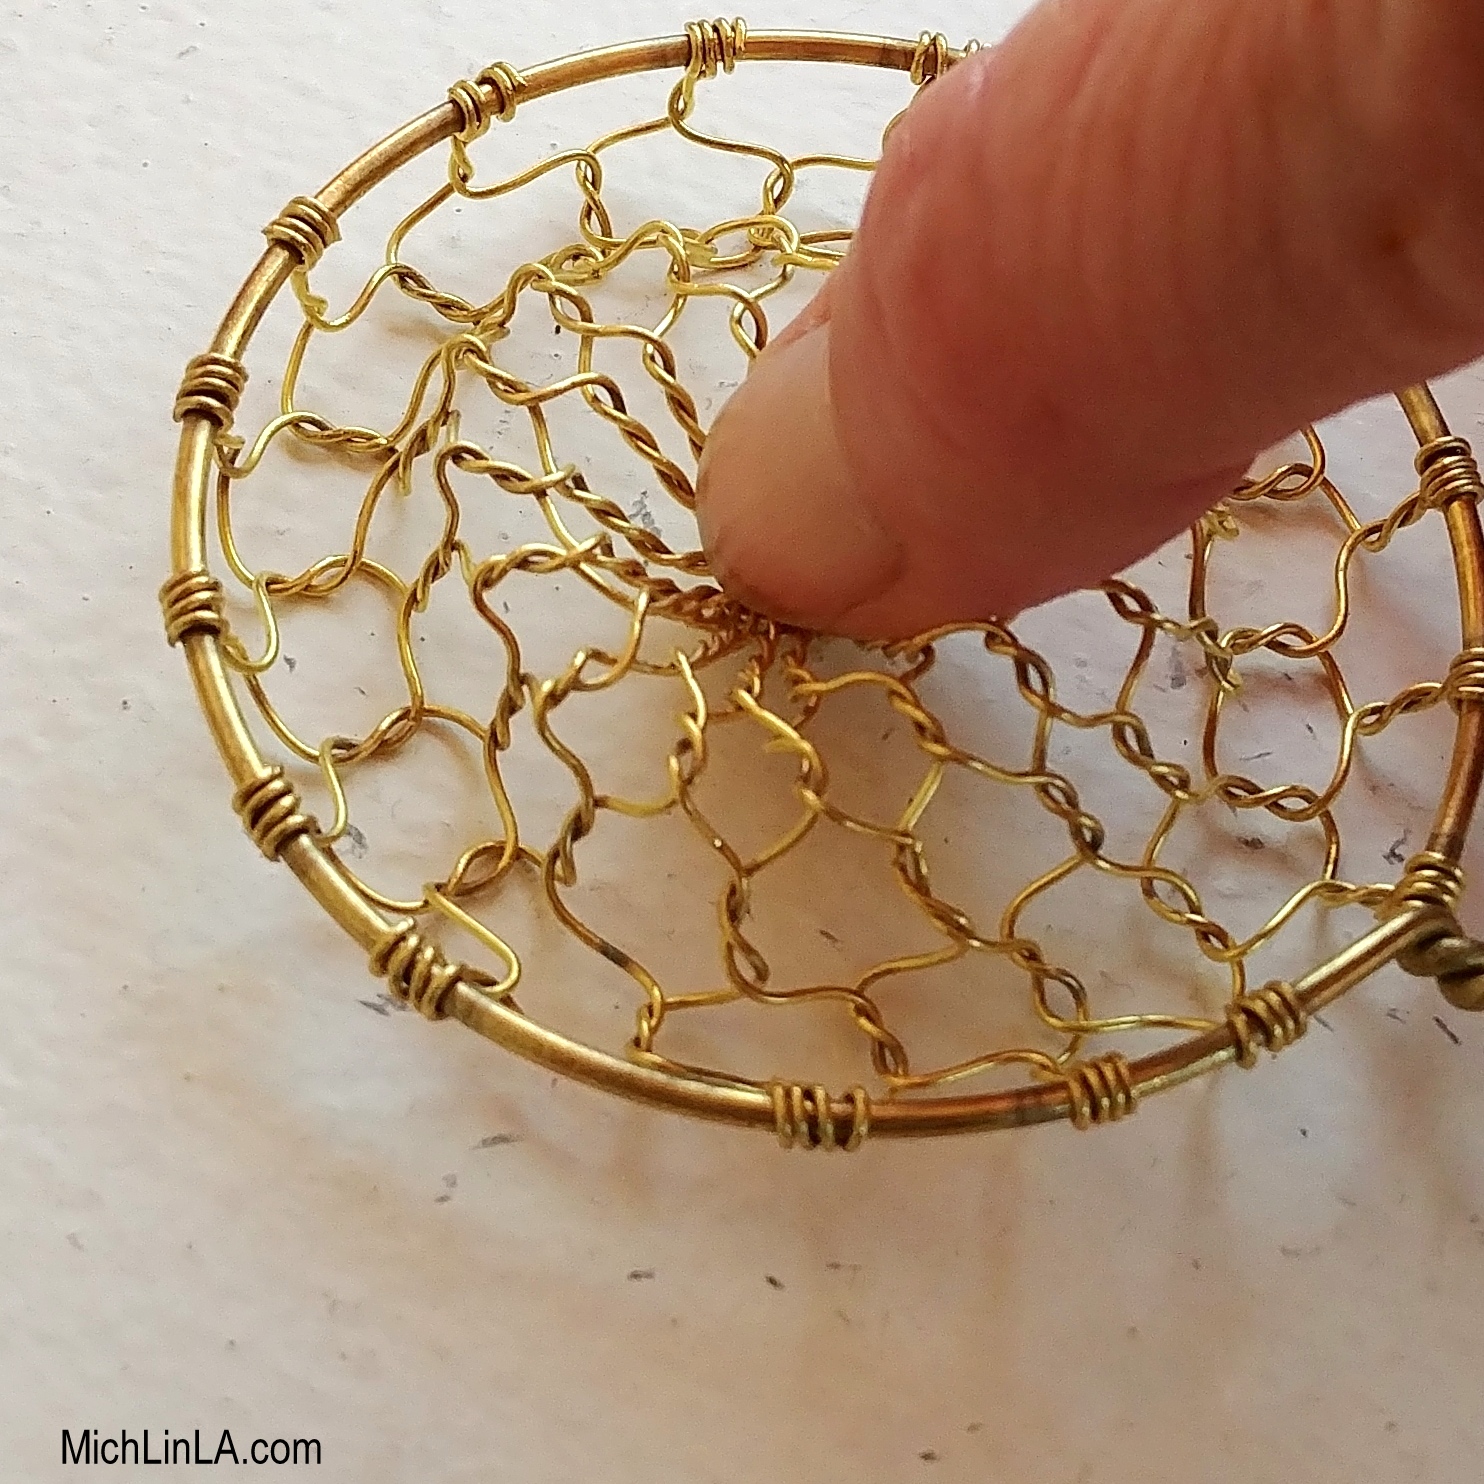
Here's the DIY. I began with a loose-weave metal strainer spoon. I found mine at an Asian market for less than two bucks. Try your favorite kitchen shop or dollar store for something similar.
First I squished the center of the spoon inward.
Then I flipped the spoon over and squished again, flattening the small inner bump. It created a pattern of concentric circles in the mesh.
I untwisted and trimmed the handle wires. Then I made small loops with the trimmed ends, like so:
Tip: that two-loop bail was the one tricky bit. Because the handle wire was so curly, I had to straighten it with pliers before turning the loops. You could simplify by just cutting the handle short, and turning a plain loop.
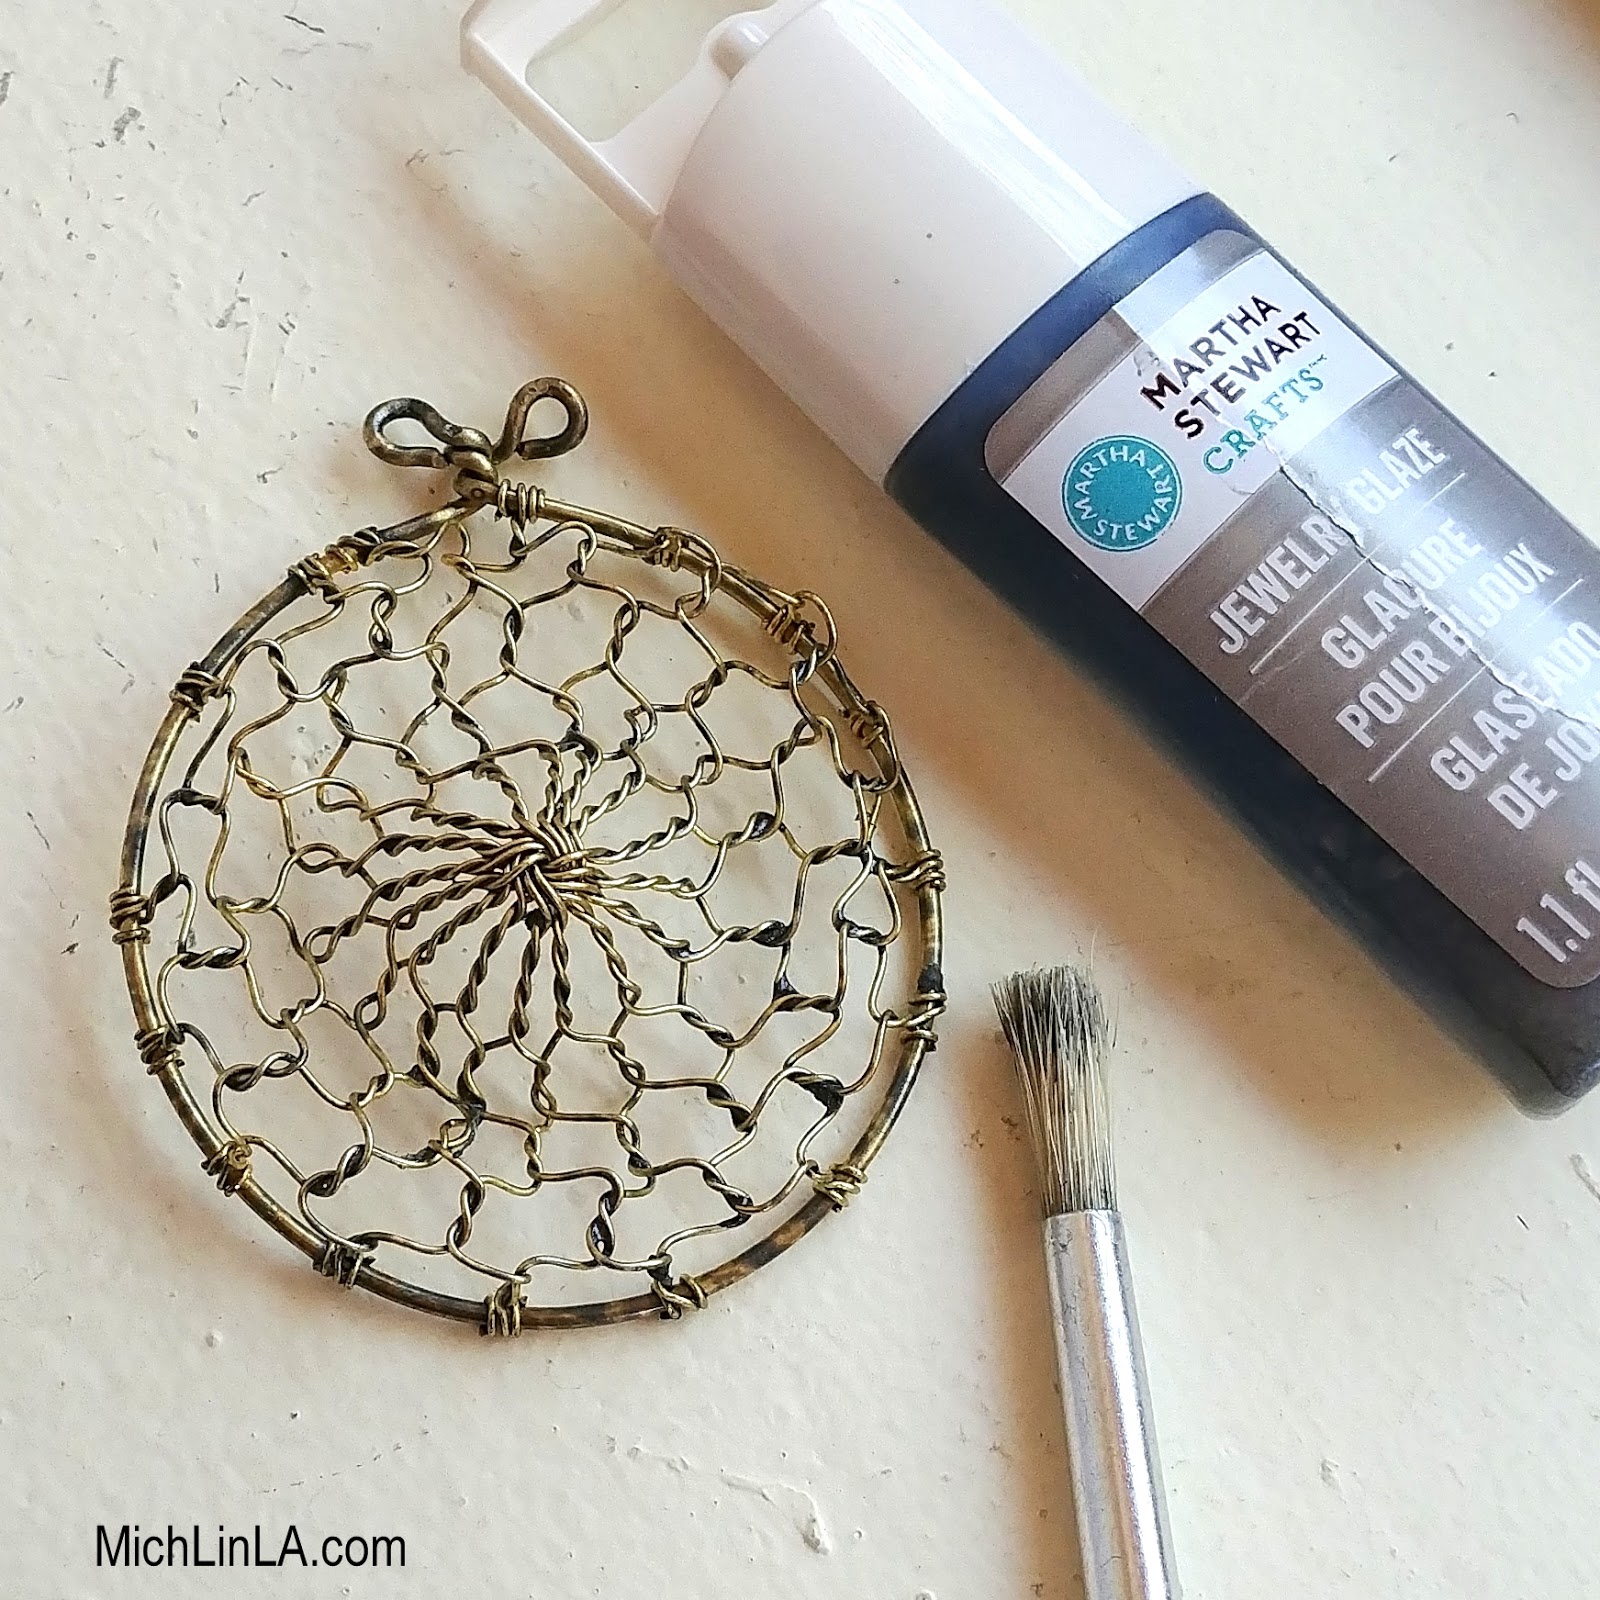
If you like the bright brass color, your dreamcatcher web is all done and ready to decorate. I took one extra step: a dark jewelry glaze to add an antiqued look.
Tip: If you don't have glaze or patina, a simple wash with brown or black craft paint will work, too!
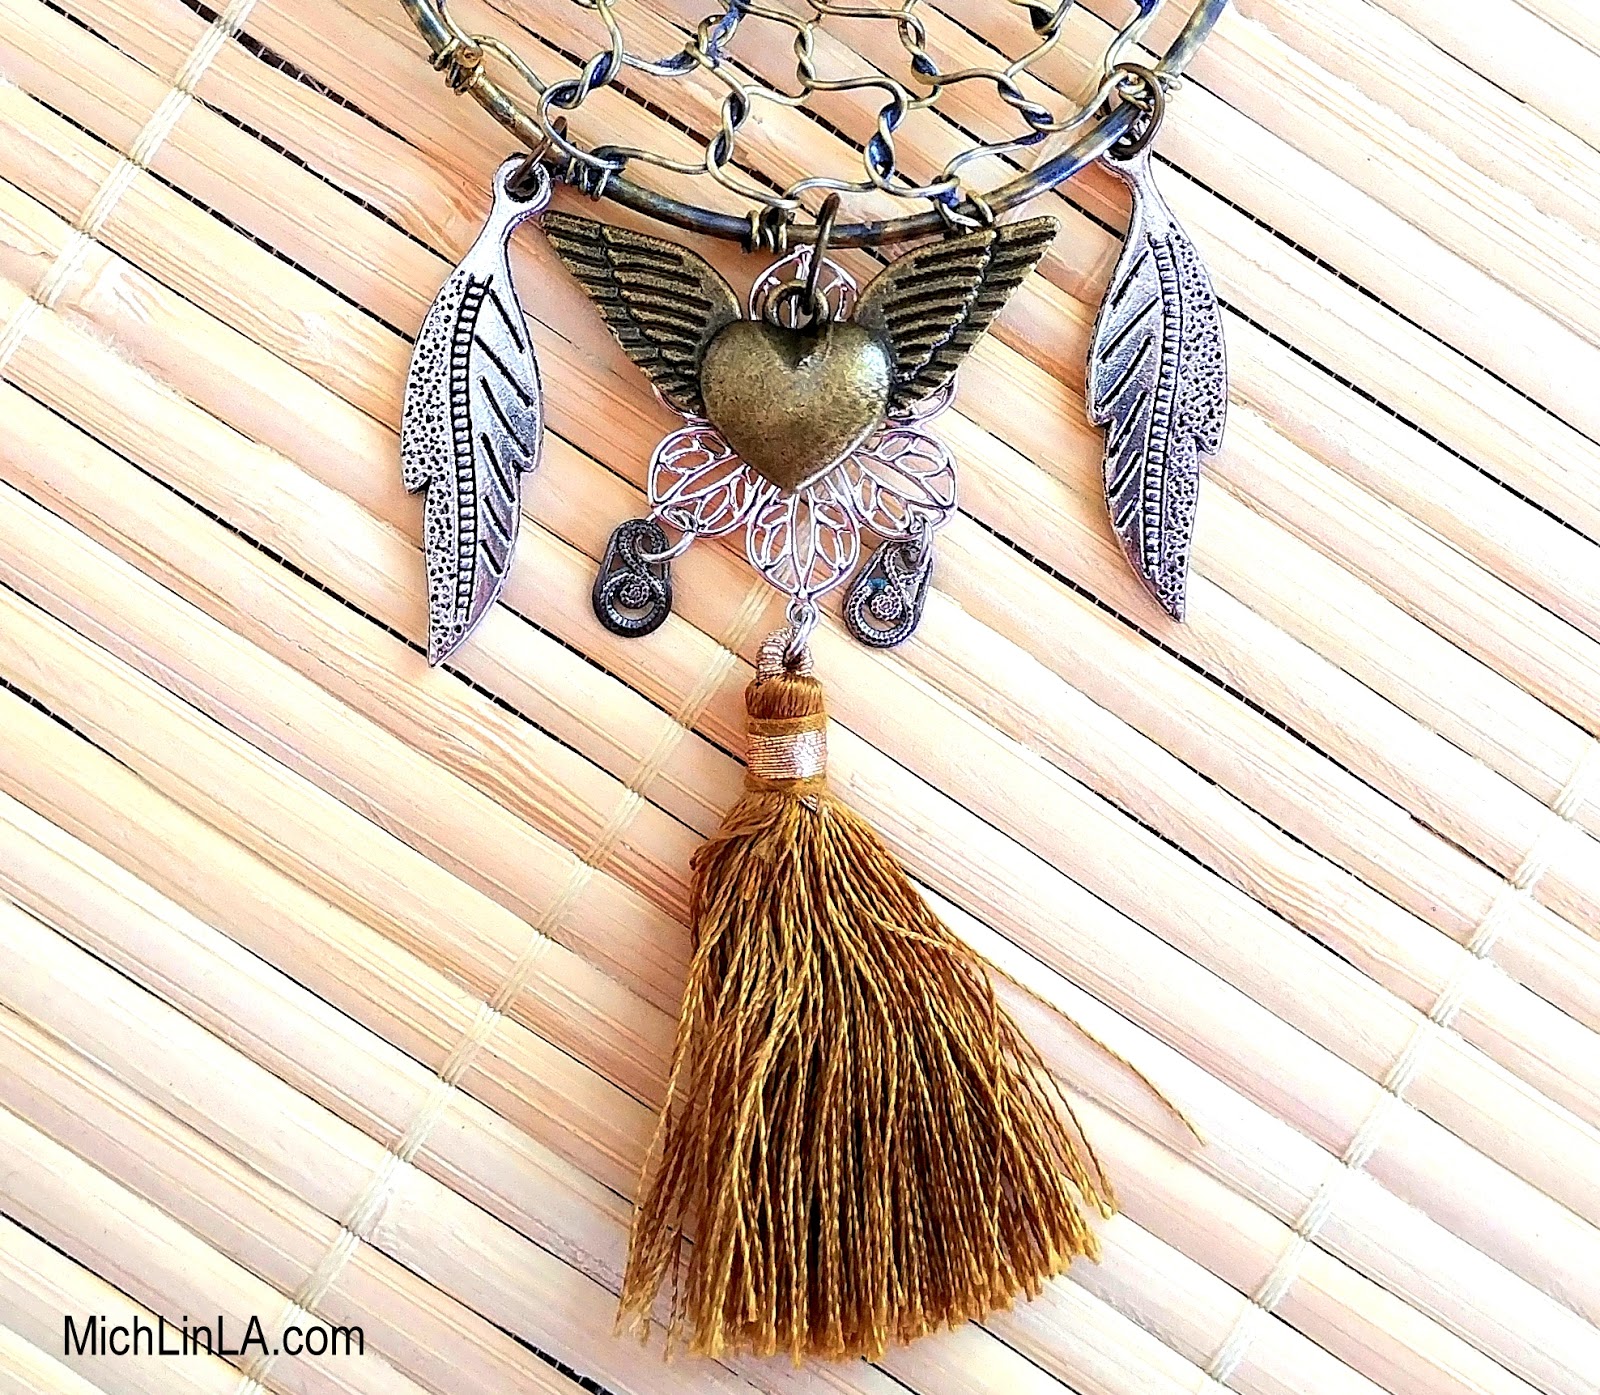
Then I had a great time with the adornments. Metal feather charms, flying hearts, filigree and a tassel went into the final result.
And my dreamy catcher was ready to hang above the bed.
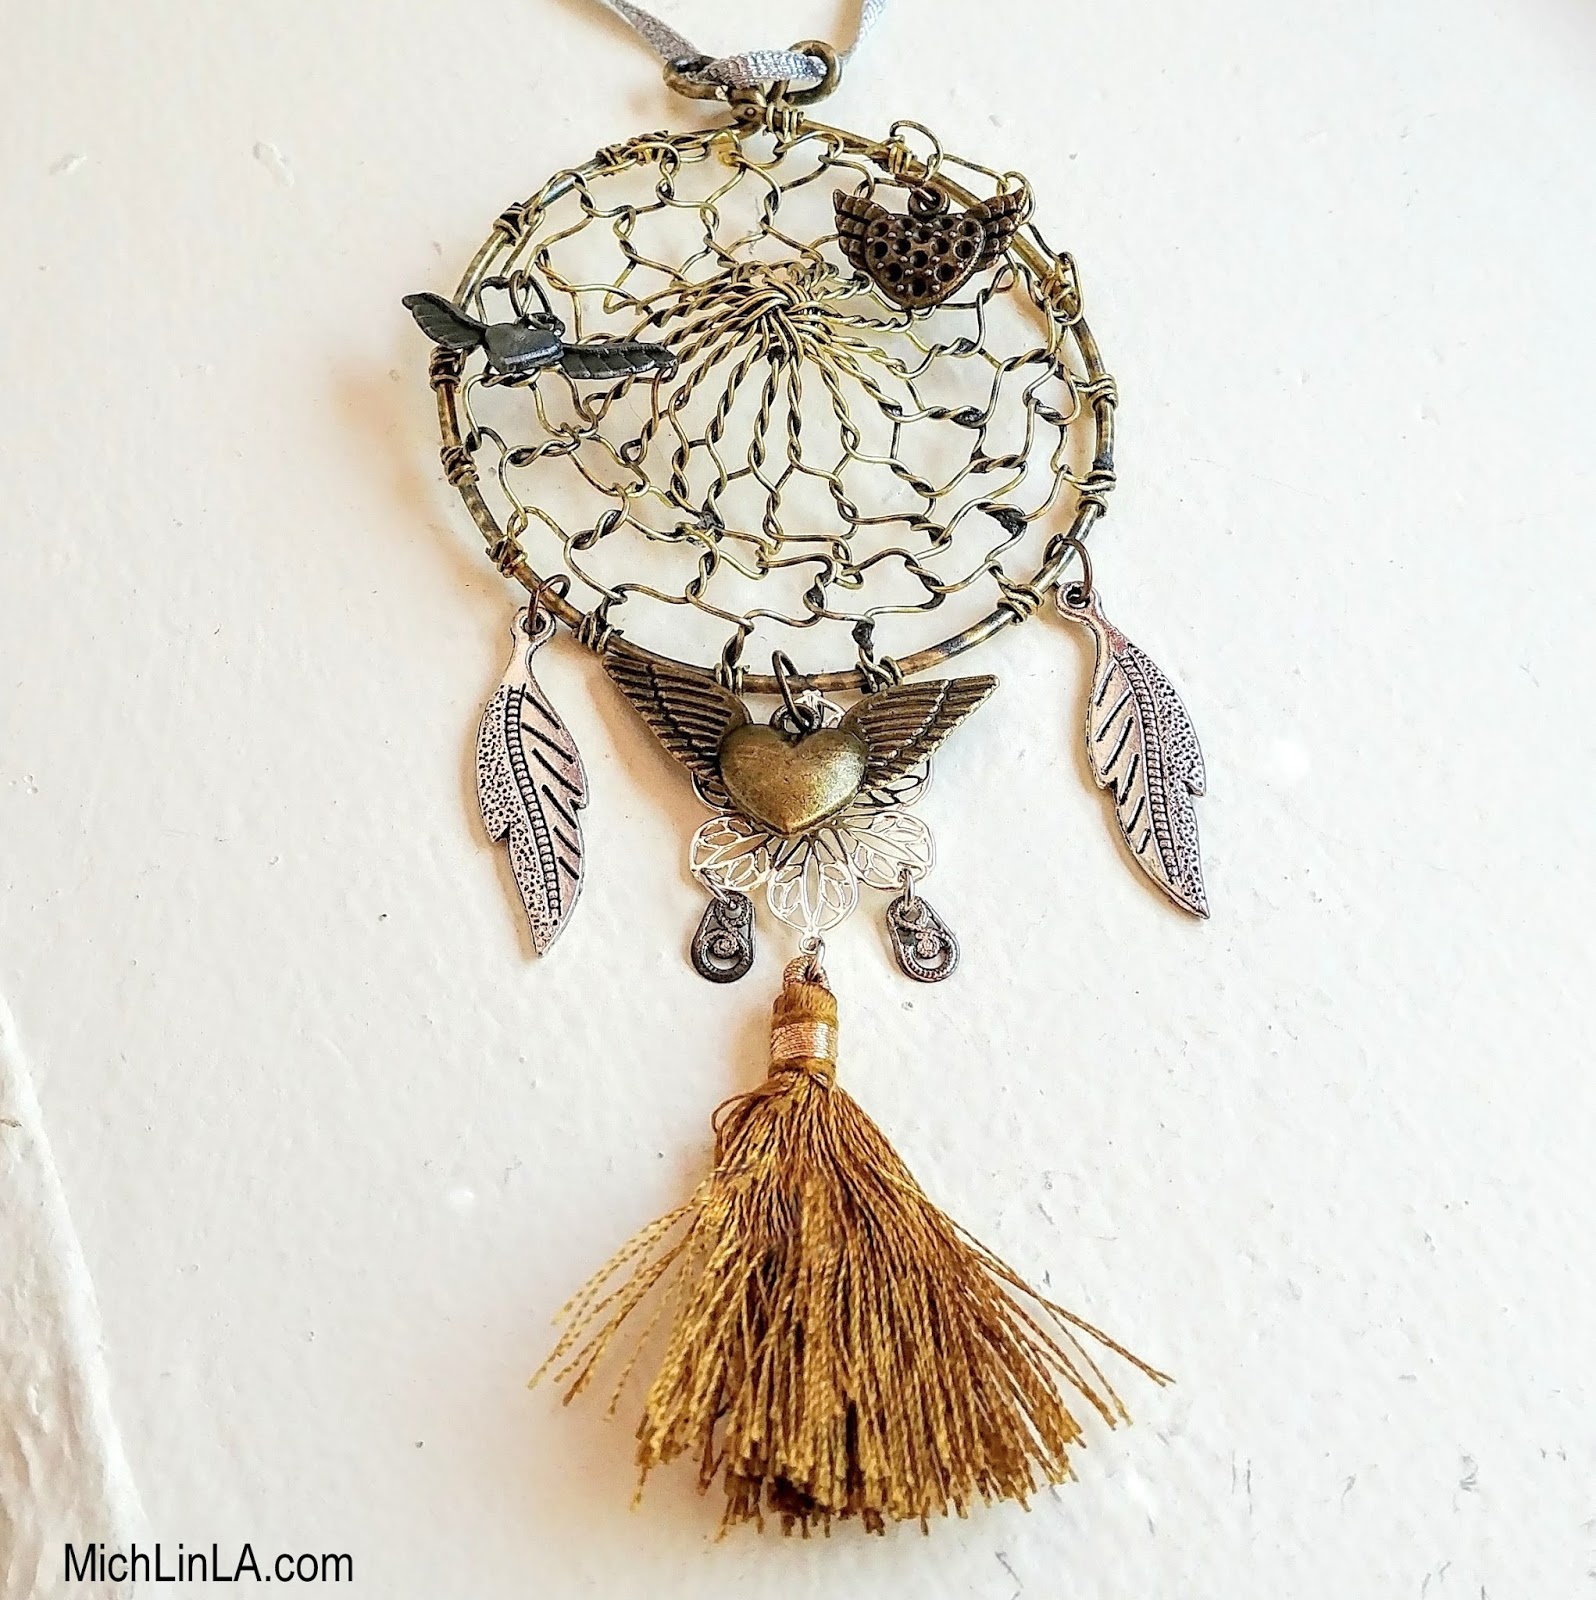
Of course, this is just an example. You might prefer to include more traditional elements. Bone beads, feathers, shells or other natural objects - there are lots of different styles when creating a dreamcatcher, with personal meaning for each maker.
Consult your own taste, aura, and sense of magic.
Now wouldn't this make a great gift, especially for a guy or someone who isn't really into jewelry? Or hey - I would even count this as a handmade Christmas ornament.
OK, people, thanks a bunch for visiting! See you again...maybe in dreams.
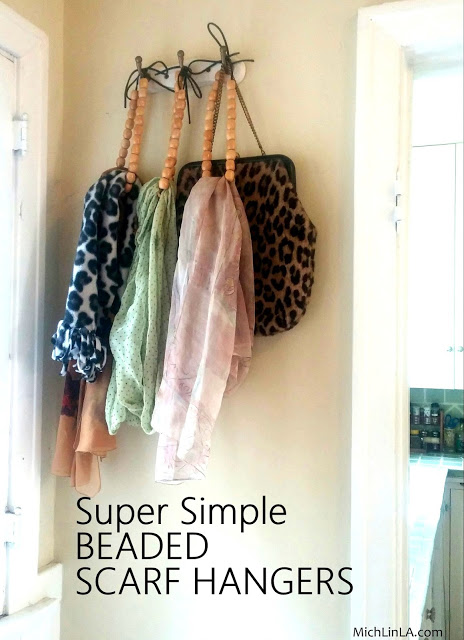
Well hi! Today I thought I'd show you the quickest, simplest beaded home decor project evah. It's practical, it's pretty, it's economical - heck, there's even a little element of upcycling in there for good measure.
It's a scarf hanger system, for storage and display.
The DIY takes about a minute. You will need:
-a buncha big beads
-an old shoelace
Ready? Go!
Thread 16-20 inches of big beads onto an old shoelace (or any bit of cord or ribbon you happen to have handy). Tie a bow, and double-knot it.
That's it, baby! Hang one (or three or six or ten!) on your wall, as demonstrated here...
Then just add scarves.
I hung mine on a cute 3-hook coat rack, but you could hang these up in a number of ways. Use little nails, or individual hooks, or even those removable hooks for apartments.
I was looking for a way to use up a vast quantity of not-so-thrilling wooden beads, and this was just the ticket. I'm a VERY scarf-y person, so it's something I actually need and use - daily!
It could also be a fun project to do with kids, tweens or teens. Let them choose beads to suit their personal style to make hangers for their own rooms, or to give as AWESOME handmade gifts.
Hope this one catches someone's fancy. See ya!
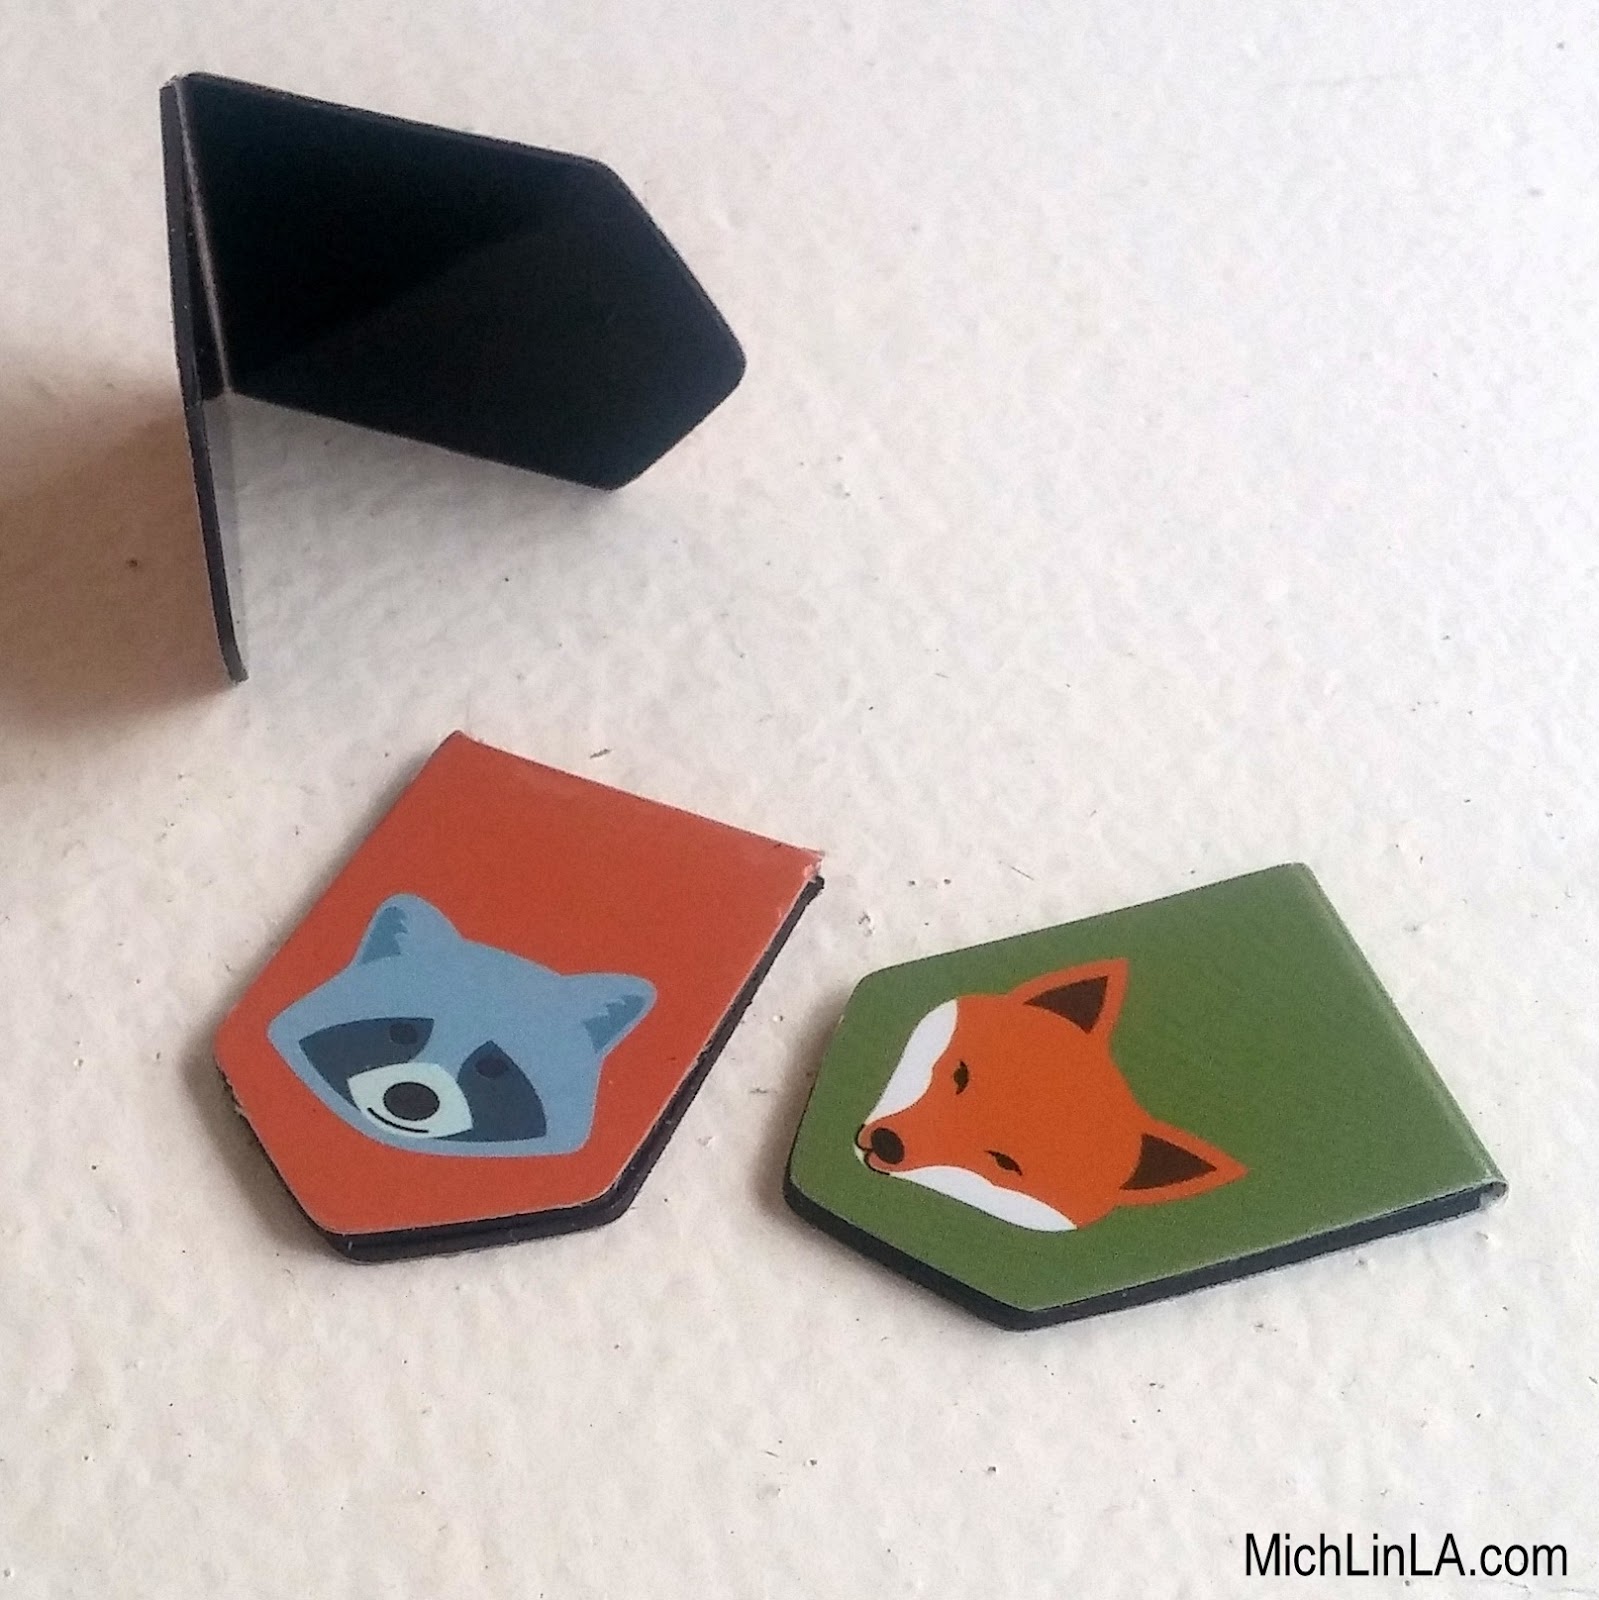
You know those magnetic bookmarks, right? The kind with two flat magnets that stick to the edge of your page. Like these woodland cuties.
They are always embellished with some type of nicely laminated art; you can find them in thousands of adorable designs.
I have a funny little hack for turning them into necklaces. As an added bonus, they are interchangeable - switch out the bookmarks to a different design in seconds. Wanna see? Sure you do!
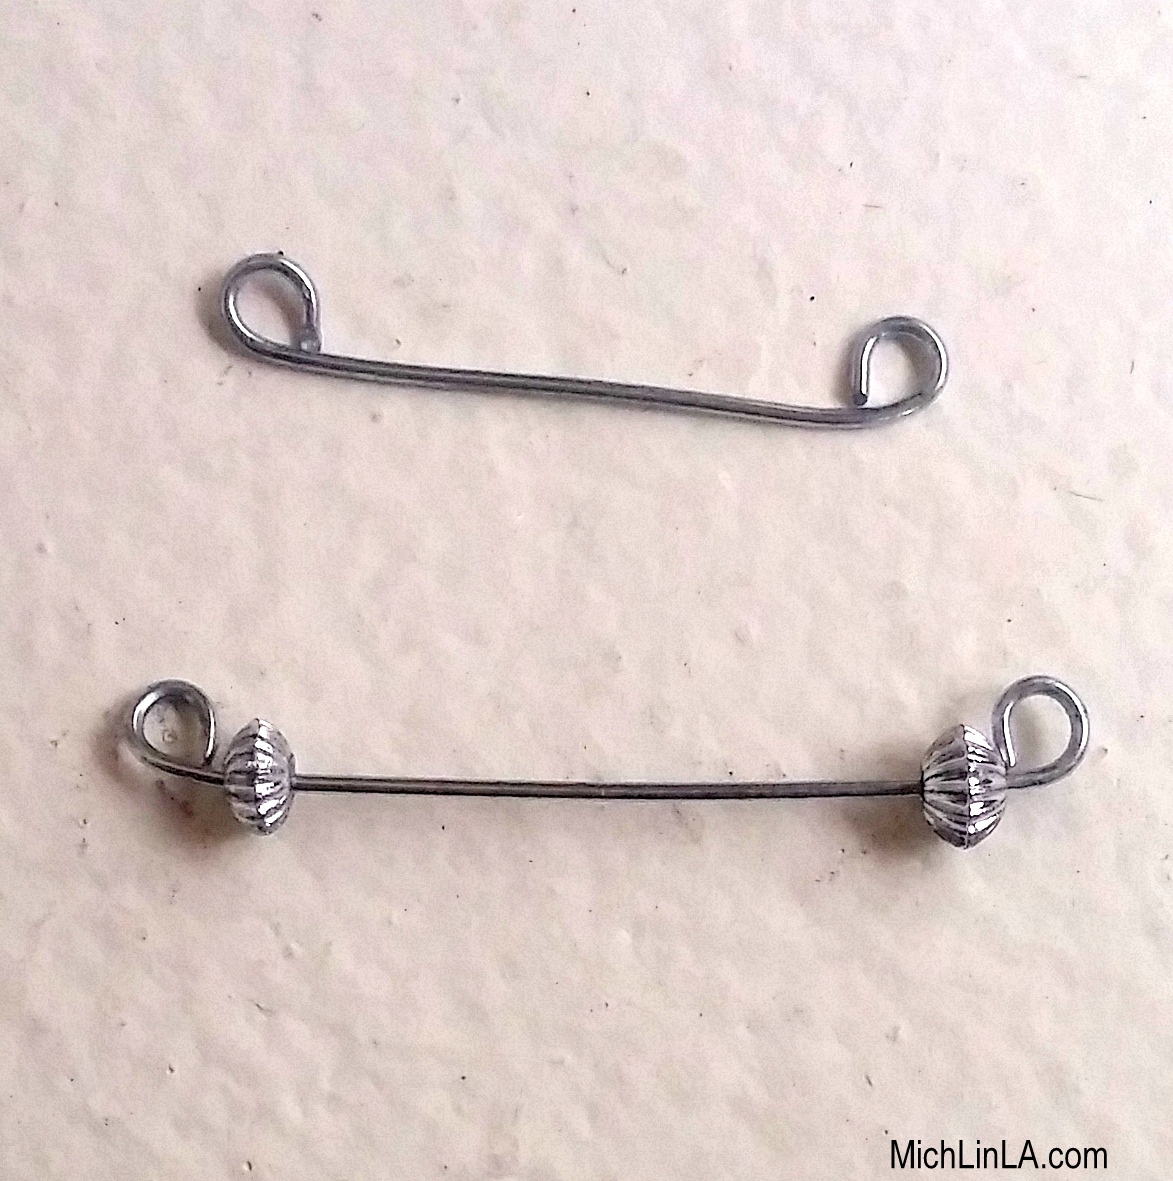
Begin by making a simple wire piece with a loop on each end. The straight section of wire should be the same width as your bookmark. (Optional: add two small decorative spacers.) Here's how it should look:
Now add the wire piece to a necklace or a chain.
Open a bookmark, slip it over the wire, and let it fall closed. That is it!
Switch it to another bookmark in the blink of an eye.
It's a great beginner's wirework project. Couldn't be any easier - two loops and you're done. Try it with a teen or a tween, or a jewelry-making newbie!
This would be a fun gift for a book lover: give a set of bookmarks and a convertible necklace to go with it.
I'm sure you can find an elegant bookmark out there to match anyone's taste. Something sophisticated, or whimsical, or literary...
Or you could go in a different direction.
!!!Omg puppies!!!
Bye for now.
p.s. thanks for the puppy ones, mom!
p.p.s. fellow blogger Divya suggested making them for your book club - great idea!
Somewhere out there exists a Scrooge or Grinch who would not think this is cute. All I can say to that person: Bah humbug. And I hope you are remembering to feed Max.
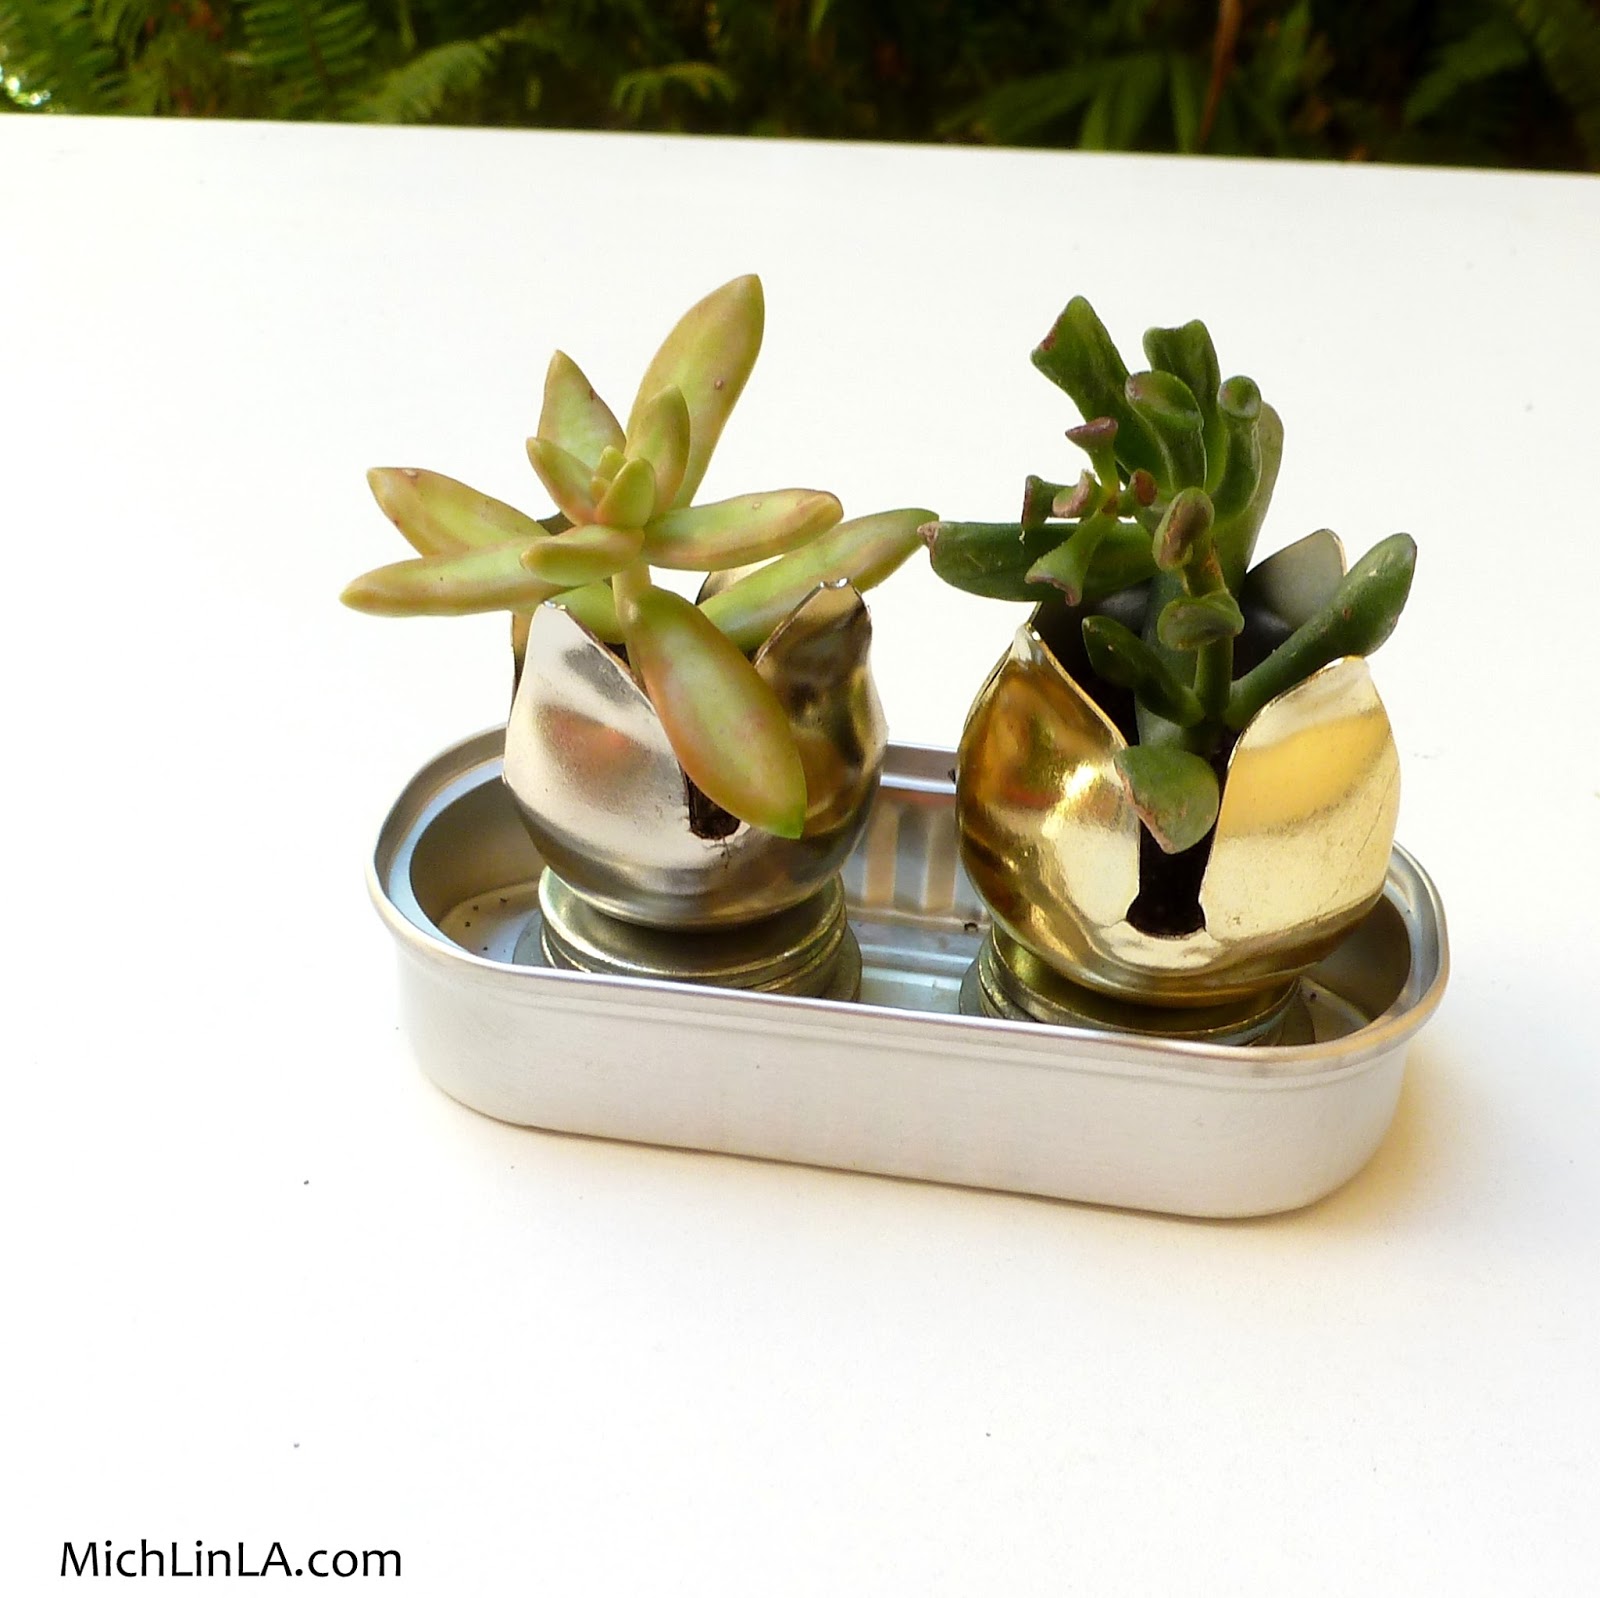
For the rest of us, here's my little idea for the world's tiniest flower bud succulent planters.
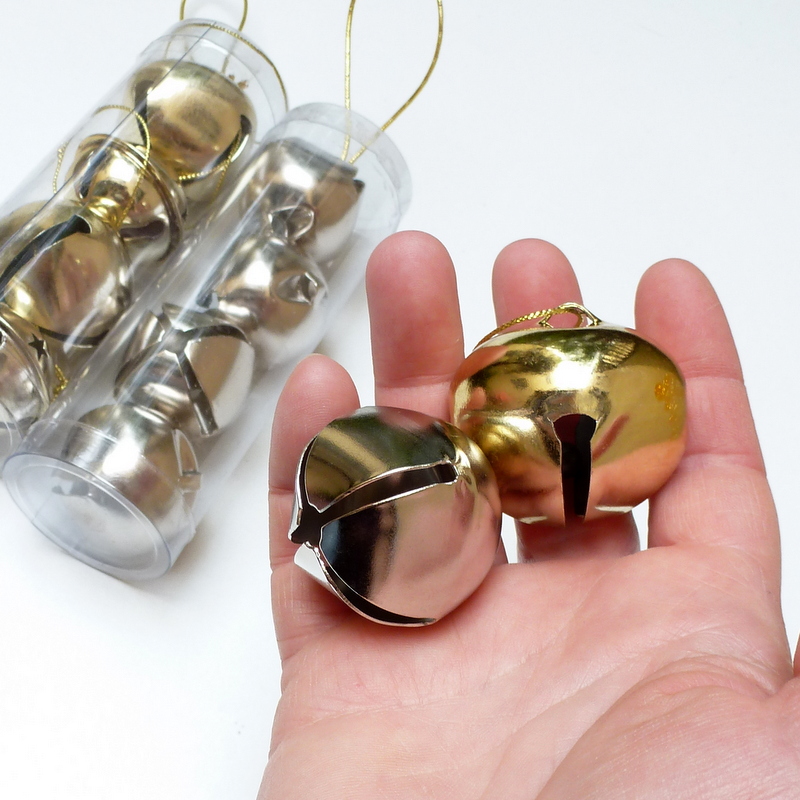
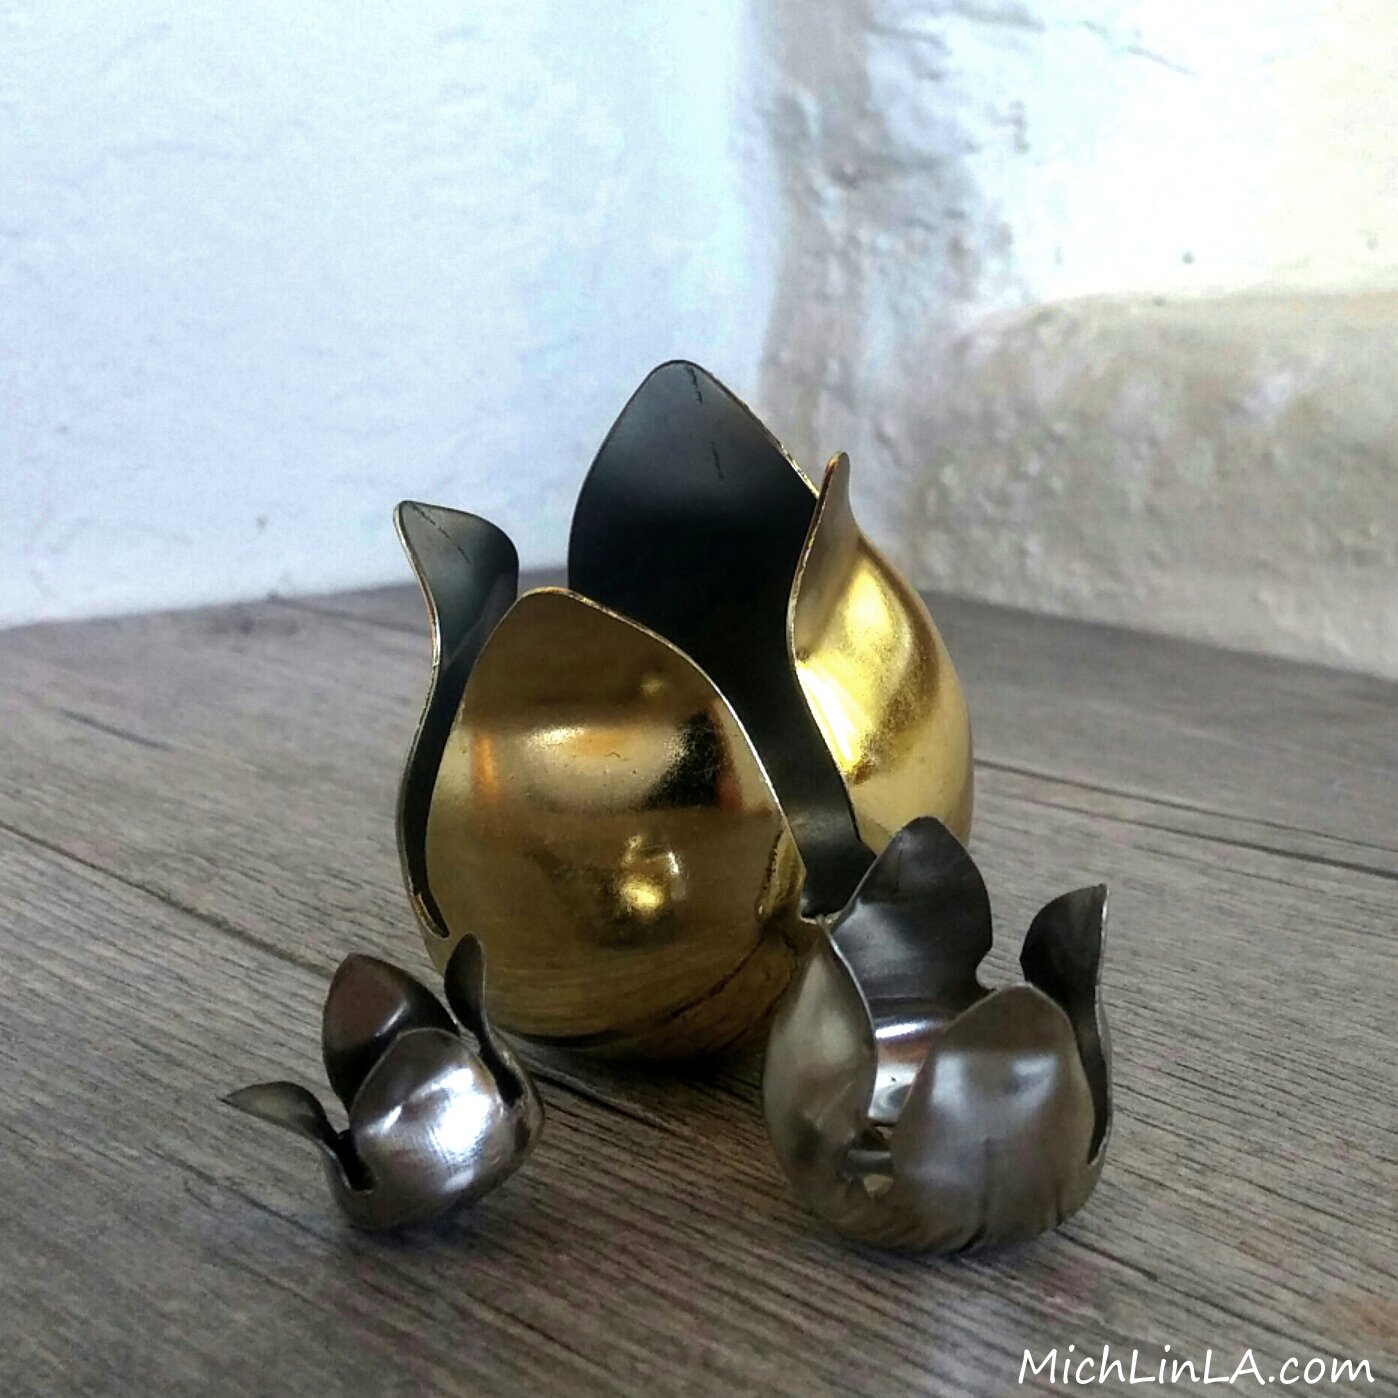
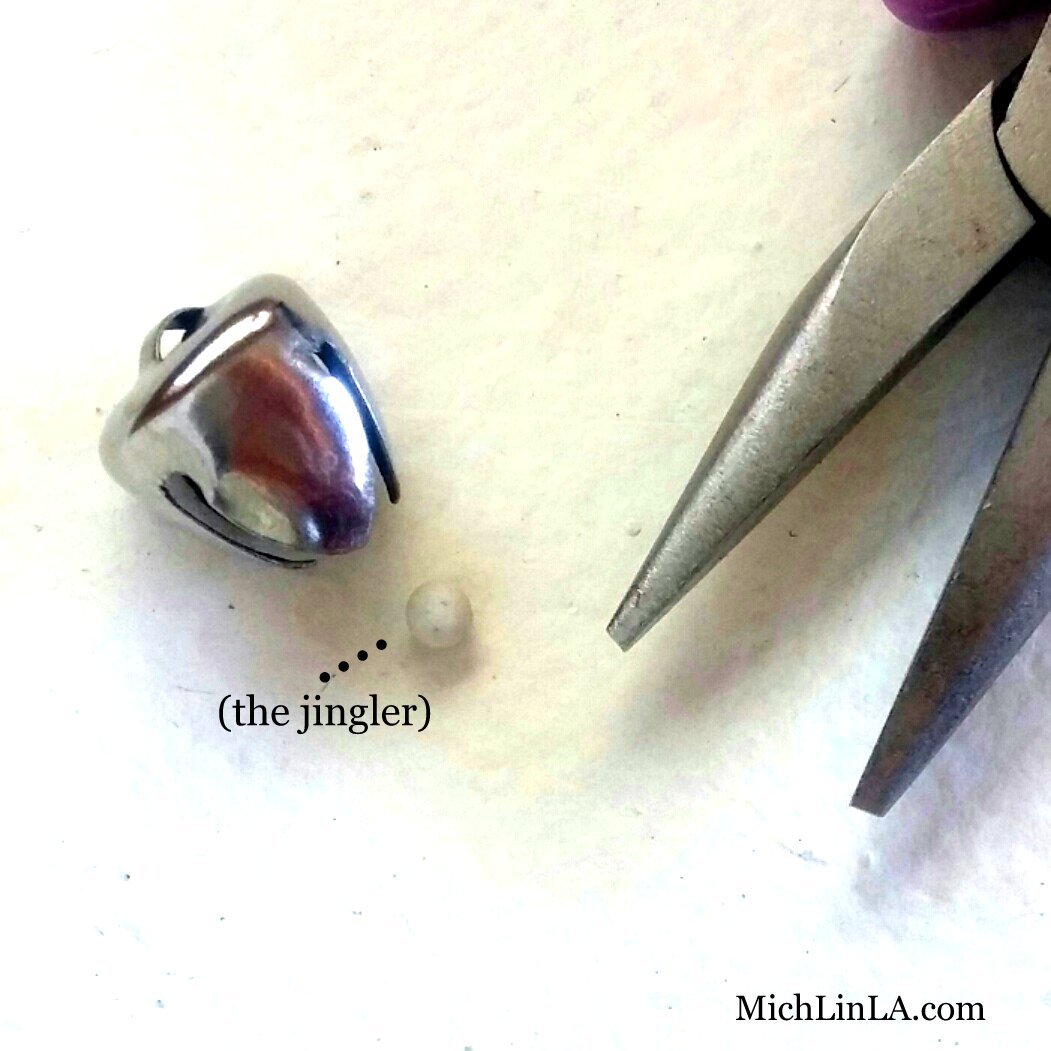
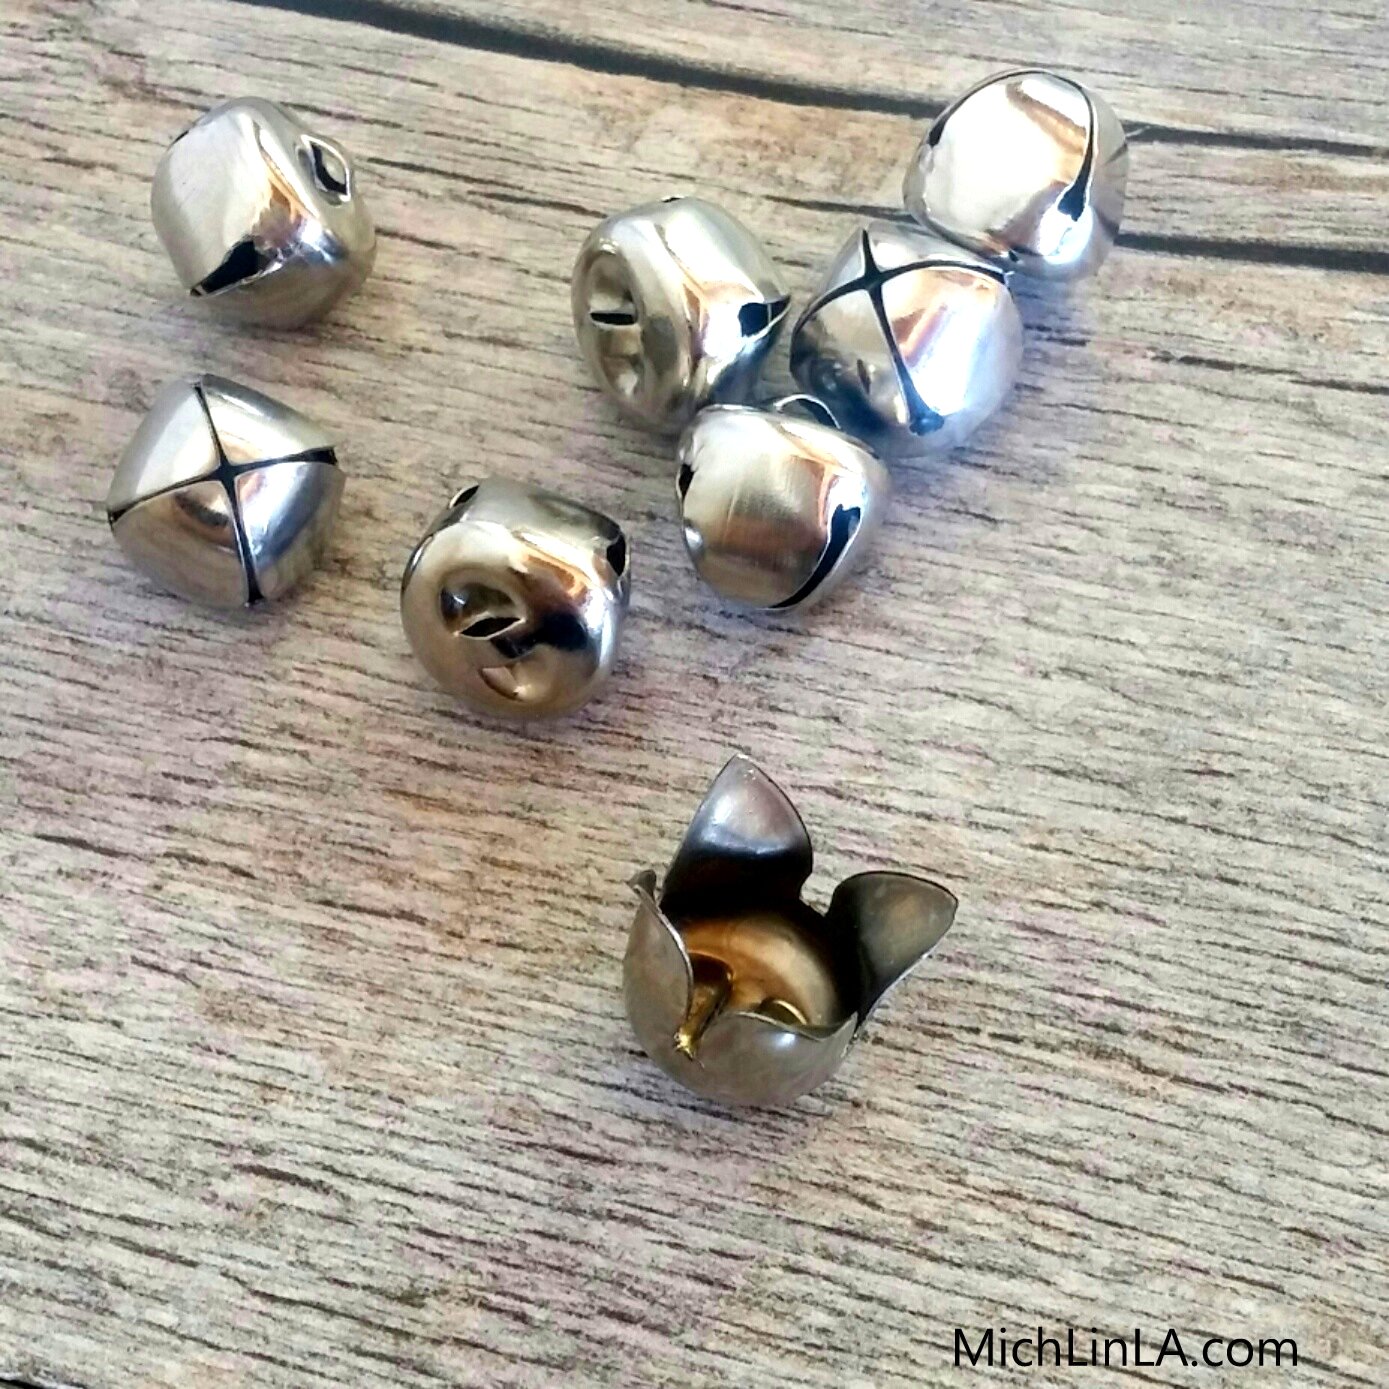
They are made from jingle bells. (Cheap dollar store ones, preferably!)
Wanna make this? Here comes the DIY!
Begin by turning a jingle bell into a little flower. Go here to follow my easy tute - and see a few fun examples of jingle bud jewelry like these earrings.
Once you have a flower, fill it with a dollop of soil.
Grab some metal washers. (Glue is optional.)
Plant a scrap of succulent inside the flower, then balance on a washer (or two or three) so it has a stable base. All done!
Keep it for yourself, or give it away. A pair of them in an anchovy tin makes a darling hostess or neighbor gift.
I also envision these on the tables at a wedding or other celebration - wouldn't it be a sweet party favor to take home?
Tips Tips We Got Tips:
*If you are giving it as a gift, you might choose to glue the metal washers to the bottom of the jingle bud so they don't tip over en route. For the ones on my own windowsill, I don't bother to do this step.
*Water sparingly! 1/2 teaspoon of water once a week should do it. The bottom will leak, so place it on a plate or paper towel until the water is absorbed.
*After a few months, some rust might form on the petals. Try to think of it as patina. ;)
I sure hope you guys enjoyed this one! Thanks a bunch for coming by.
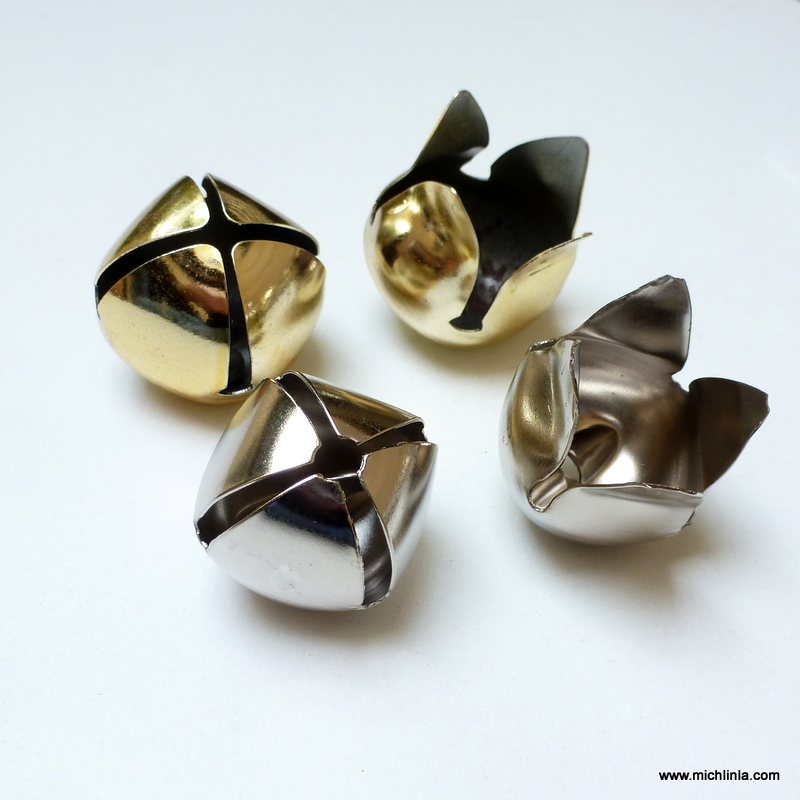
It's the most wonderful time of the year: that month when you can buy jingle bells at the dollar store! (Okay, you can buy them other places too. So I'm told.)
Why is this wonderful? Well, duh, they make everything more jingly. But even more significantly -
You can turn them into flower buds.
They are awfully fun to use in crafting. Delightful for jewelry...
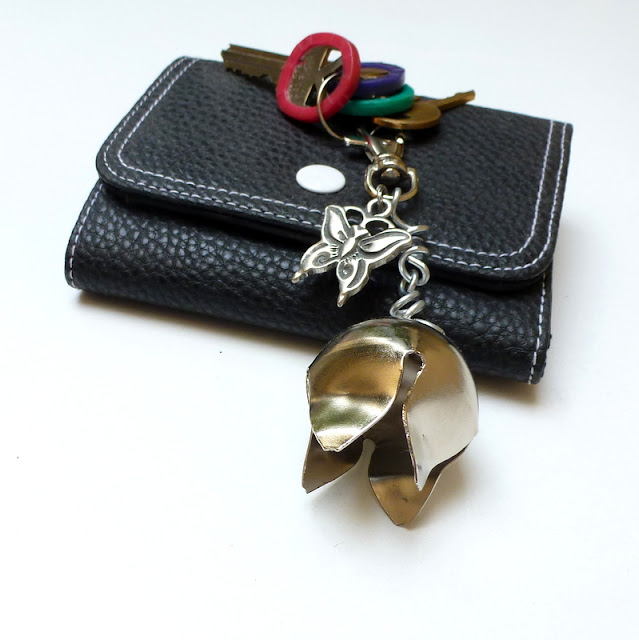
I love to use them in home decor projects (more about that in another post), and for cute flower gifts like these key rings.
If you try, bet you'll come up with all kinds of cool things to use them for.
The DIY is easy - you can probably figure it out without a tutorial. But I have a neat little trick to show you, so bear with me all the way to the end - you might decide to do it my way. Ready? Here we go.
First the basic technique - this is how I used to make them before figuring out my super secret maneuver. And it's a perfectly fine way to do it.
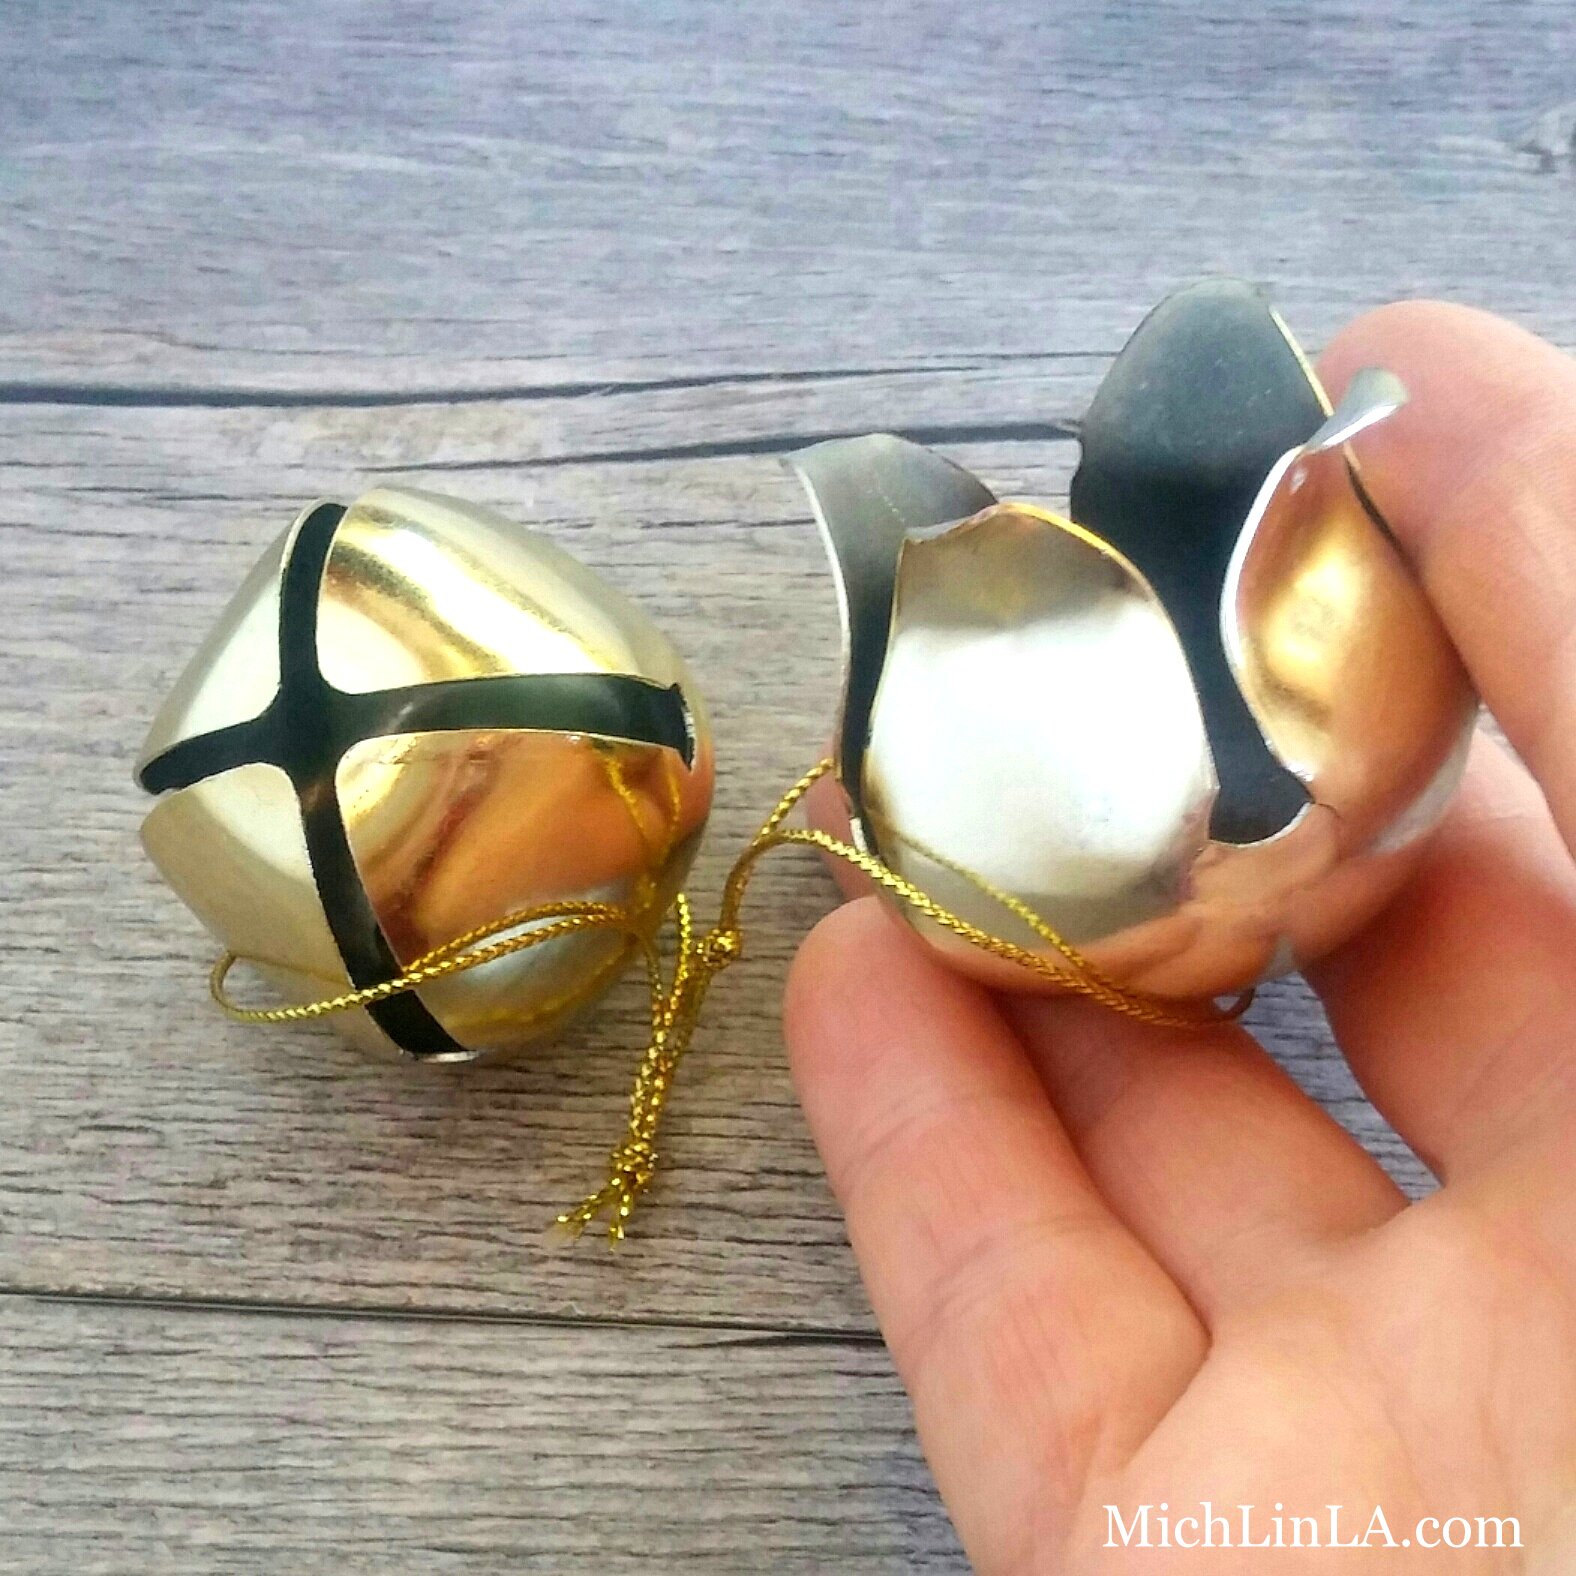
1. Use a fingernail or pliers to open out the petals just far enough to jettison the jingler.
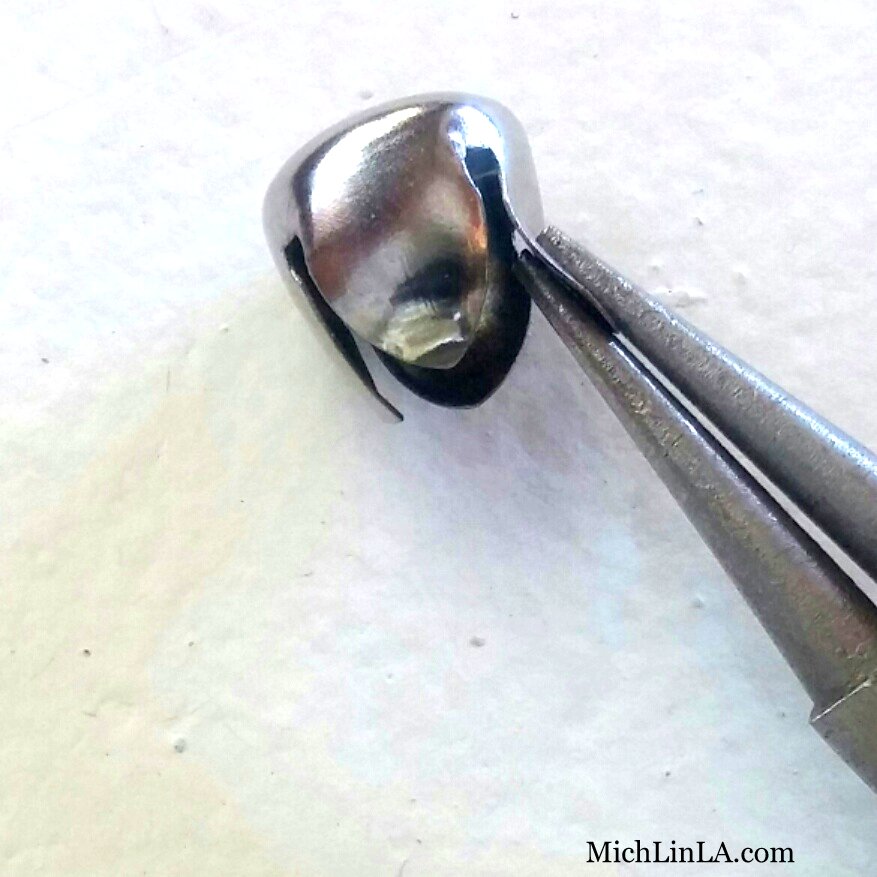
2. Grab a petal between pliers and bend it over - as little or as much as you like.
Do it with all four petals and - yep, that's it! Flower done!
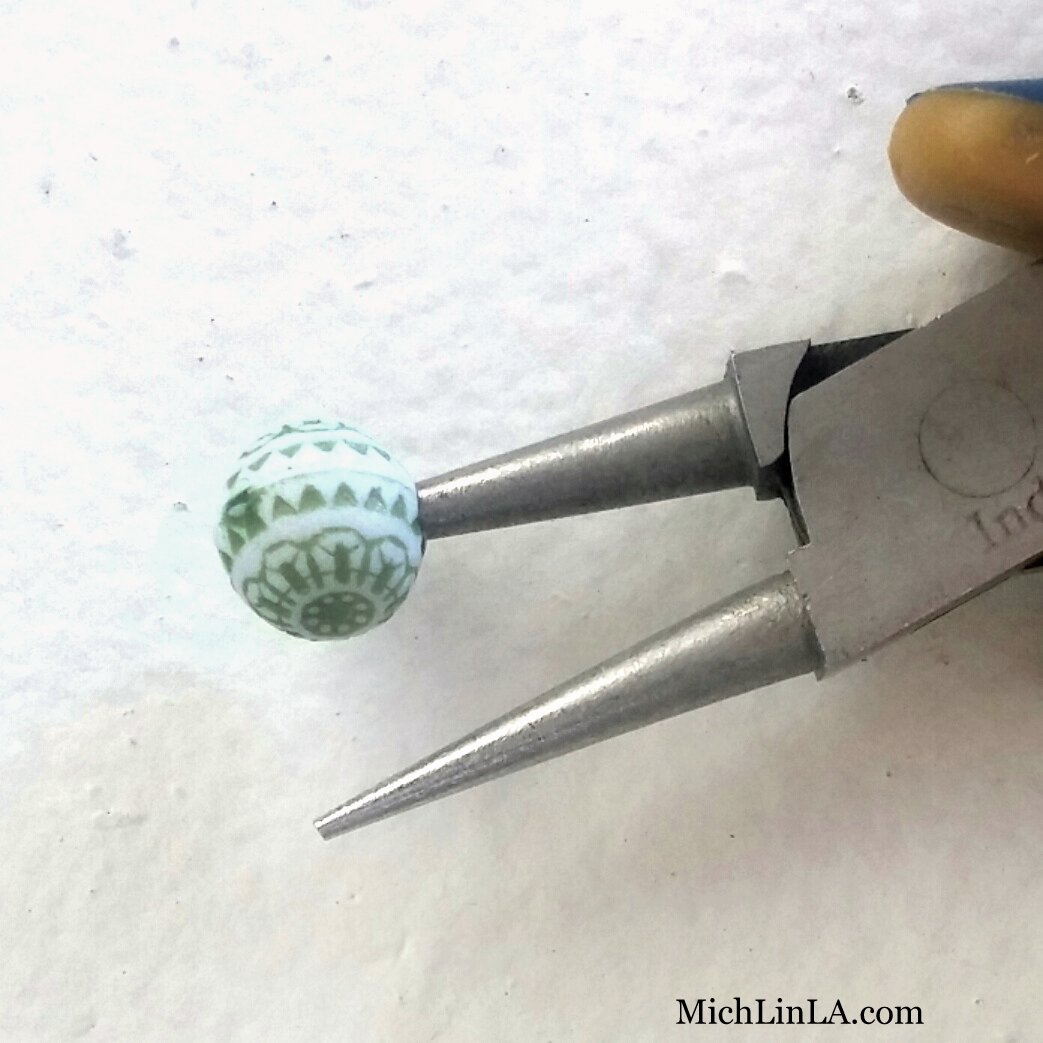
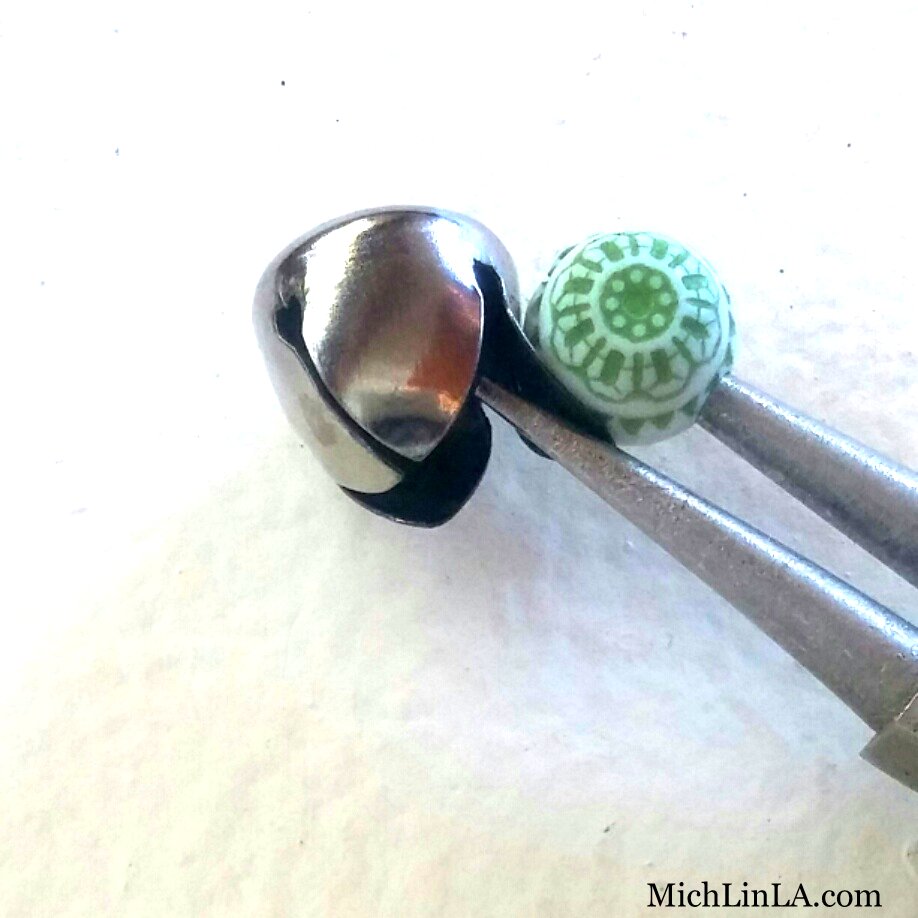
But here comes my awesome trick. Watch carefully now.
Pop a round plastic bead onto one tip of the pliers.
Now grab your petals (with the plastic bead on the outside) and bend.
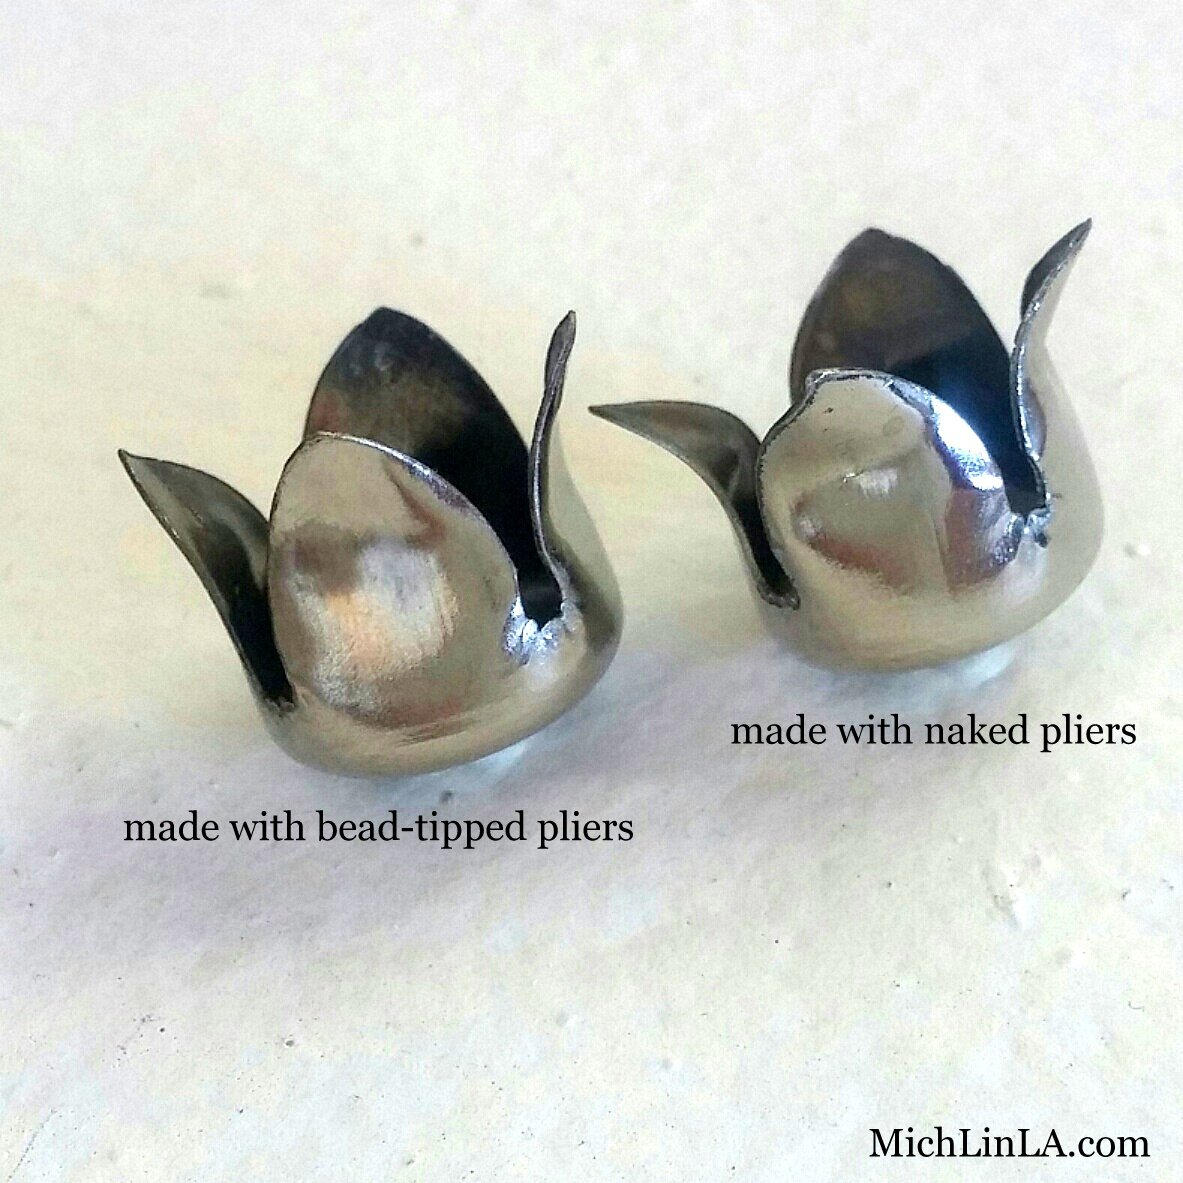
The round bead will protect the metal and make a prettier, unmarked petal! This photo shows what I mean:
A tiny - but interesting - difference, is it not?
I hope you enjoyed this idea! Perhaps there's a trip to the jingle bell store in your future?
P.S. check my next post for another awesomely adorable idea for the jingle buds!