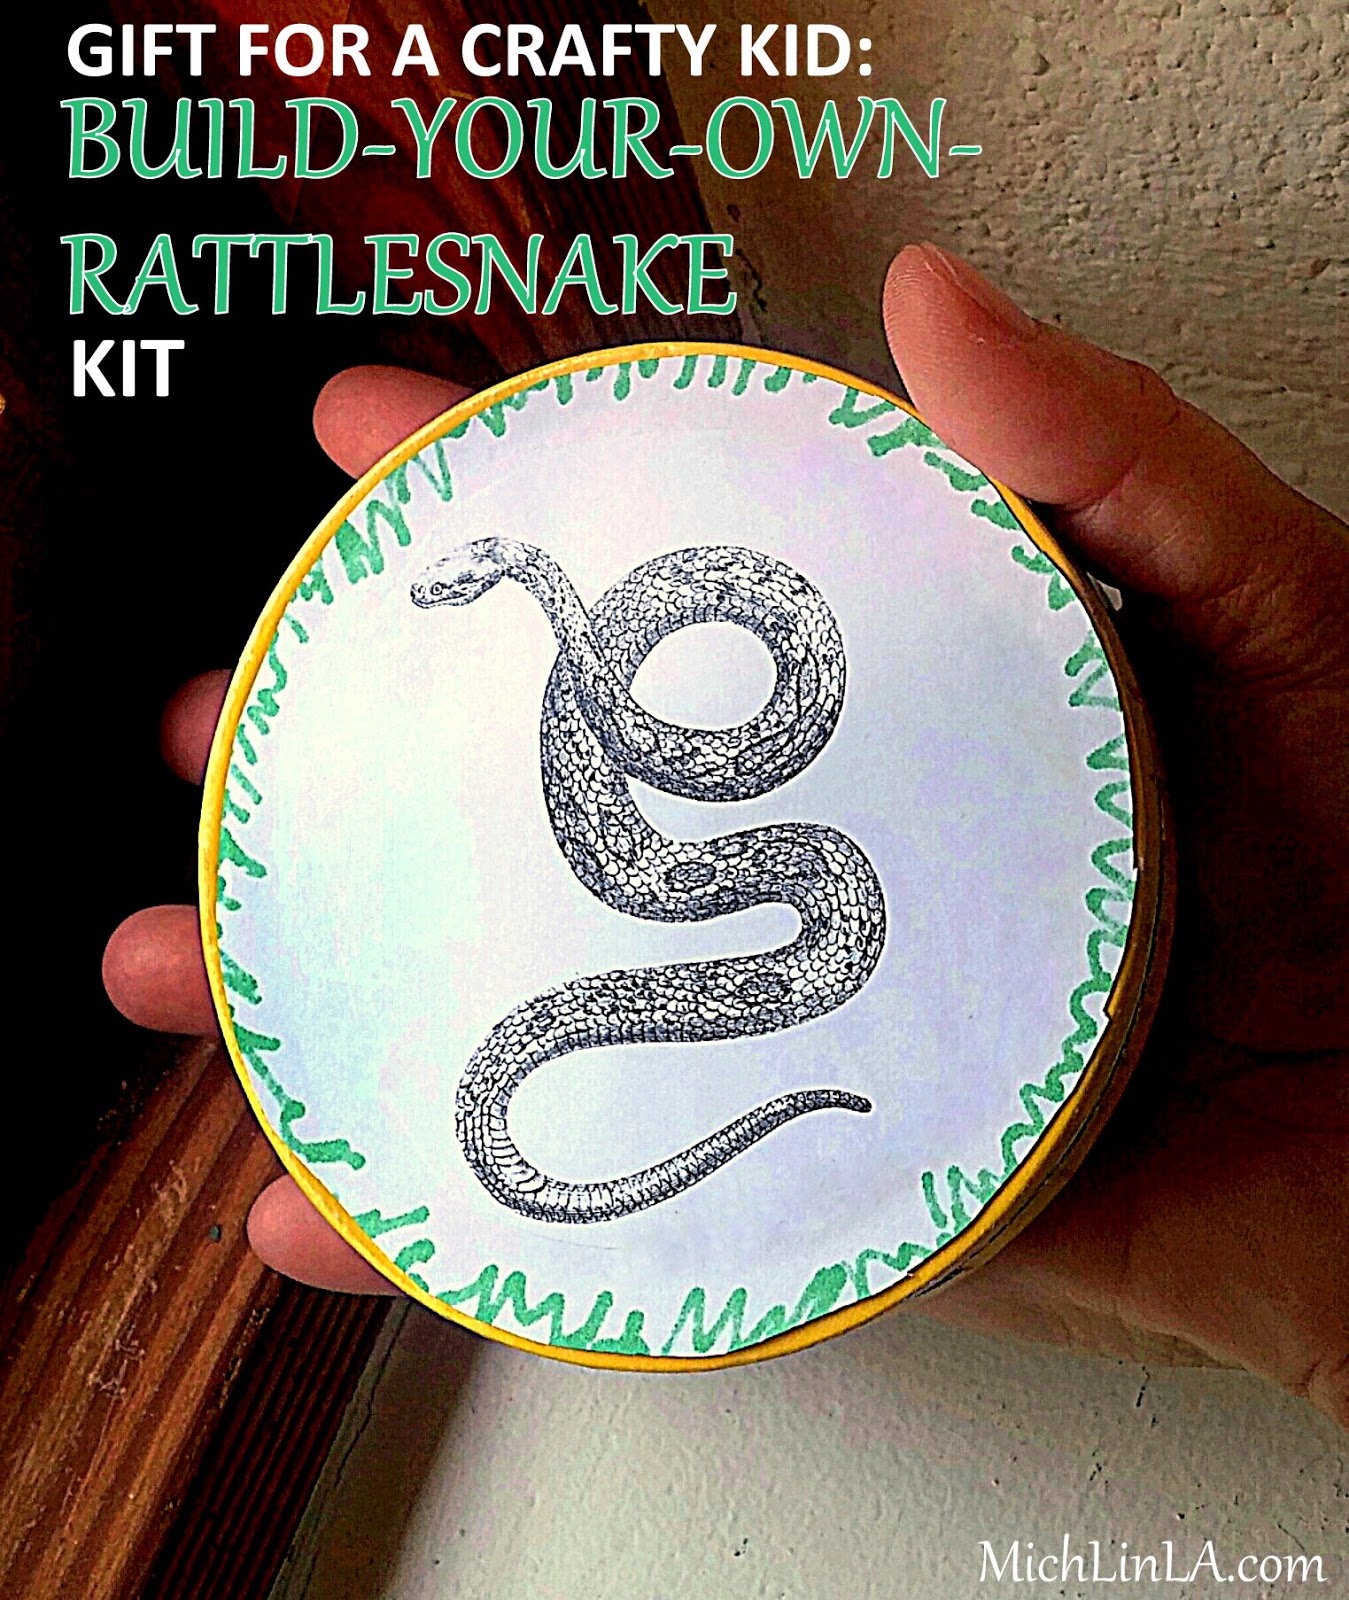
This little box - formerly a grocery store cheese container - holds an awesome homemade gift for a kid!
That's right, people, you can make a super fun, easy, crafty kit for some lucky child. All you need: a handful of beads, a bit of craft wire, and a Sharpie. A great project for girls and boys - snakes are cool for everybody.
Check out the quick-as-a-wink DIY.
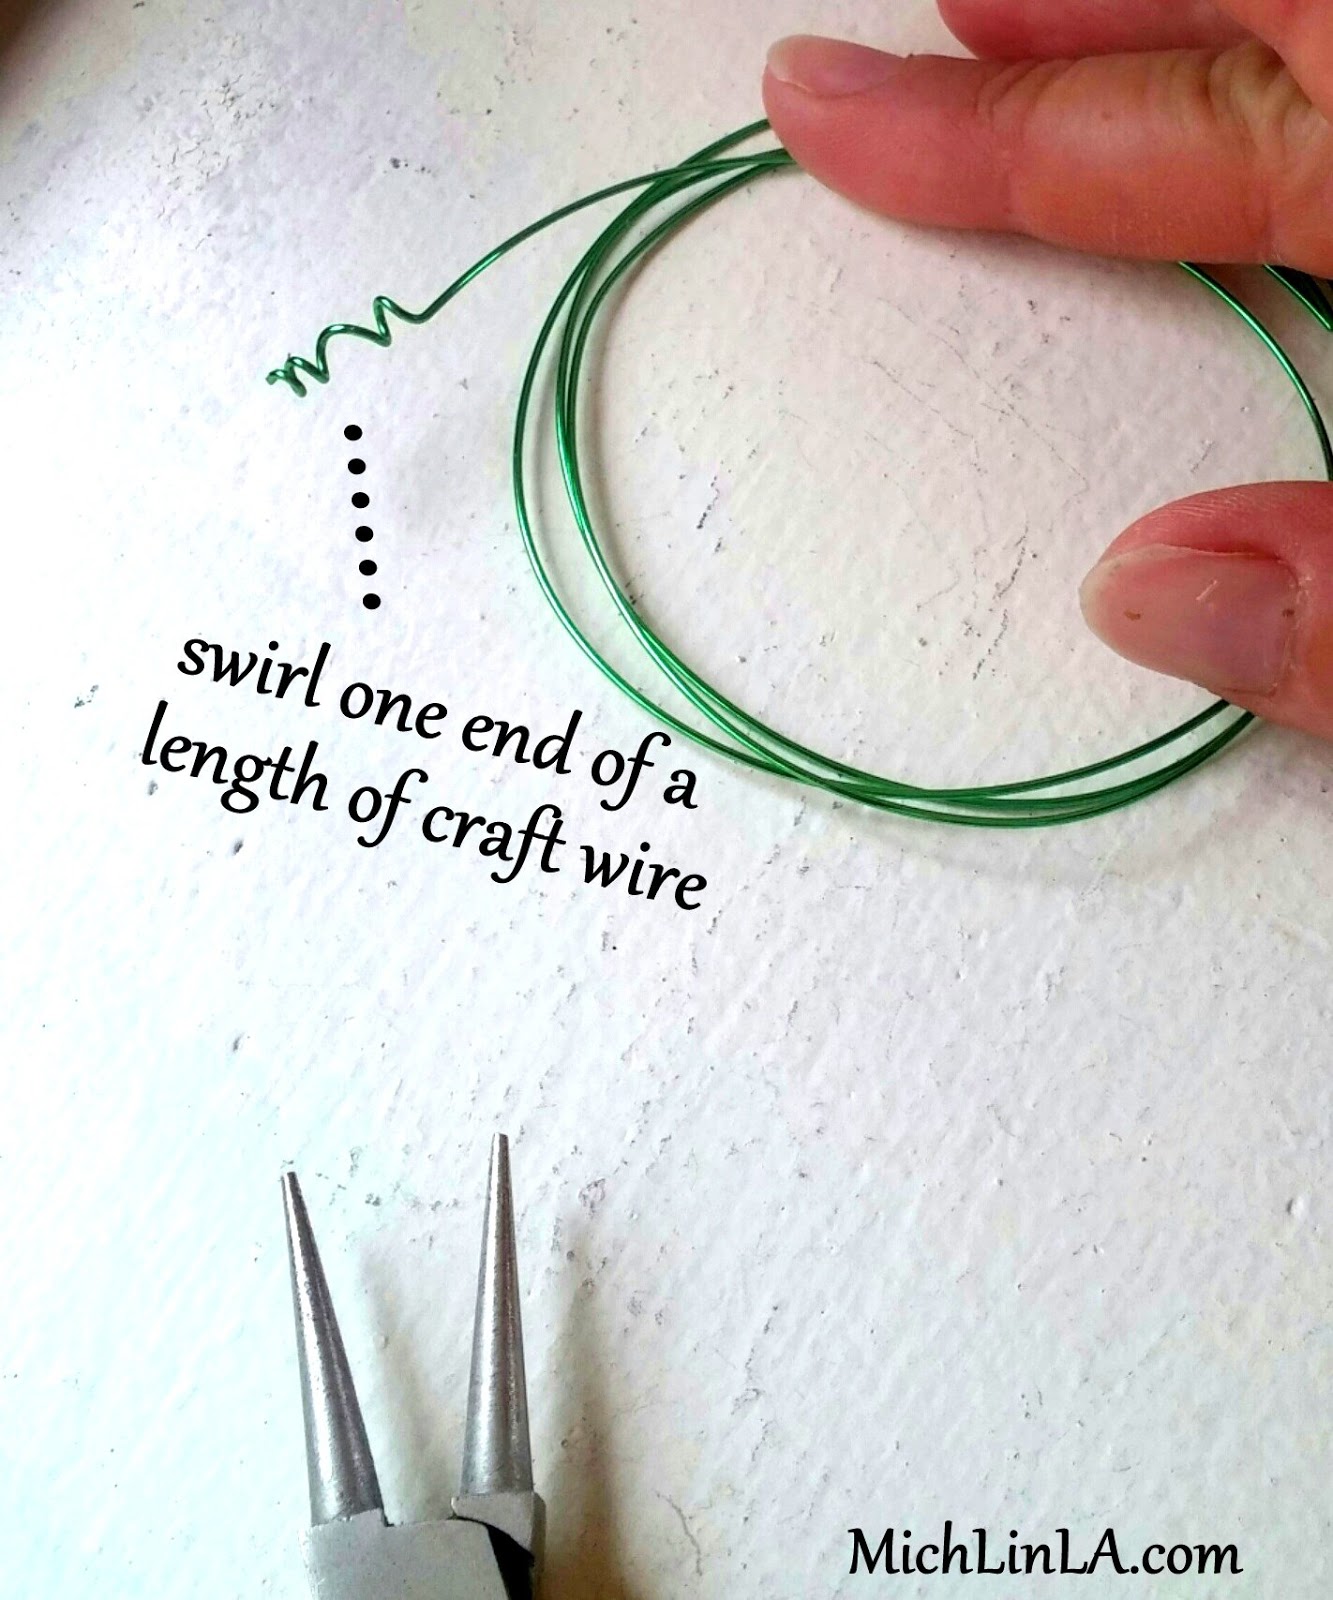
Begin with a piece of craft wire, between one and three feet long. (Some kids prefer loooong, crazy mismatched snakes. Some kids prefer shorter, regularly patterned, beautiful snakes. It's funny, but rarely do the two overlap.)
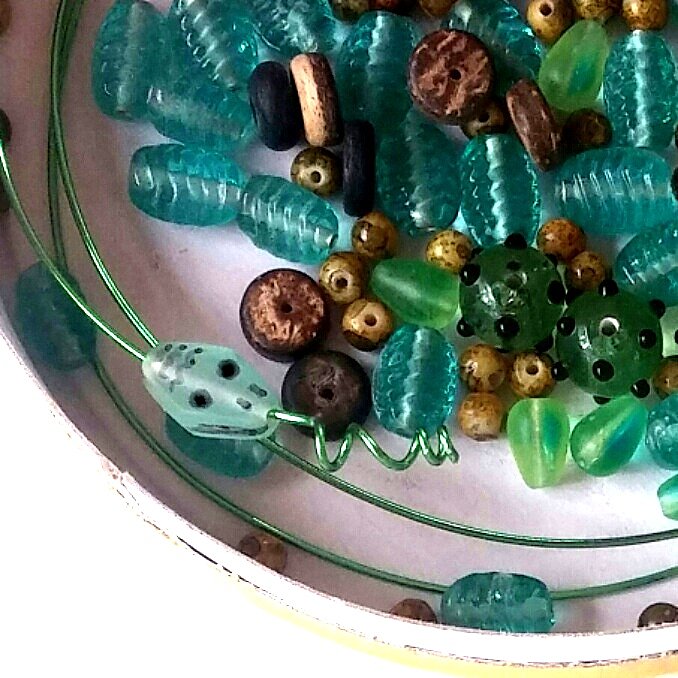
Twist a swirly onto one end, like so:
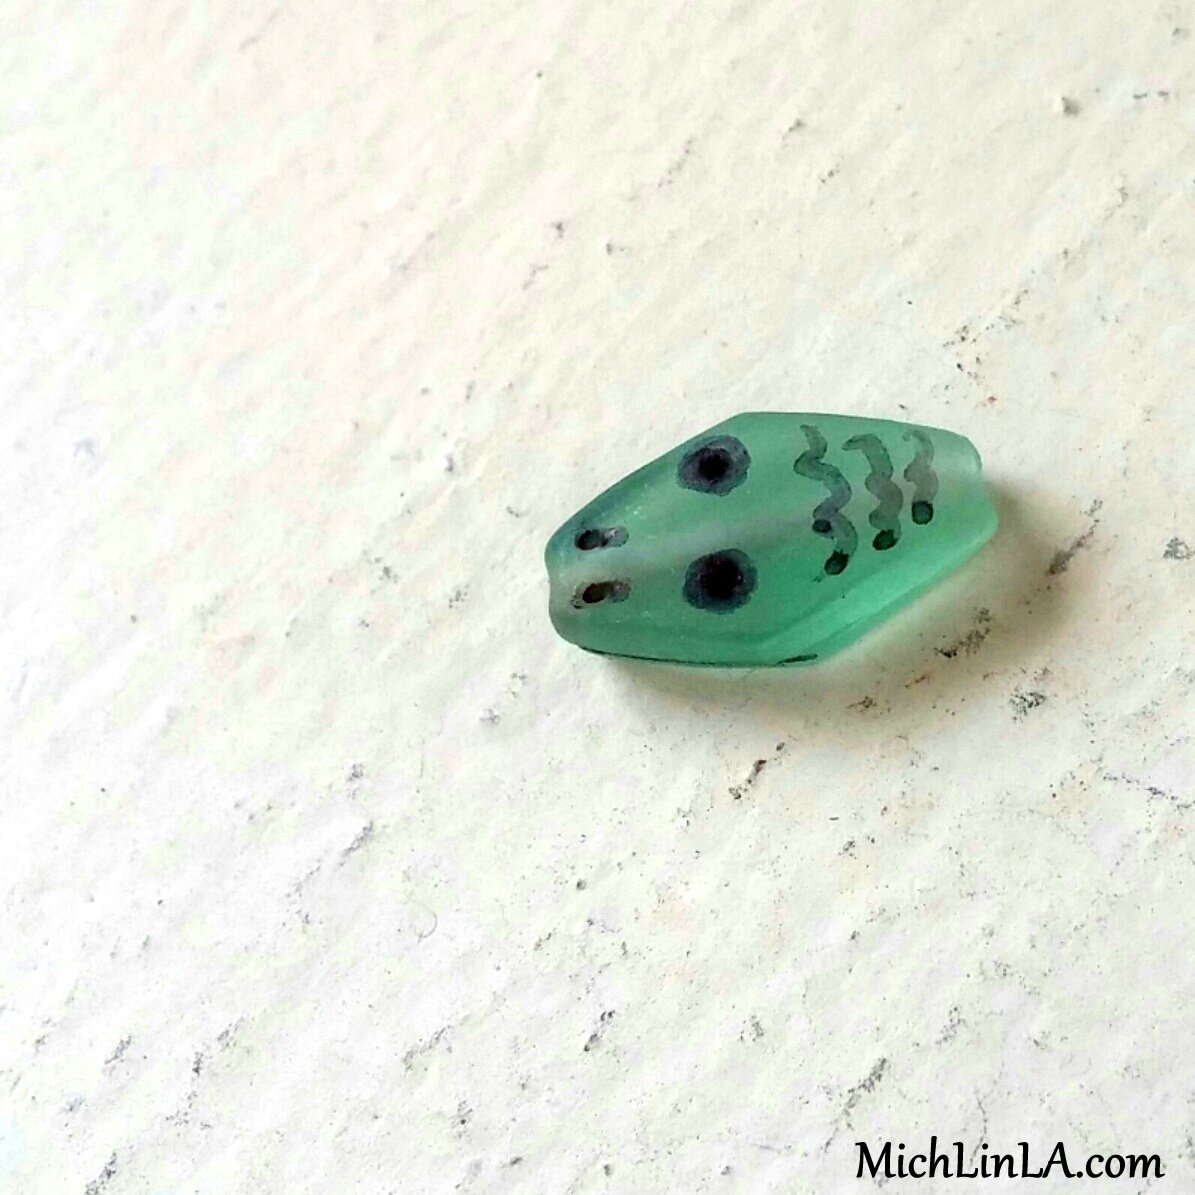
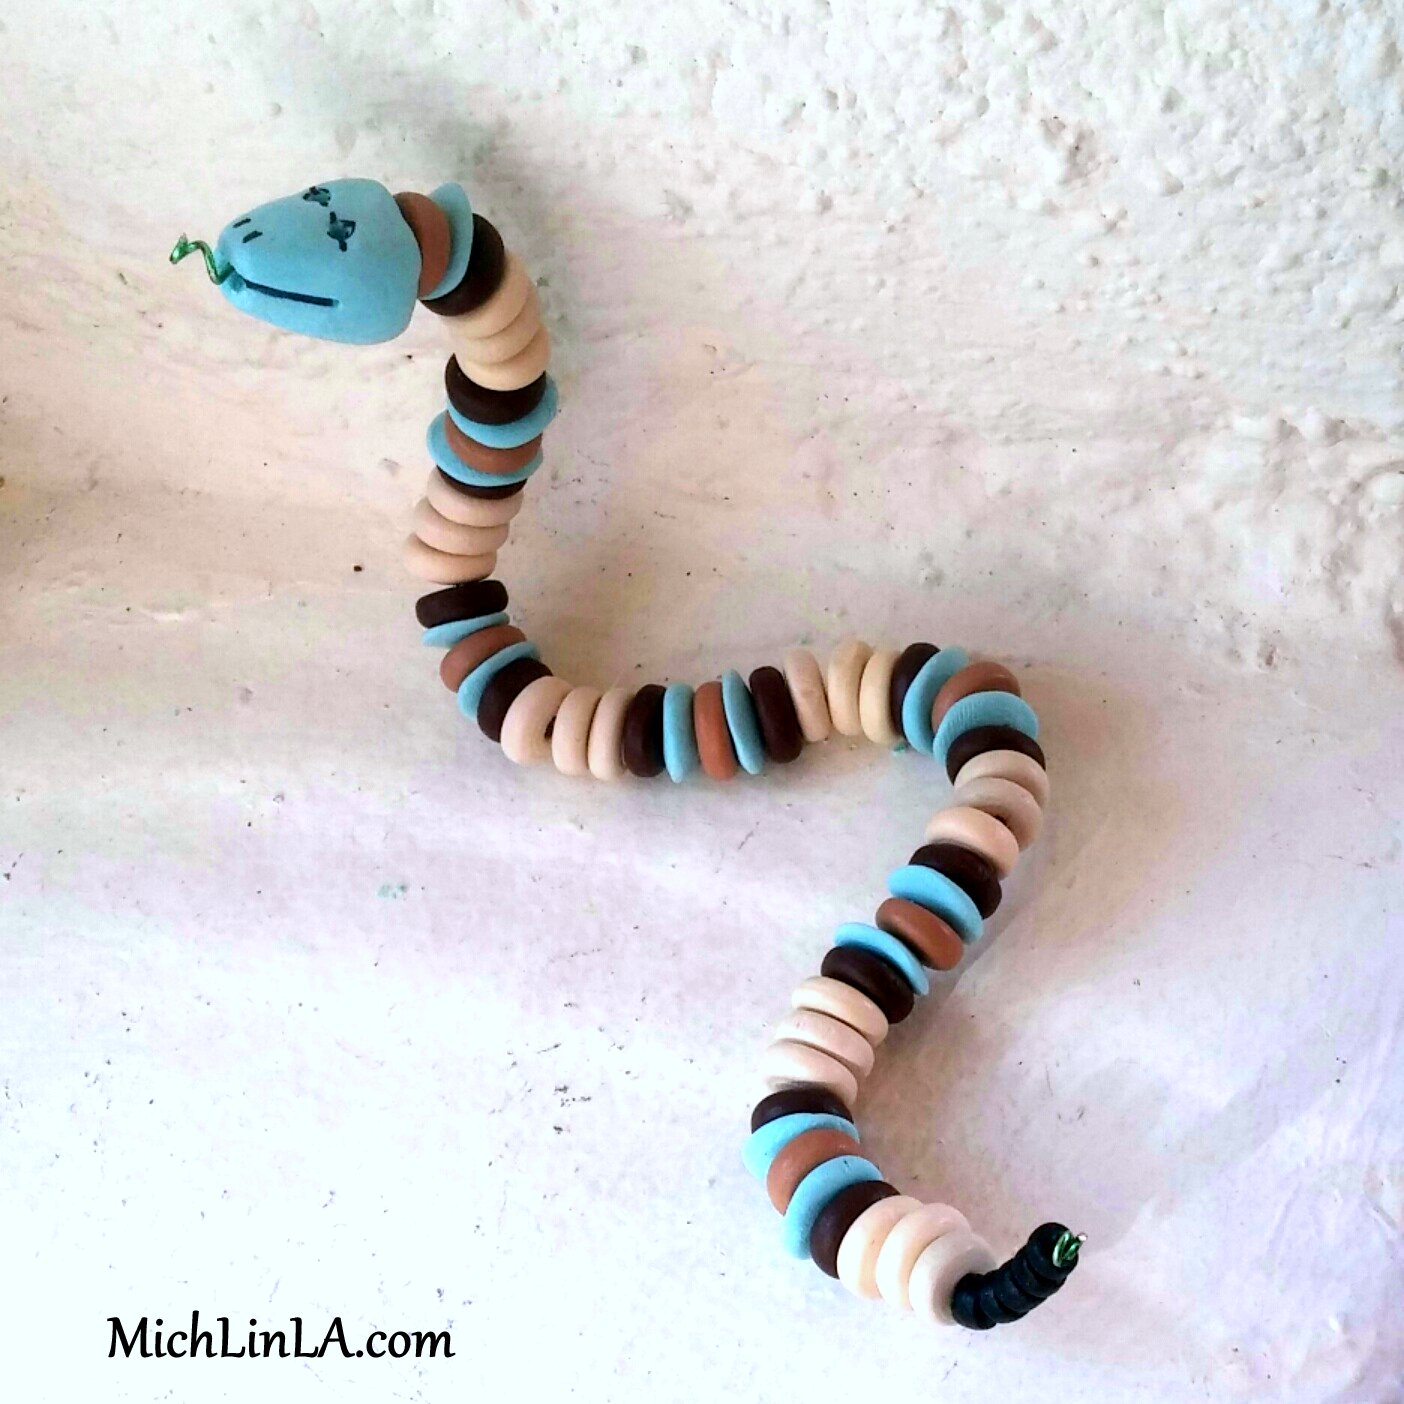
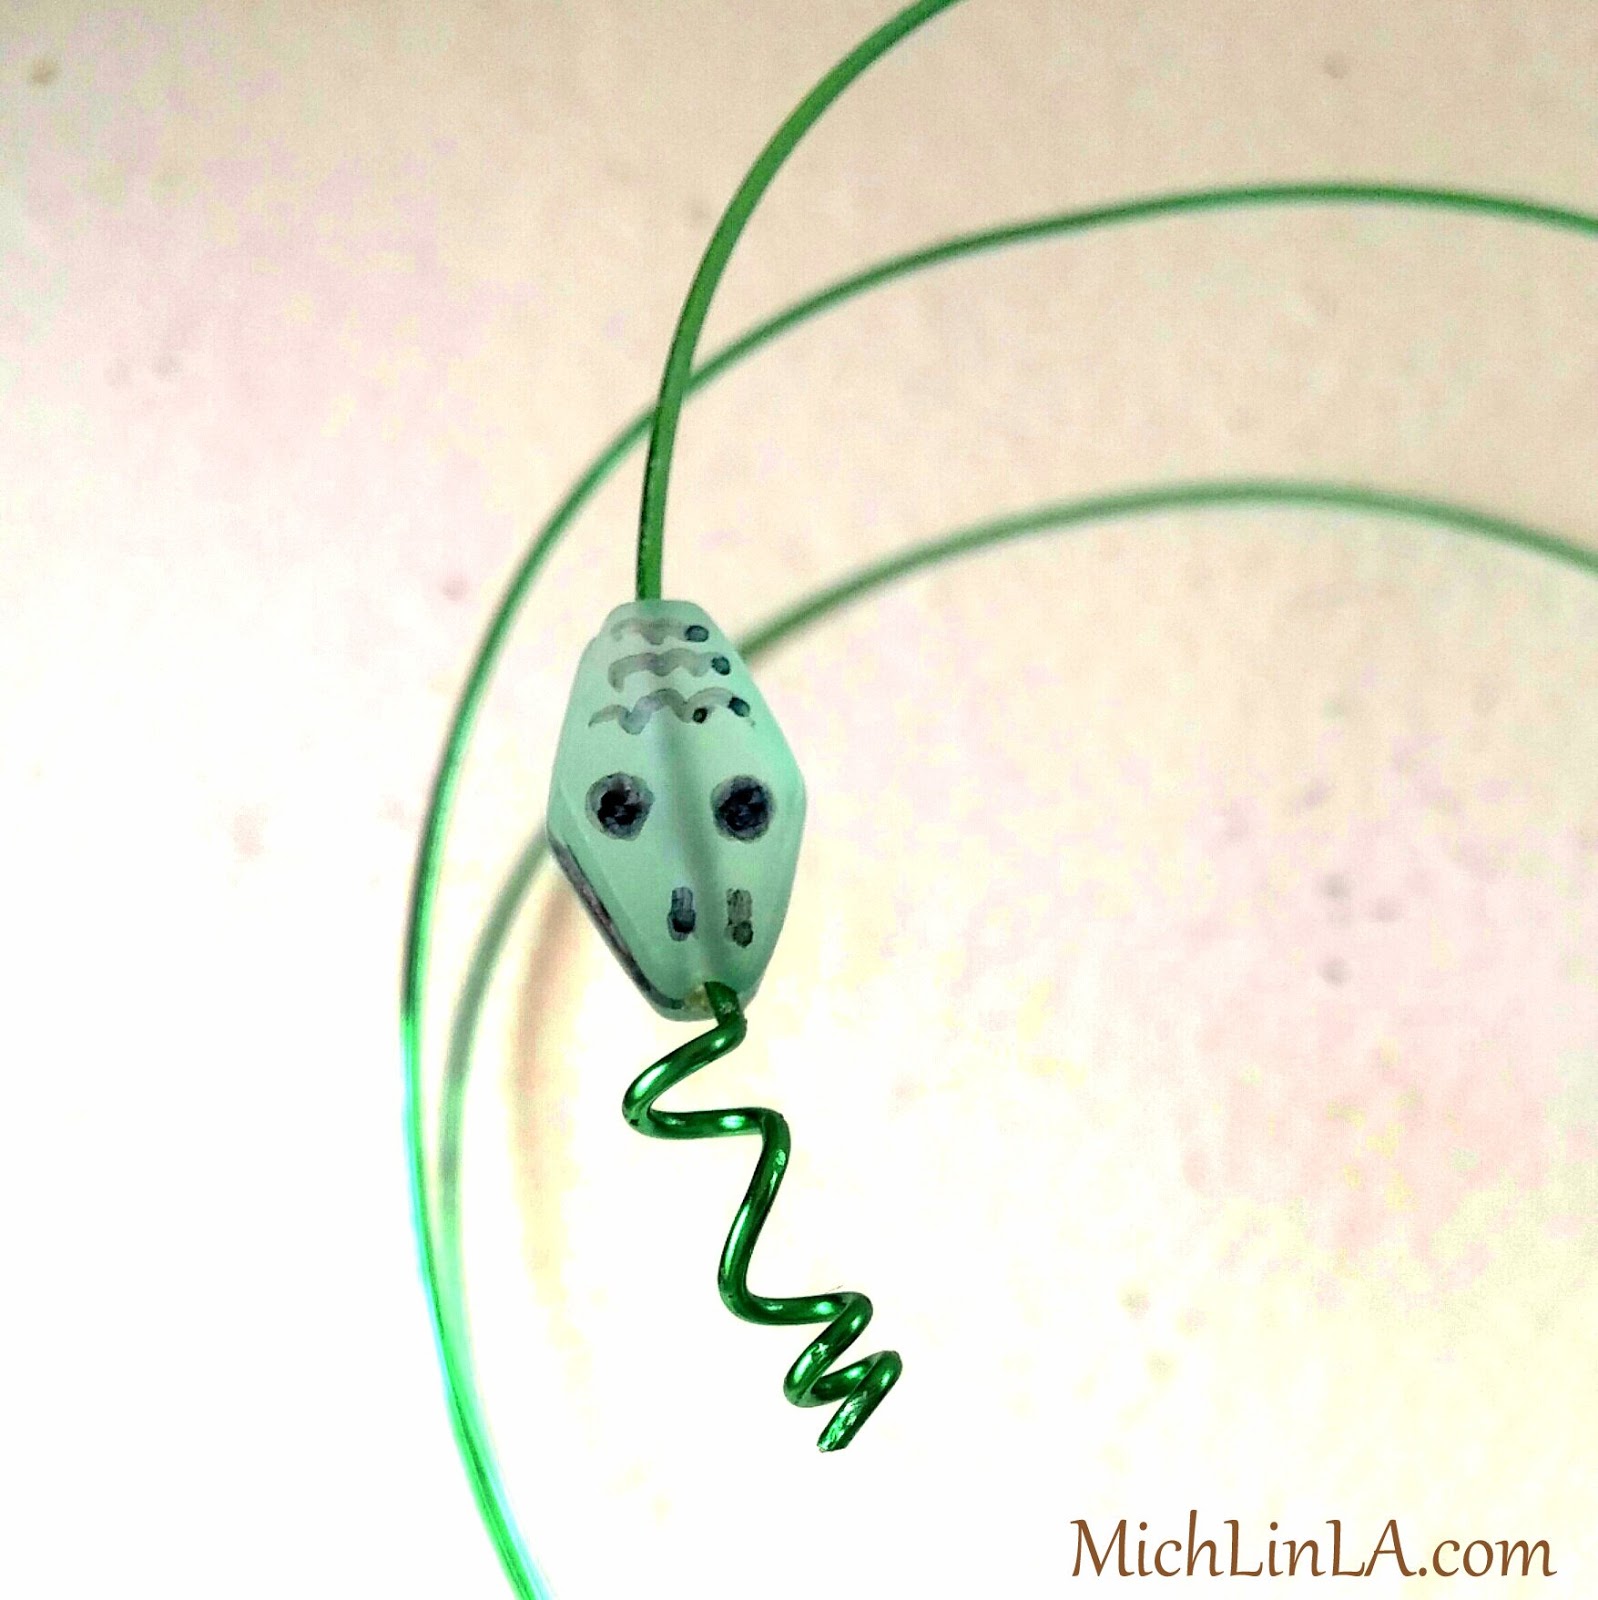
Find a flat bead that you can Sharpie on. Matte finish glass beads work well. Or choose plastic or wooden ones. Draw two eyes and two nostrils, and anything else that says snake.
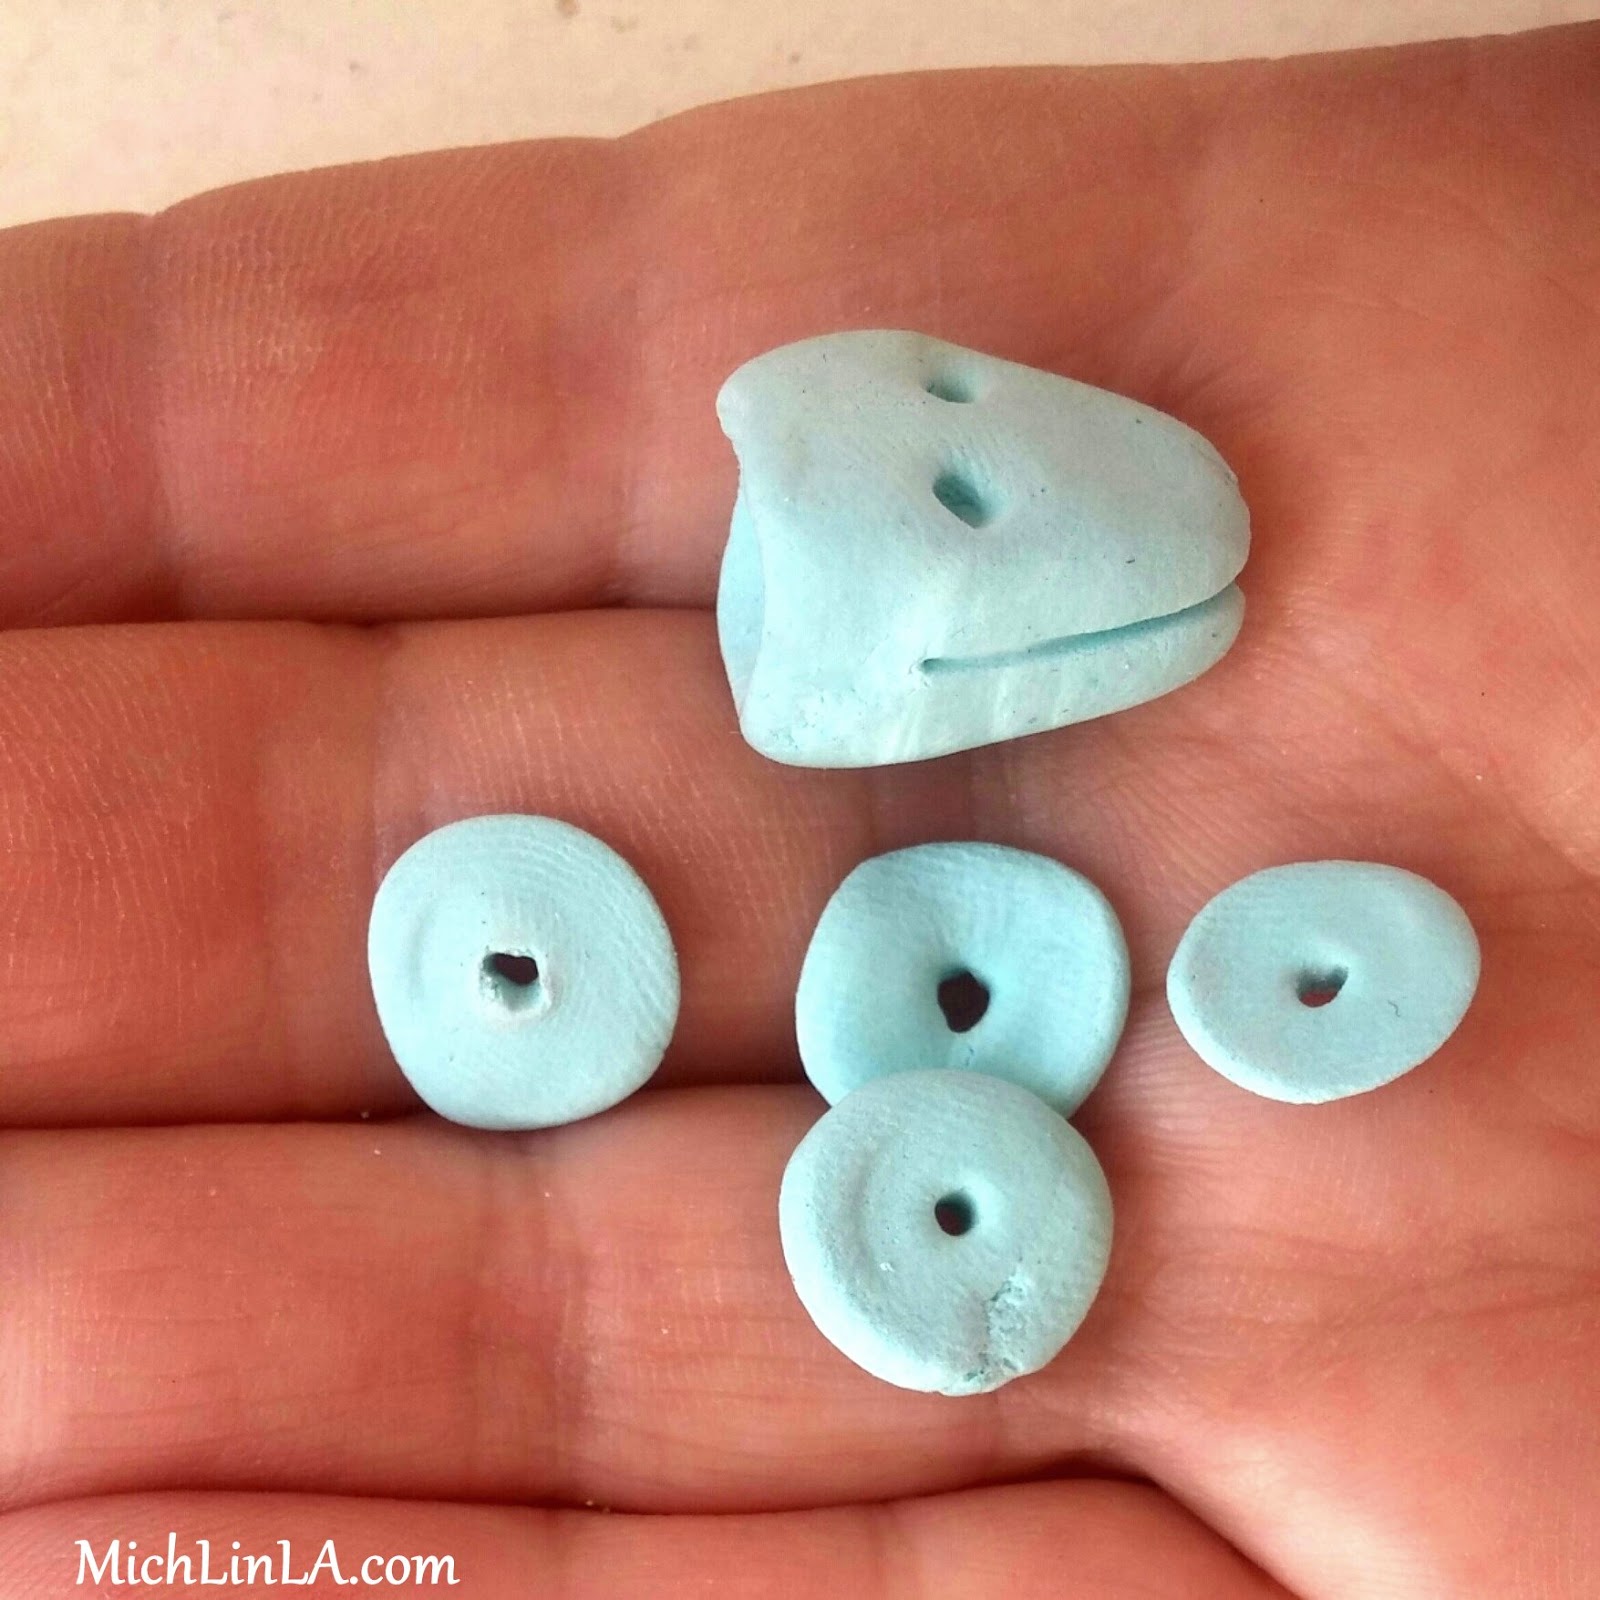
Another option: make a simple snake head bead from air-dry clay. (You can add Sharpie details once it's dry.) I made some extra little disc beads to match.
Next, add your snake head to the wire.
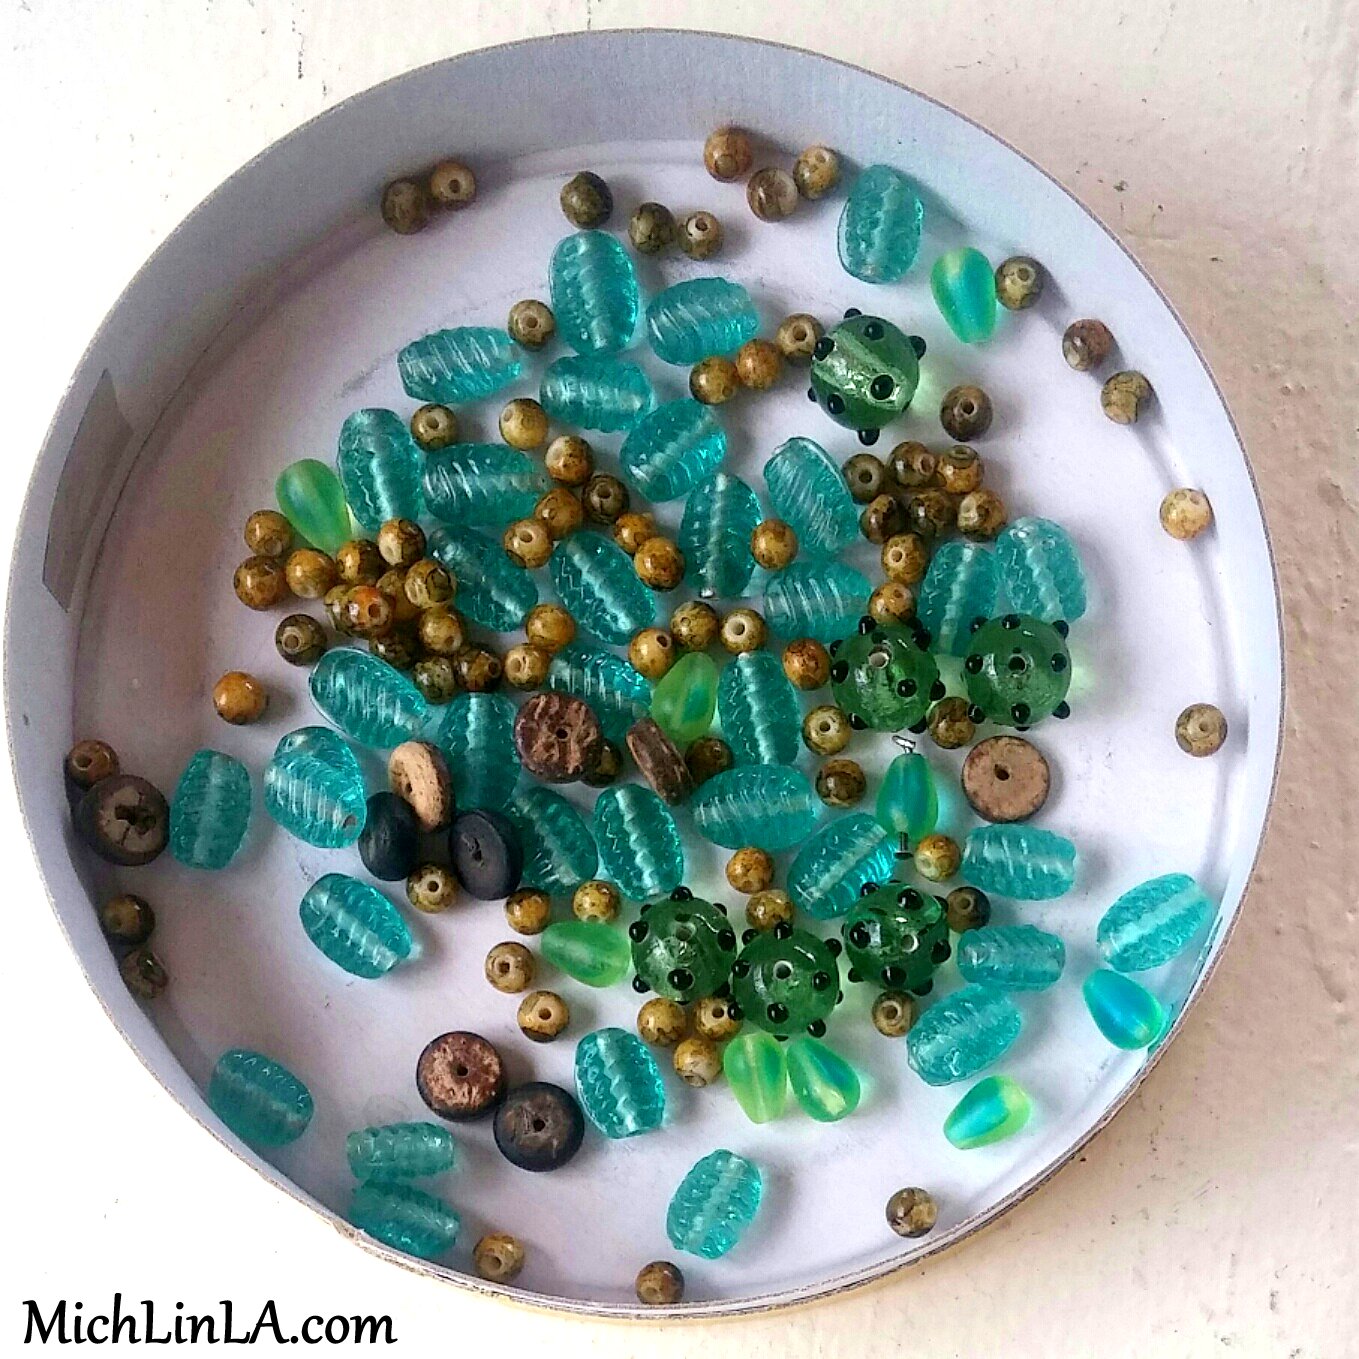
Now gather a bunch of beads and mix 'em up. You can use random, unmatched beads - a wonderful way to use up those strays! Or go with a color scheme. Or even do as I tried to do here: choose some that look kinda snaky.
Include a few small disc-shaped beads if you have 'em - they make a nice rattle at the end of the tail.
Put the bead mix in a cheese box.
Tip: some of these cheese boxes have small holes in the sides. I seal them up with bits of tape.
Place the snake head wire in the box, on top of the beads.
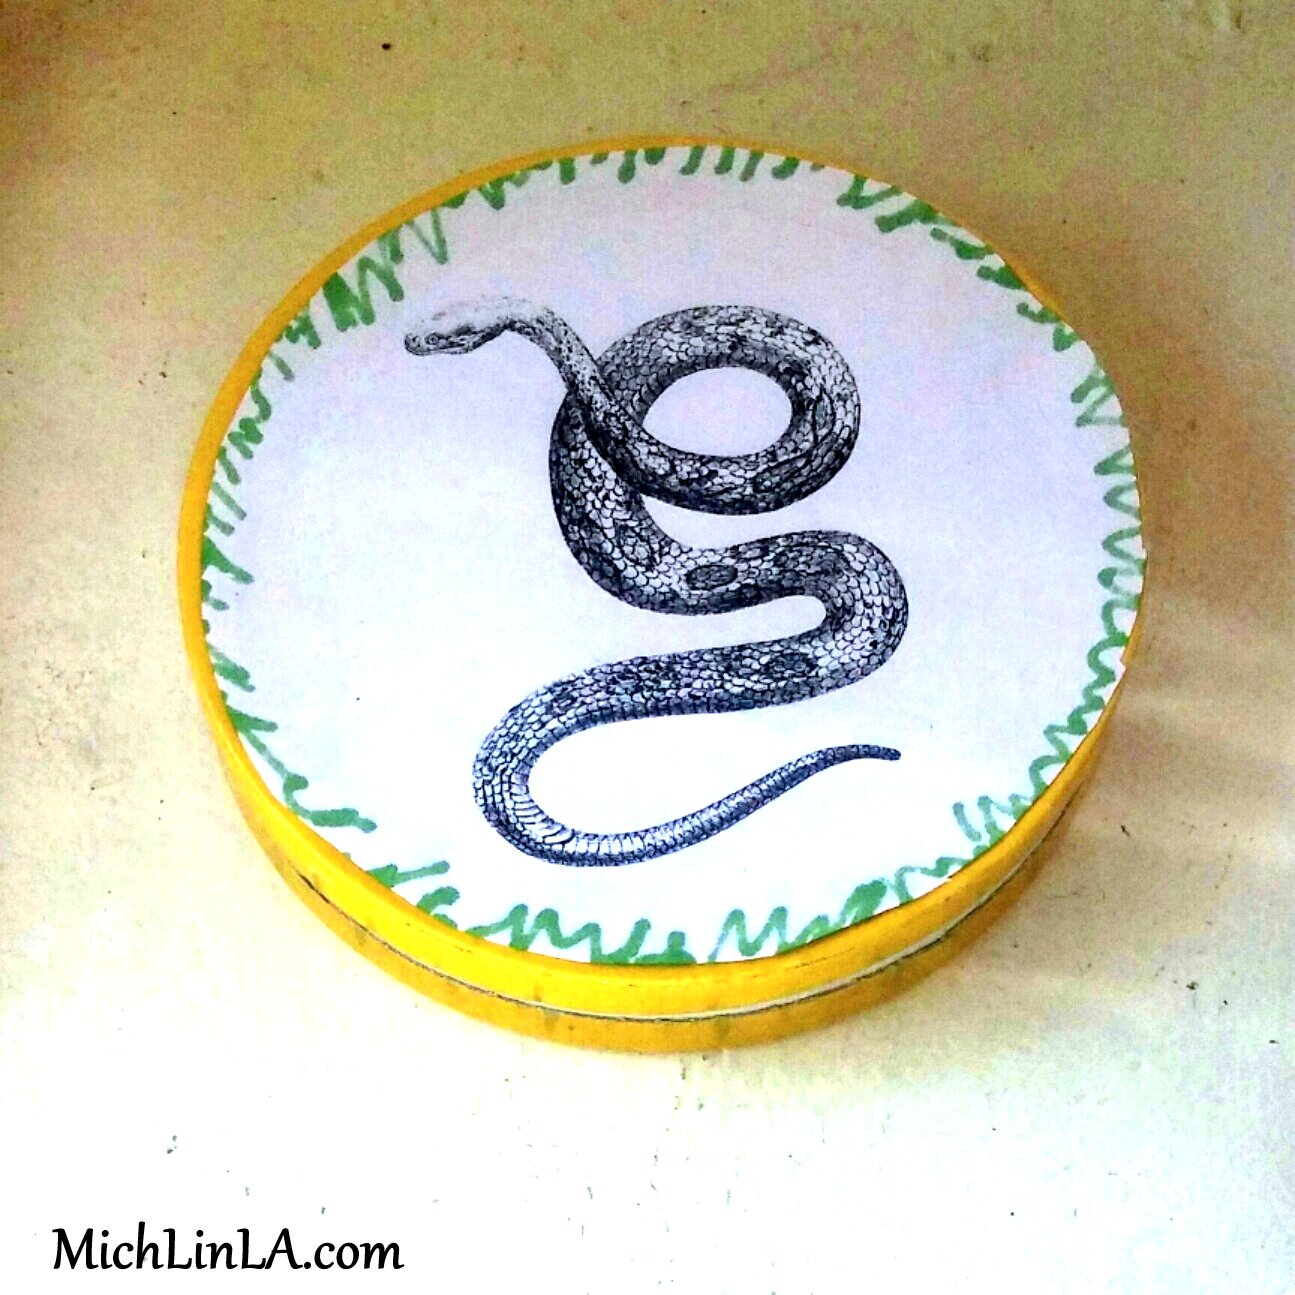
Print up a nifty snake picture (or draw one), and glue it to the top of the box. I found this lovely vintage rattlesnake art over at The Graphics Fairy.
That's your finished kit! Give one to a bored kid and watch the fun begin.
Instructions for making a snake:
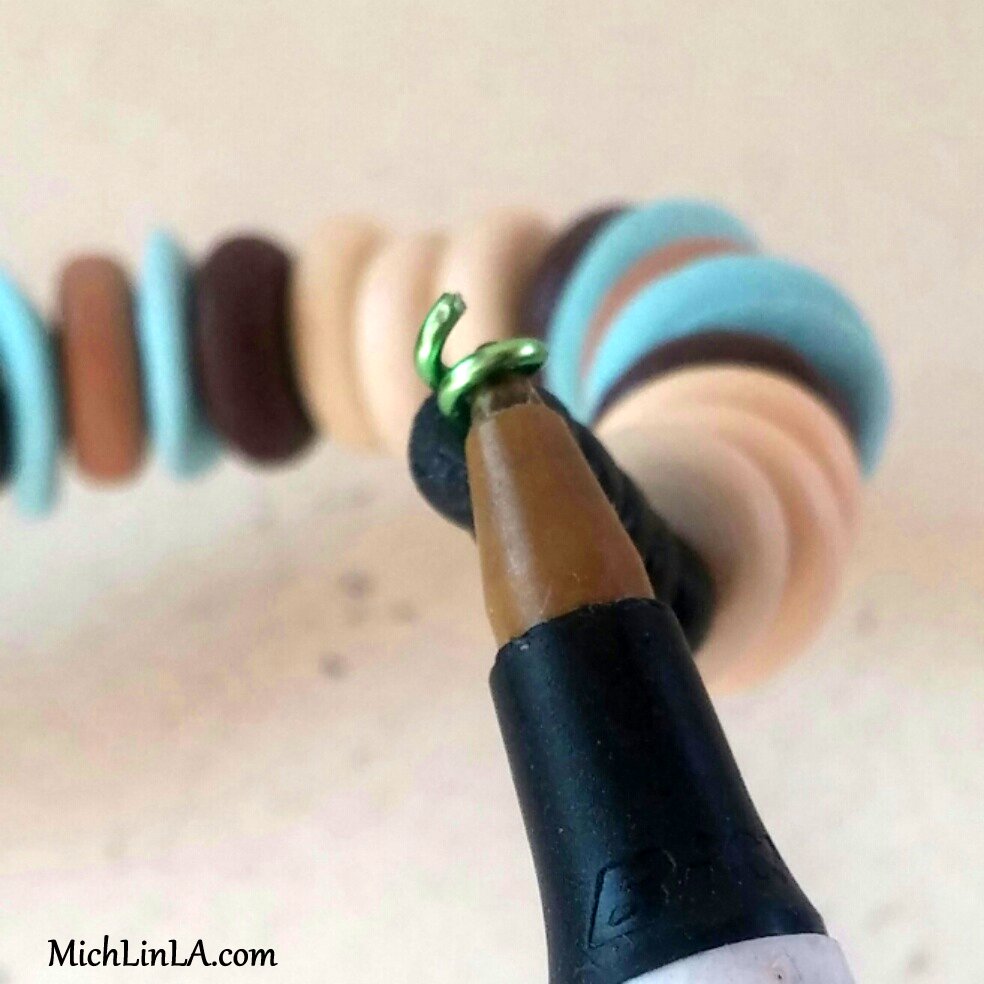
String beads on the wire until almost the end. With the last little bit of wire, use a skinny object like a pencil point to make a small loop or swirl. Like this:
Bend some curves in your snake and display proudly!
I hope this idea rattles your cage. See ya next time.
This summer, some friends of mine are going to a rancher's wedding. Location: New Mexico cattle ranch. Dress code: cowboy! Doesn't that sound fun?
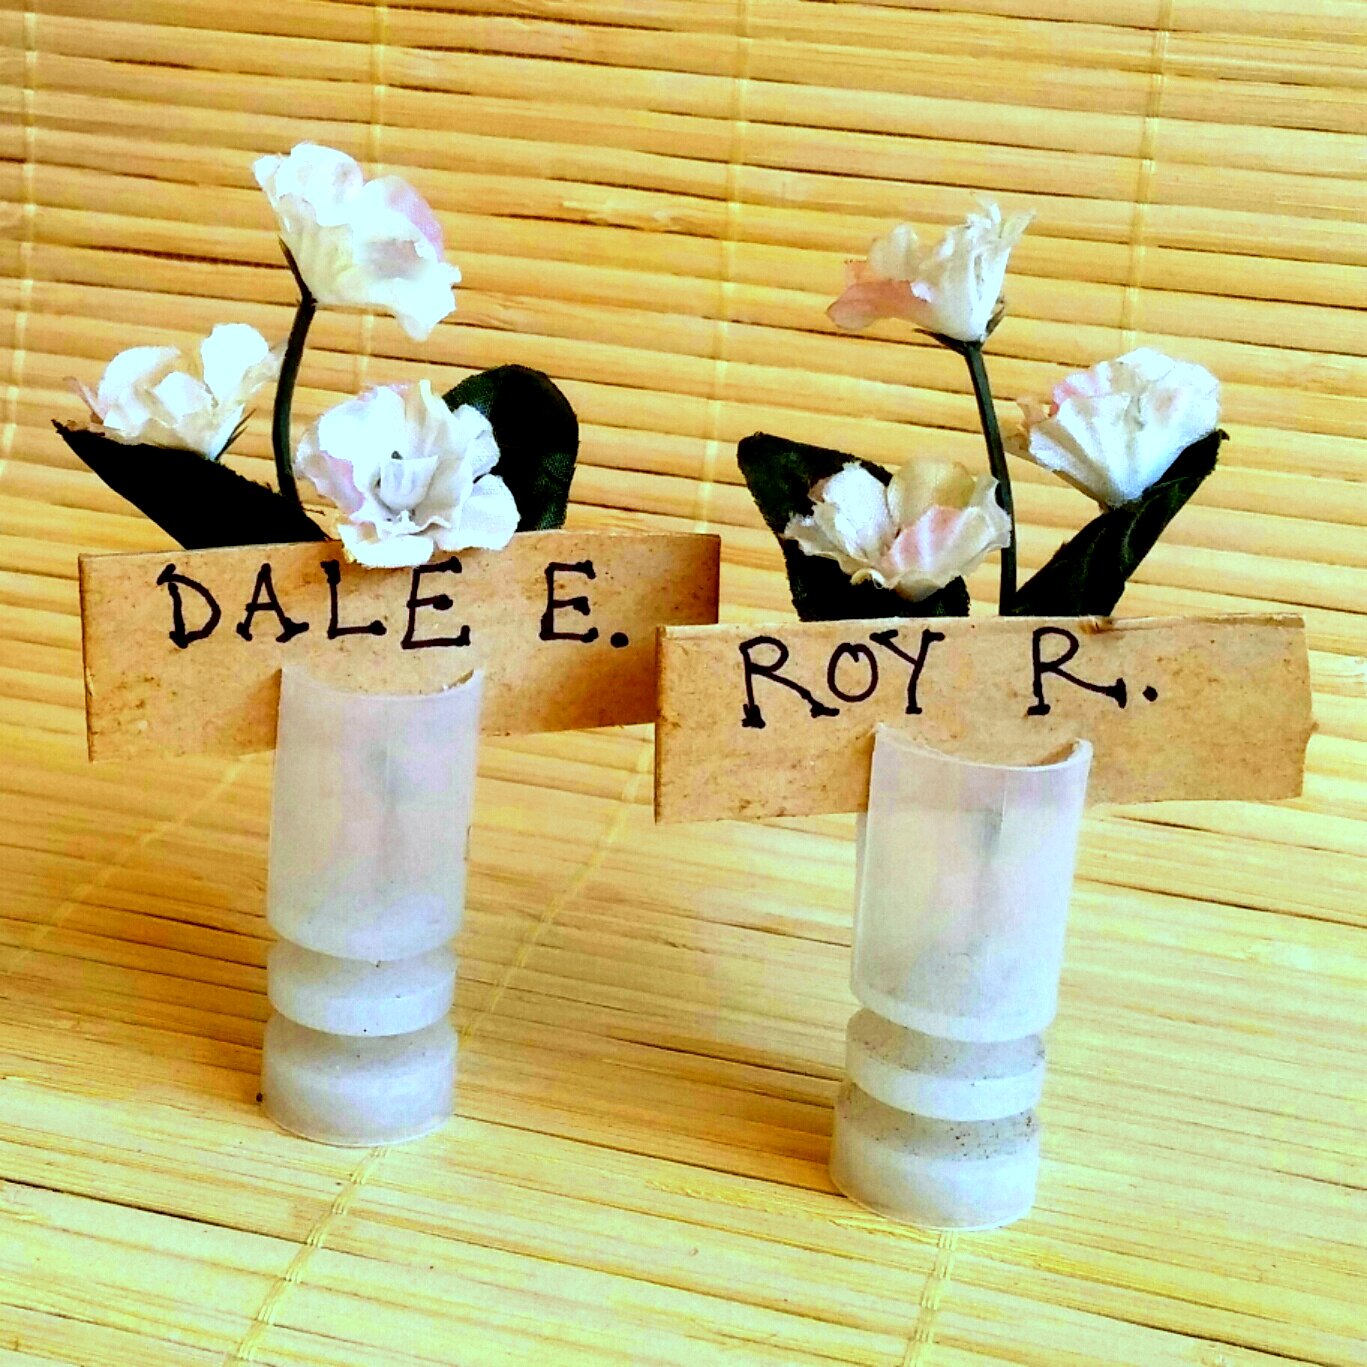
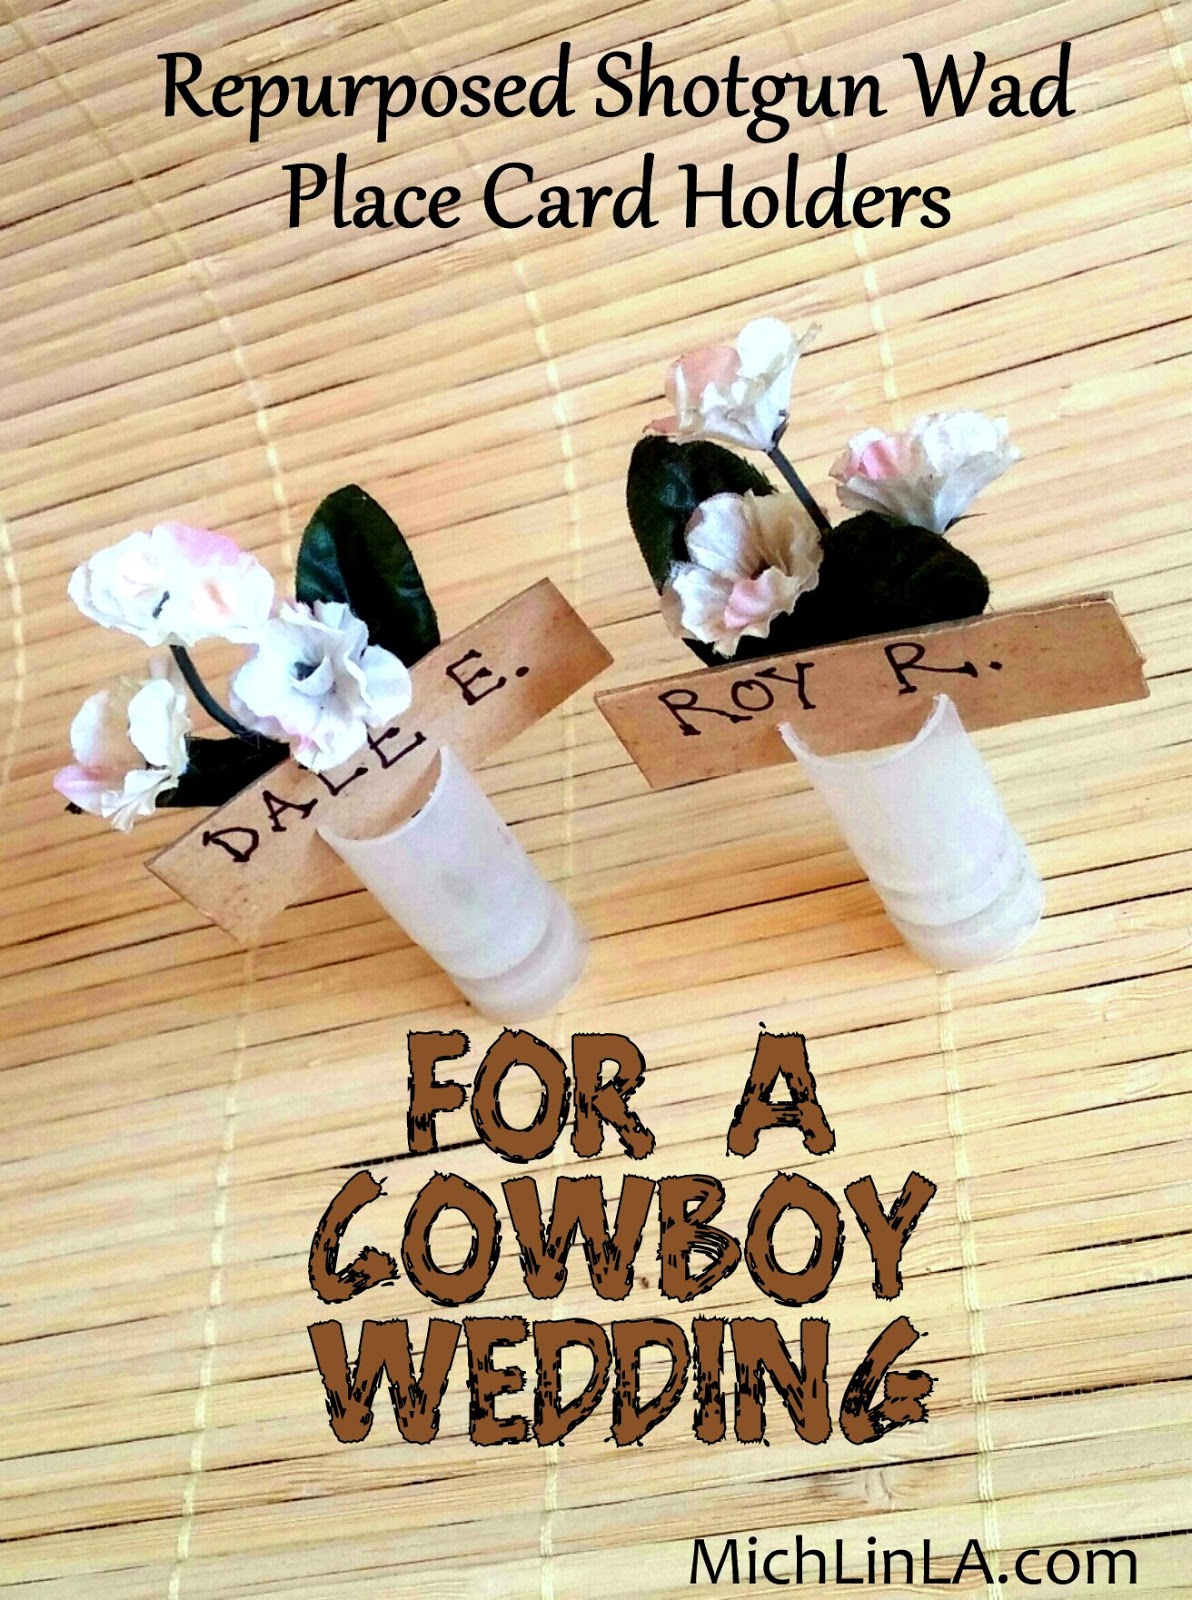
Here's a mini Guess The Mystery Thing challenge, inspired by the event. Check out these fun little place card holders:
Who can guess the identity of those interesting white bases? Now hold your horses! Whoa, dogies! Take your time and don't scroll until you have it in your head.
Got your guess? Okay, here comes the scroll down.
*
*
*
*
Some of you will know the answer on sight.
*
*
*
Some of you might be offended. Maybe? I'm not sure...
*
*
*
*
Ready?
Steady?
Okie.
Dokie.
The Mystery Thing is...
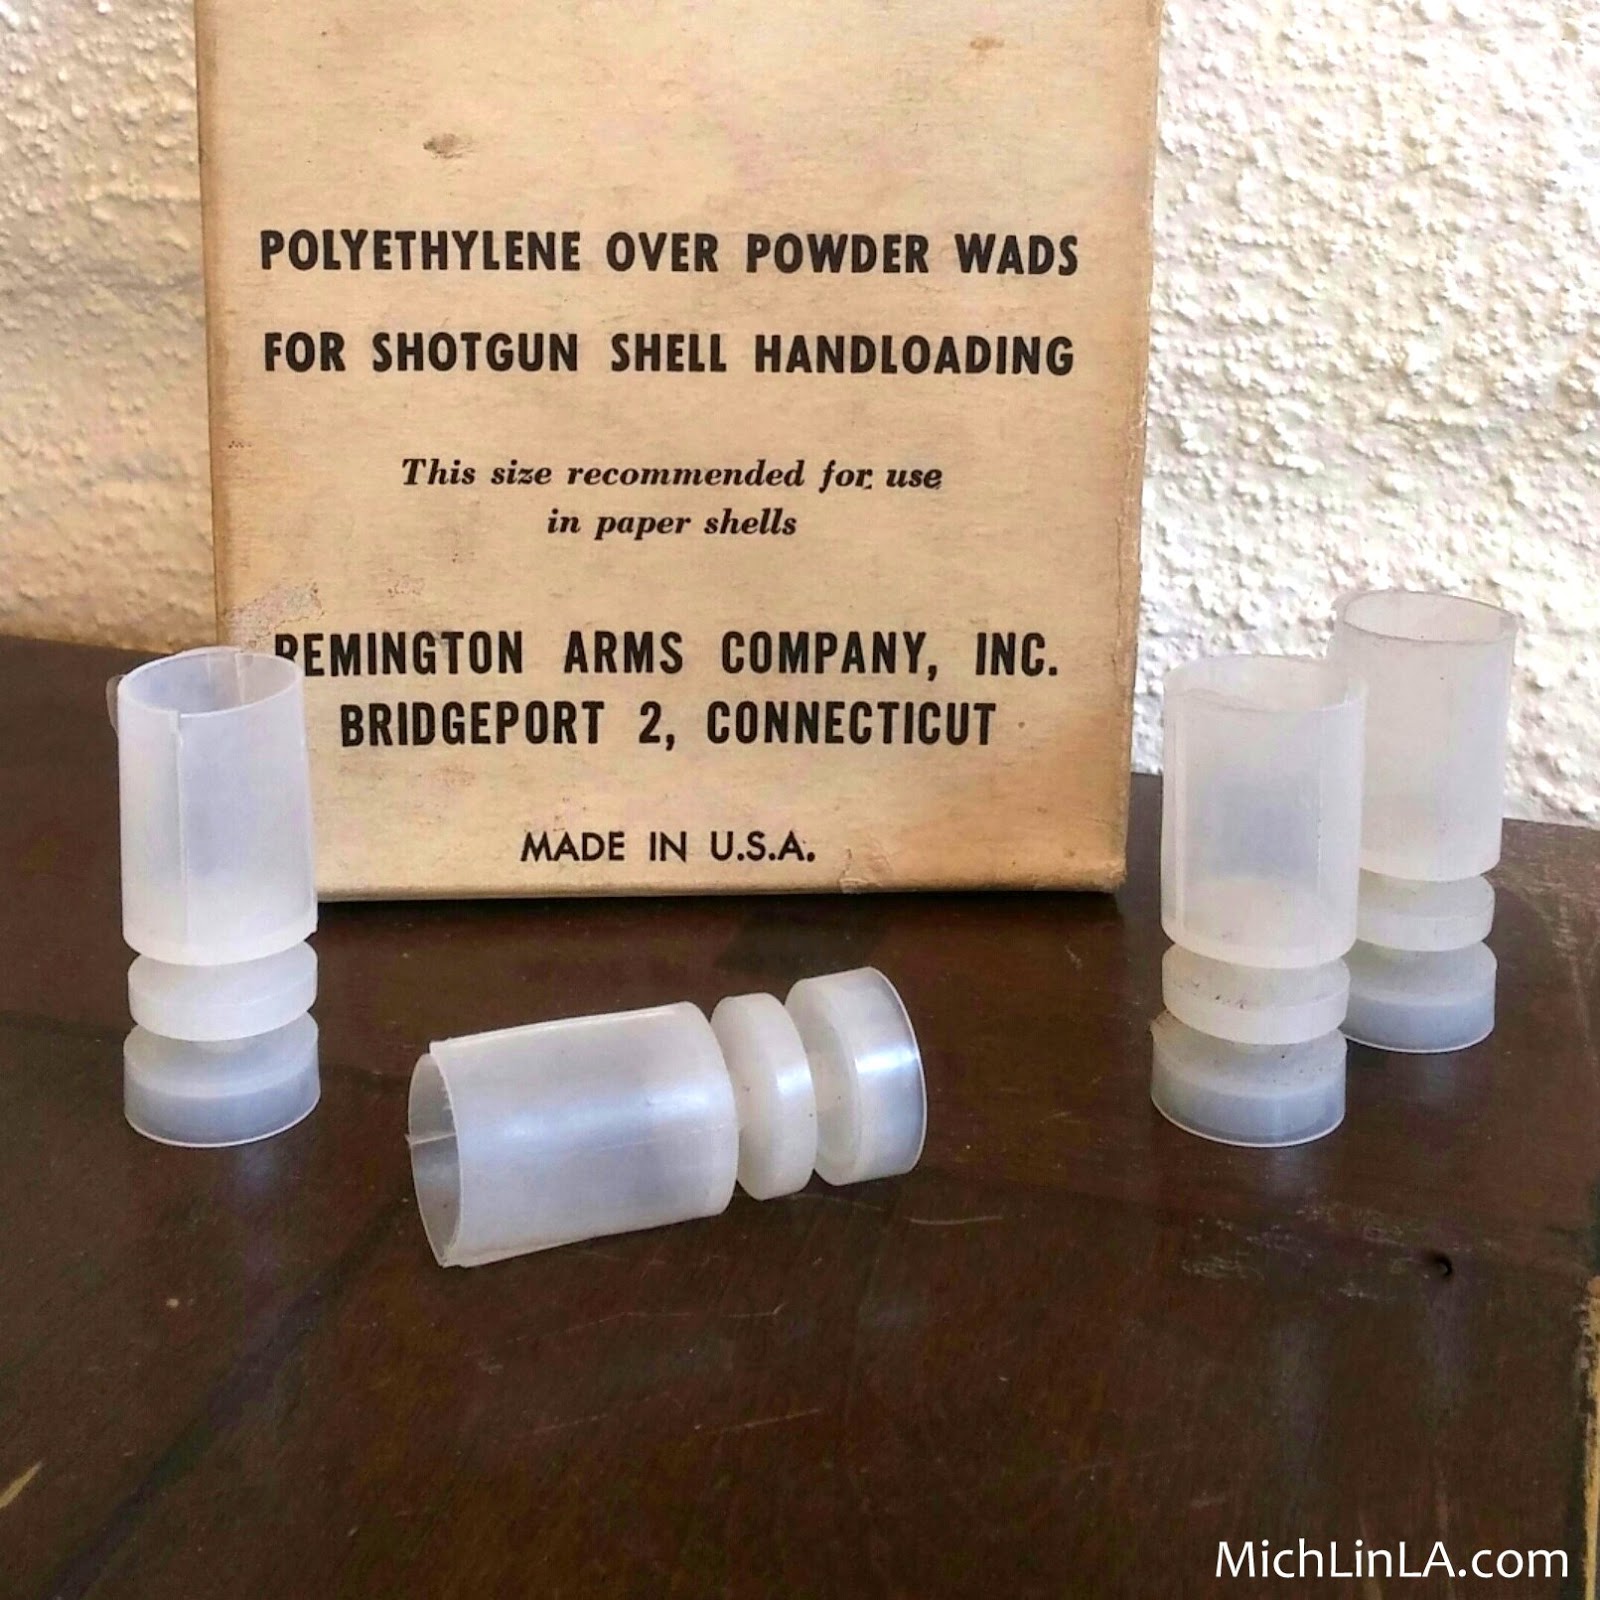
Oddly attractive shotgun loading wads. (That's what she said.) Don't be offended. They are so darn cute, with their little space age feet and ready-made slits to hold a place card!
Hope you got a laugh out of this one. Later, dogies!
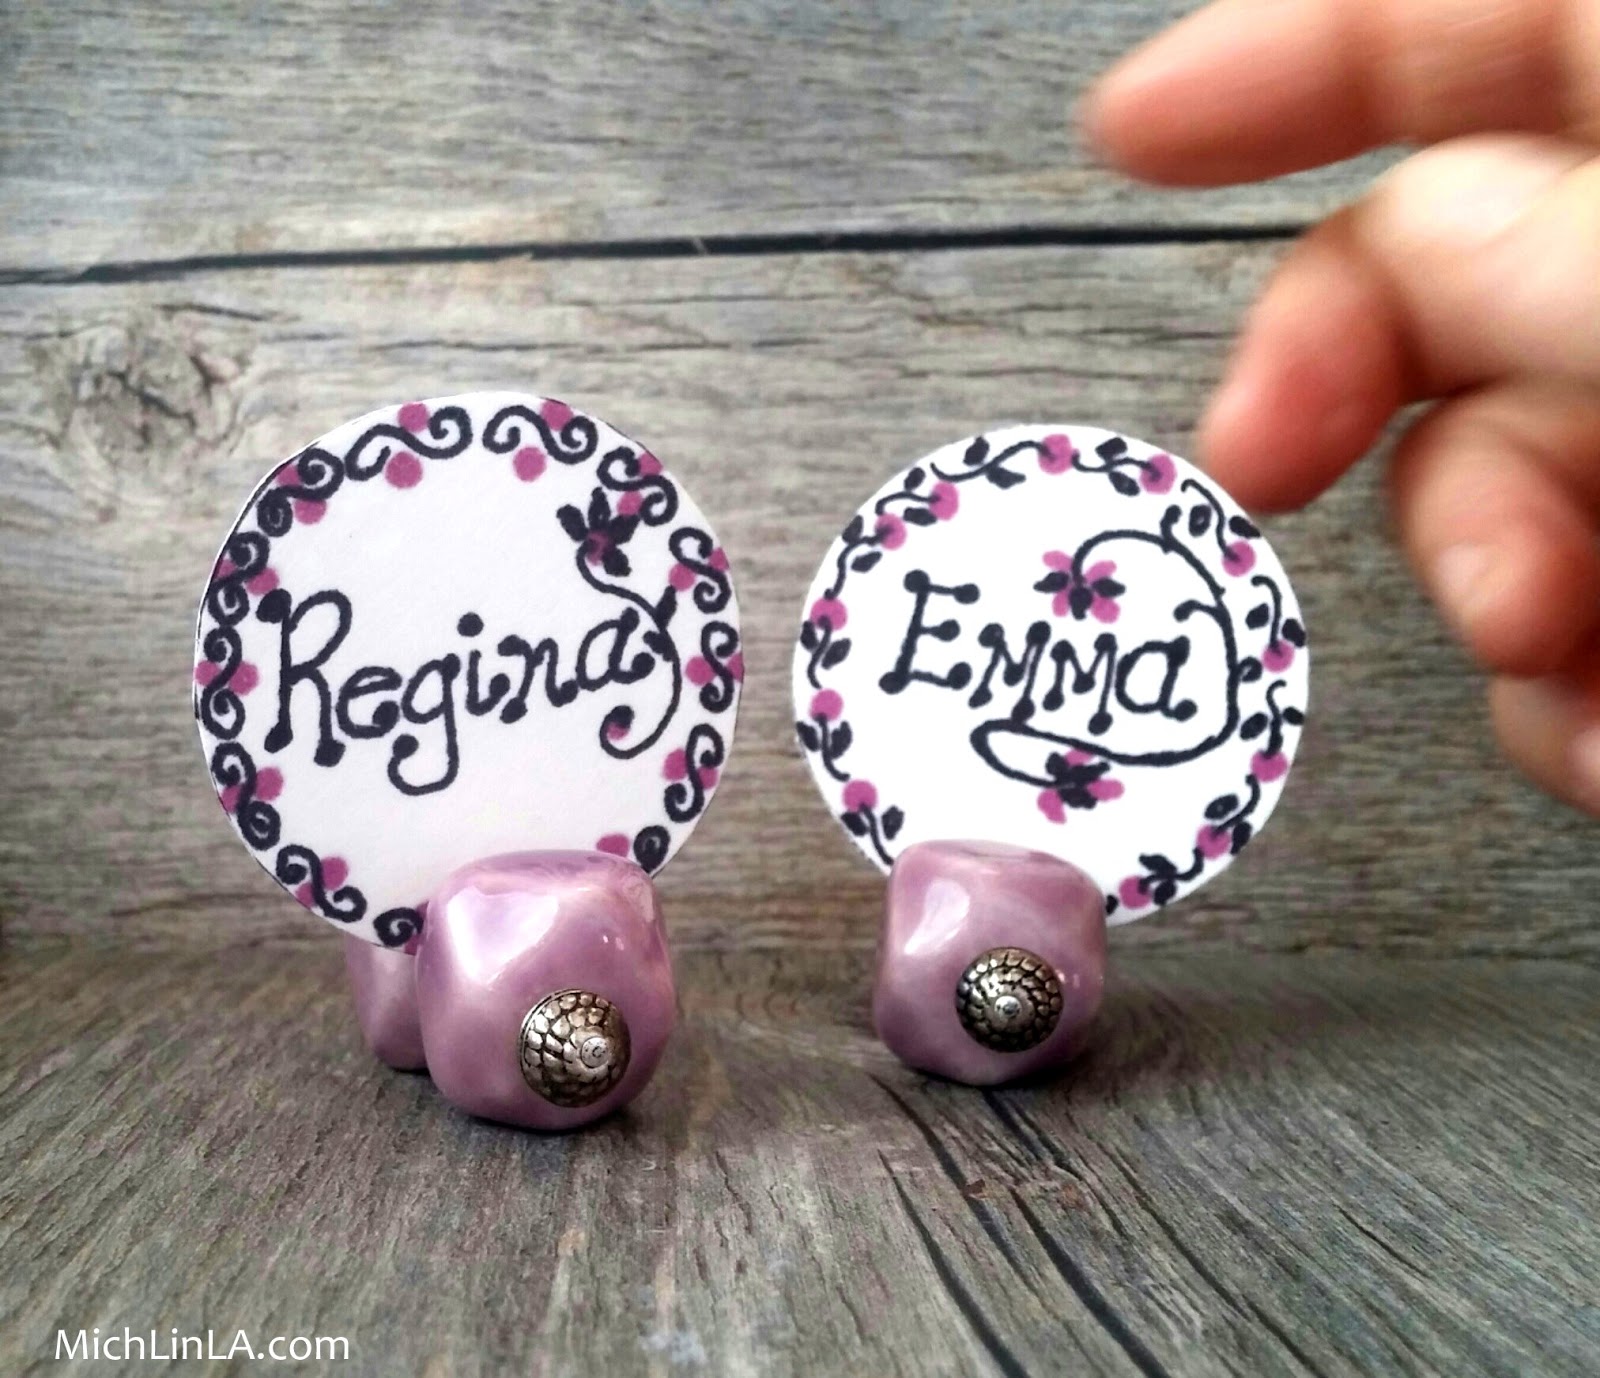
Here's a reverse mystery for you! Look at these strange tiny objects, made with two big beads.
What are they for? They are a much loved little invention of mine, a contraption I've been making and using for years.
Puzzle your head for a few moments and see if you can guess! Then scroll down to see the answer.
Scrollin'
Scrollin'
Scrollin'
Check it out...bing!
Just tuck some recycled cardboard between the two beads, and voila, earring display stands! Yep, they stand up on their own.
I love these mucho. One, they're way cute. Two, they take up hardly any space when not in use. And three, they are an AWESOME way to use up big clunky orphan beads that I'd probably never use for jewelry.
I also use them as mini holders for small photos or art:
They have lots of other uses, too - like place card holders, buffet table signs, anywhere you need to label or display something while maintaining a tiny footprint. Fer example, they make the darlingest business card display:
Pretty cool, eh? Wanna DIY? Here goes!
Stack two big beads on a headpin, with a little spacer bead in front to schmancy it up a bit.
Use round-nose pliers to turn the tail of the headpin in a loop. Cinch it all the way down tight against the bead.
For the earring card, cut a cardboard shape with a small bite out of the bottom. Looks a bit funny, but it helps balance the weight of the earrings.
Then just tuck the cardboard into the slot. Here's a side view:
How easy was that?
For party or wedding place card holders: instead of orphan beads for those, you might decide to choose beads in your favorite colors and make matched sets to decorate your table.
Here are some tips on making these. 1. Use beads with flattish ends rather than round. 2. Beads with the same approximate diameters work best together. 3. I used acrylic and porcelain beads here, but any material will do. Heavier beads will support slightly larger photos or earrings.
So ends The Mystery Of The Thing With Two Beads. Did you figure it out before scrolling down? Do tell.
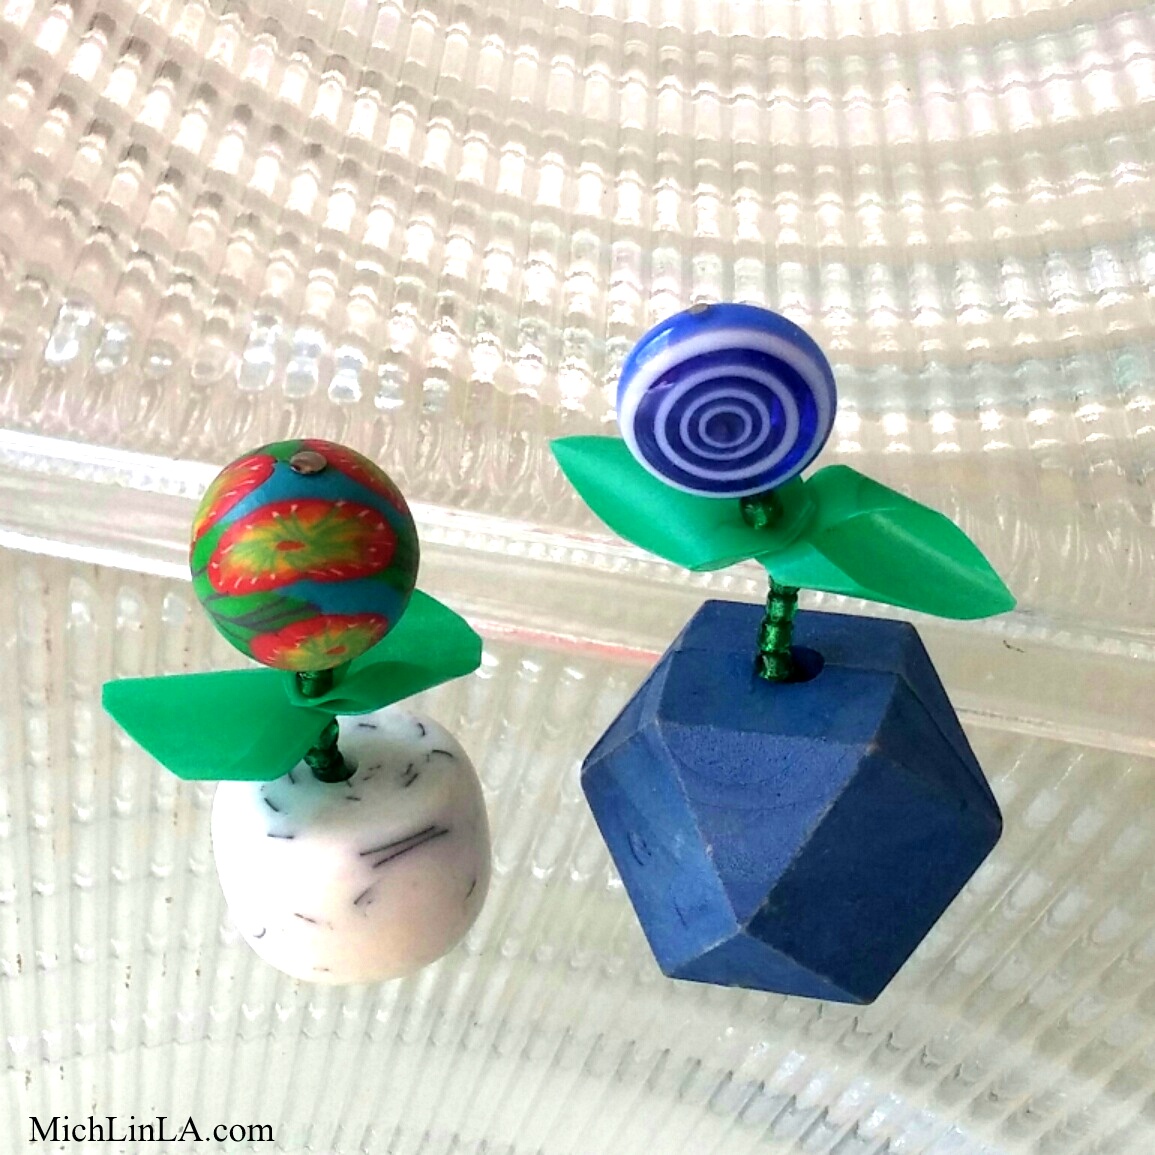
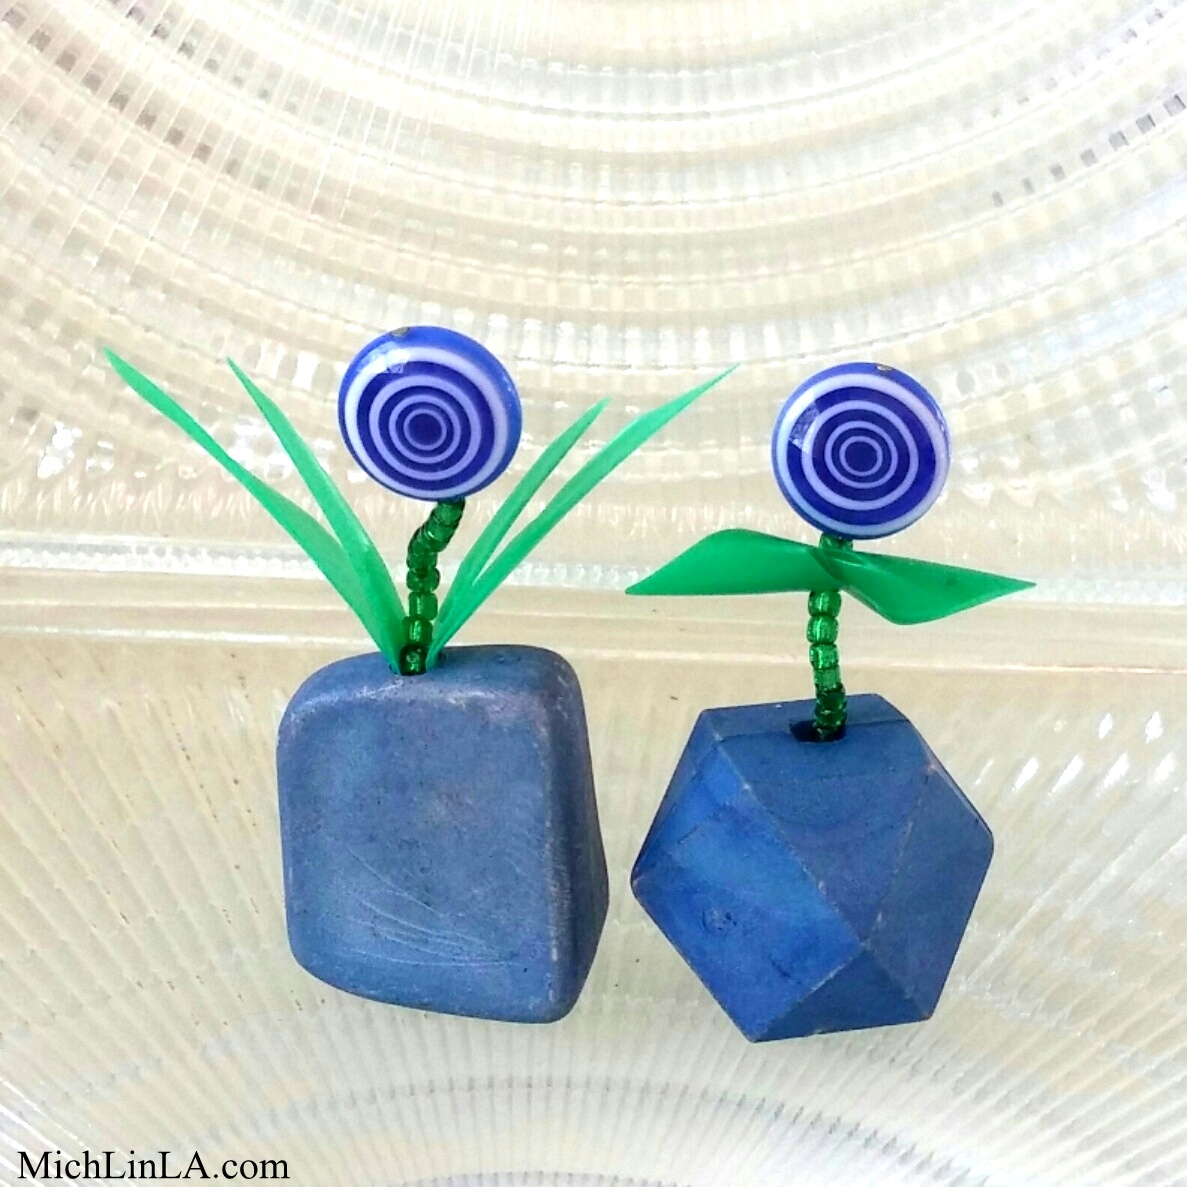
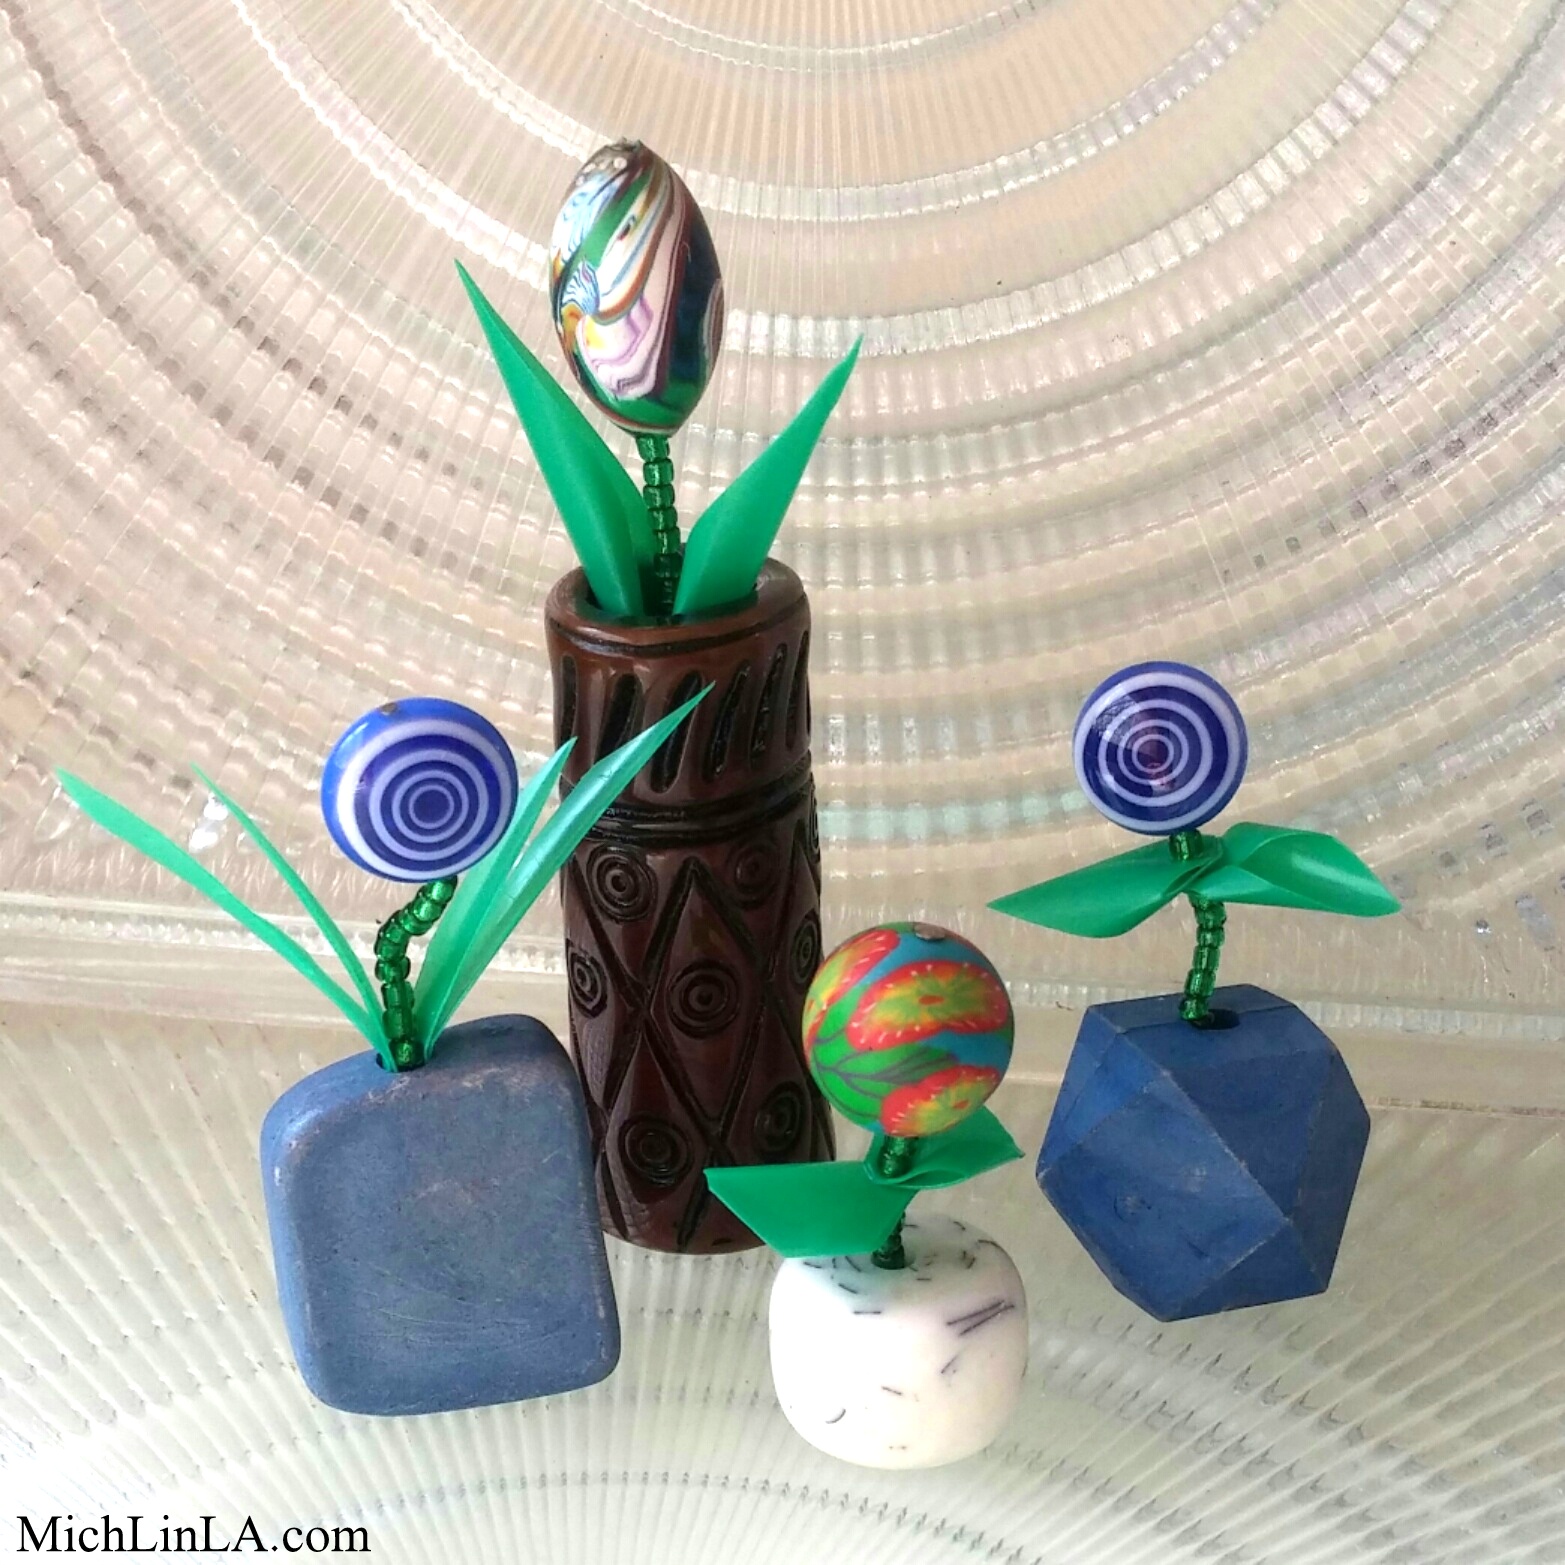
Hey, hey, hey! I have a little tiny craft for you guys. It's my first ever attempt at something miniature, and it's a cutie. Beaded flower pots!
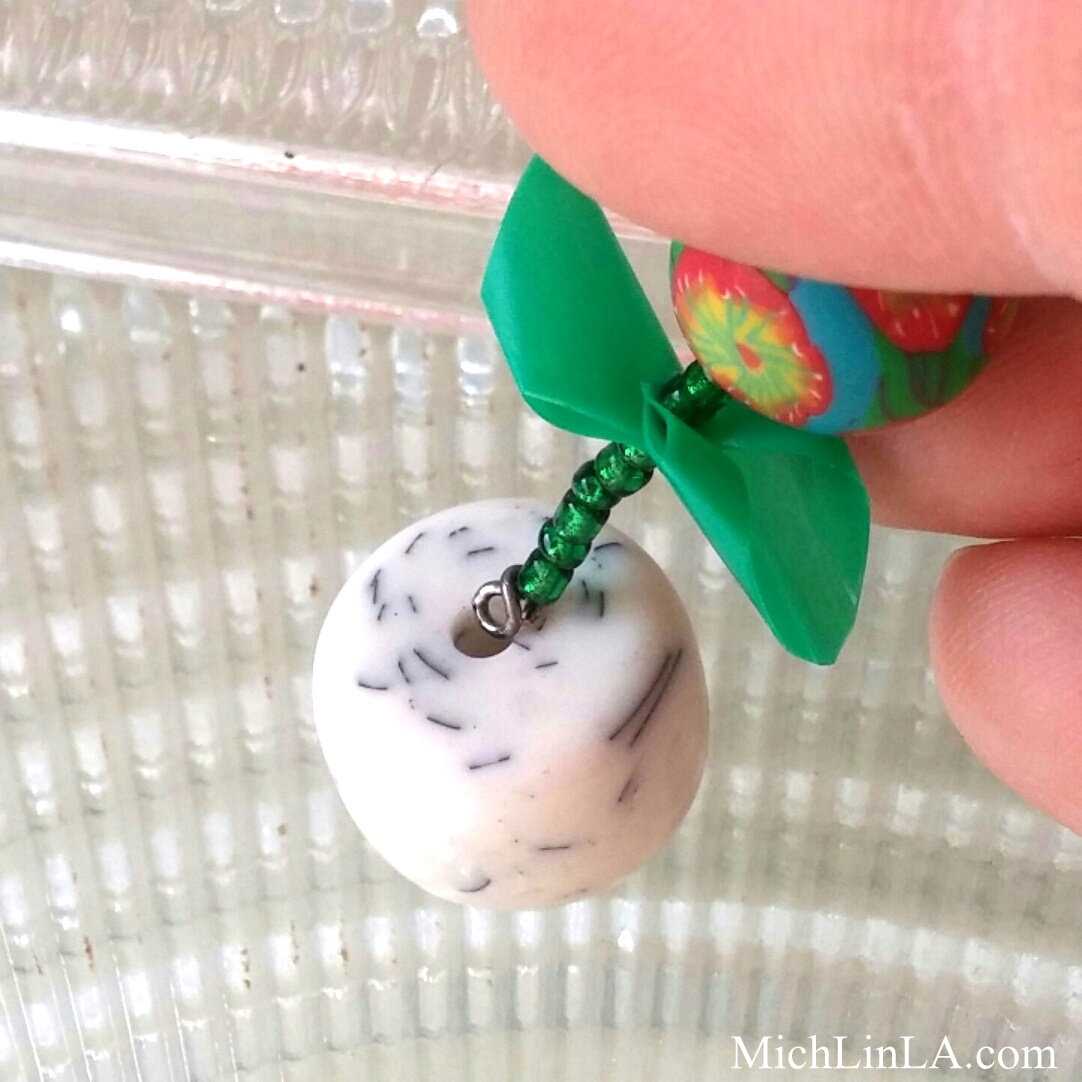
Sorry, I forgot to put something in the picture for scale - the littlest one is only an inch tall. Each 'vase' is just an extra-large bead. I'm always so excited to find a use for random honking big beads that are too bulky, ugly or weirdo for jewelry.
This is the latest in a series using upcycled Starbucks cups. Right now I'm working with those unlovely green straws - you know the ones.
Today's tute features the opposite-pointing leaf sets on these pretty darlings:
Ready? Let us DIY!
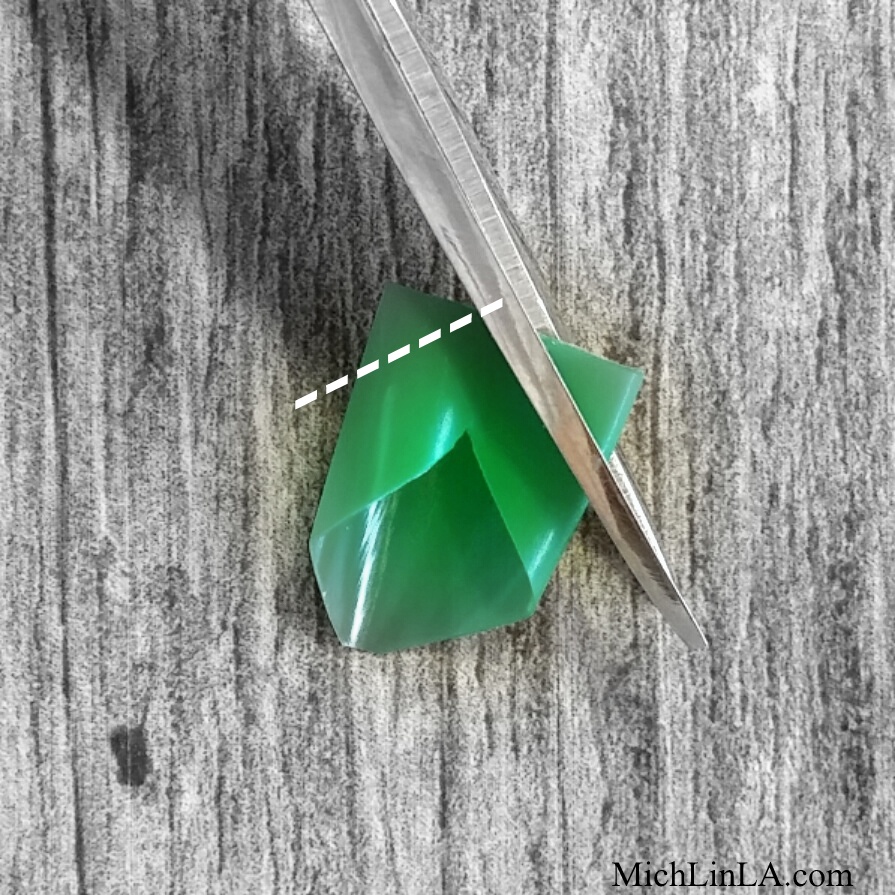
Take a short segment of drinking straw and make a diagonal cut on one end.
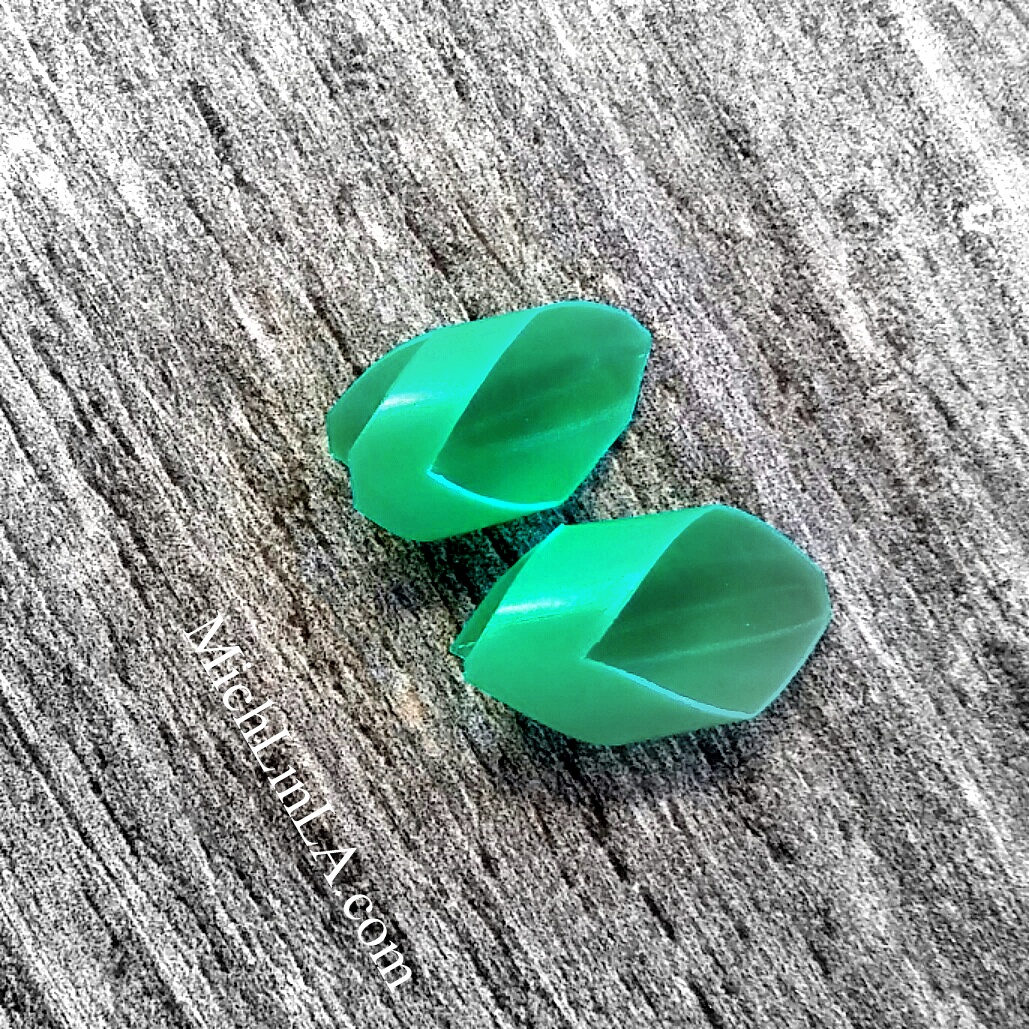
On the other end, make two two very tiny cuts, like so:
Create two leaves of approximately the same length. Here's how they should look.
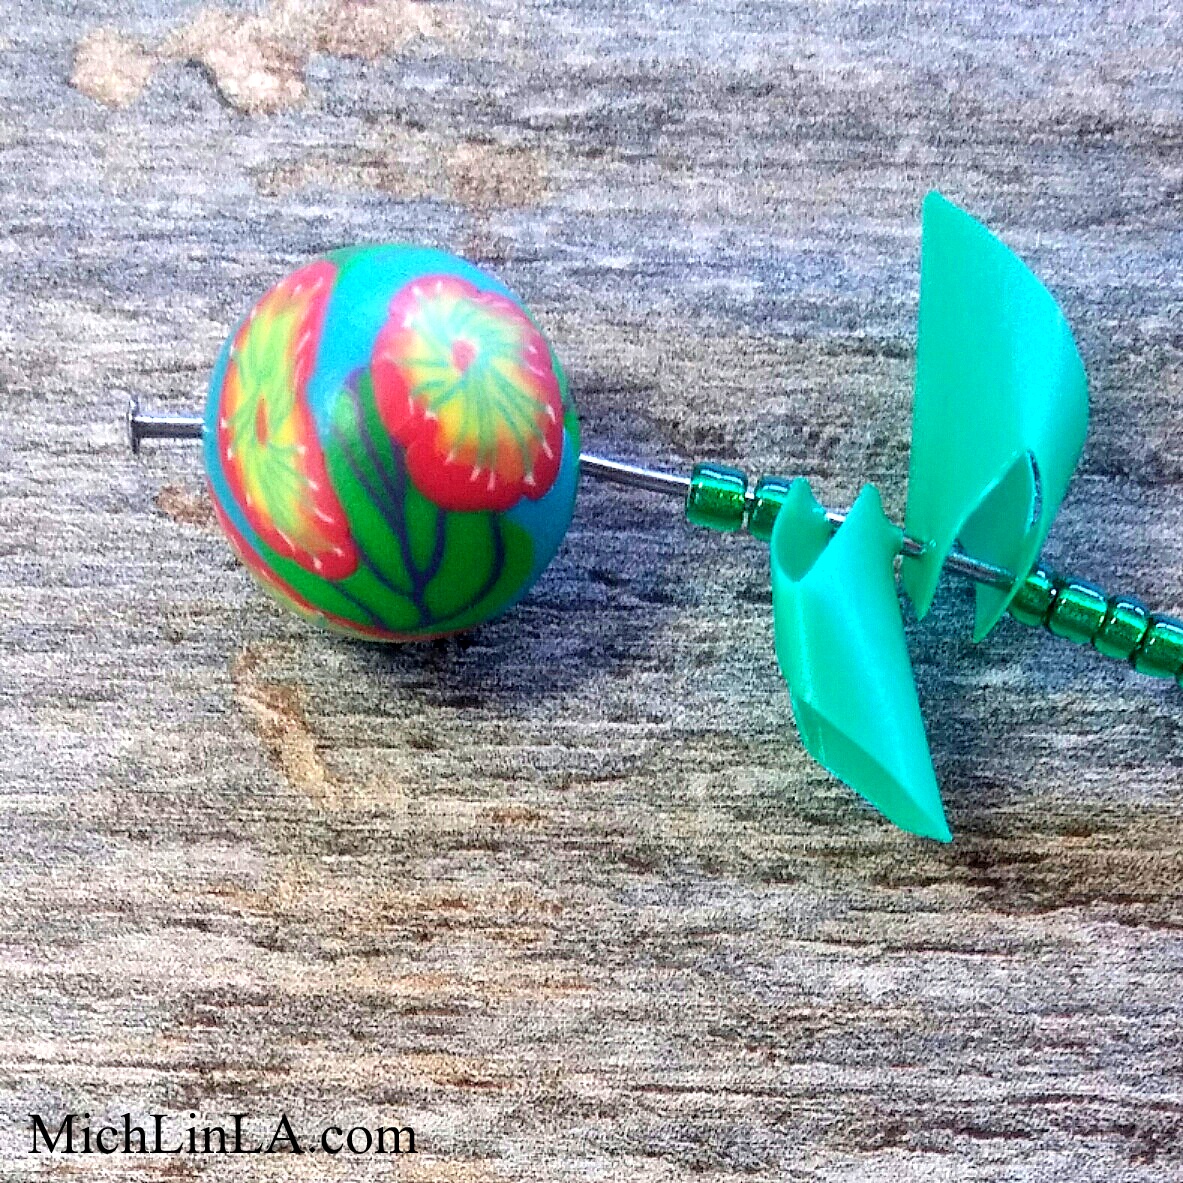
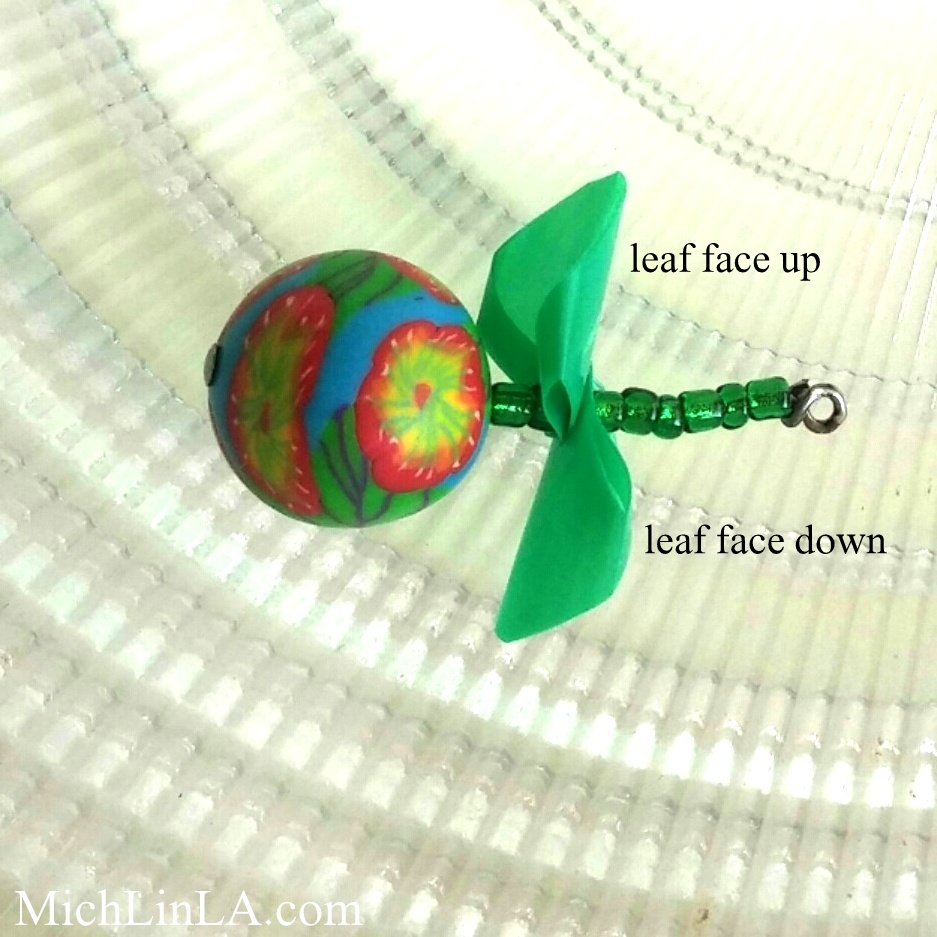
Use a pin to poke a hole in each double-snipped end. On a headpin, thread a "flower" bead and a couple of green seed beads. Now here's the important bit: when adding the leaf segments, flip one leaf over, so the two pieces nest back-to-back.
String a few more seed beads and finish with a wrapped loop. Like so:
Then simply place the stem into a random honking big bead.
Make sure the bead is heavy enough that it won't tip over from the weight of your flower. Permanence is optional: if you like, add a drop of glue inside the vase bead.
Done!
For the ones with long swordlike leaves, I just cut scraps of straw and poked them into the hole after placing the bare flower stem.
So what say ye? I'm not experienced with miniatures, but I kinda think these bitty things would make adorable dollhouse decor. Let's see, what else could you do...
How about tiny party favors or place card weights?
With a rustic terracotta bead vase, use it in a fairy garden.
Pink ones for Valentine's day - ooOOooh, I'm totally doing that next year!
Tiny gift toppers?
Reverse the headpin so the loop's on top = necklaces or ornaments.
Let me know if you have any other ideas!
To see all the ways I've recycled the dreaded Starbucks cup in its various parts, here are some links:
Long chandy earrings
Floofy cup lid flowers
Delicate leaf earrings
Magical jewelry storage system
Posy necklaces
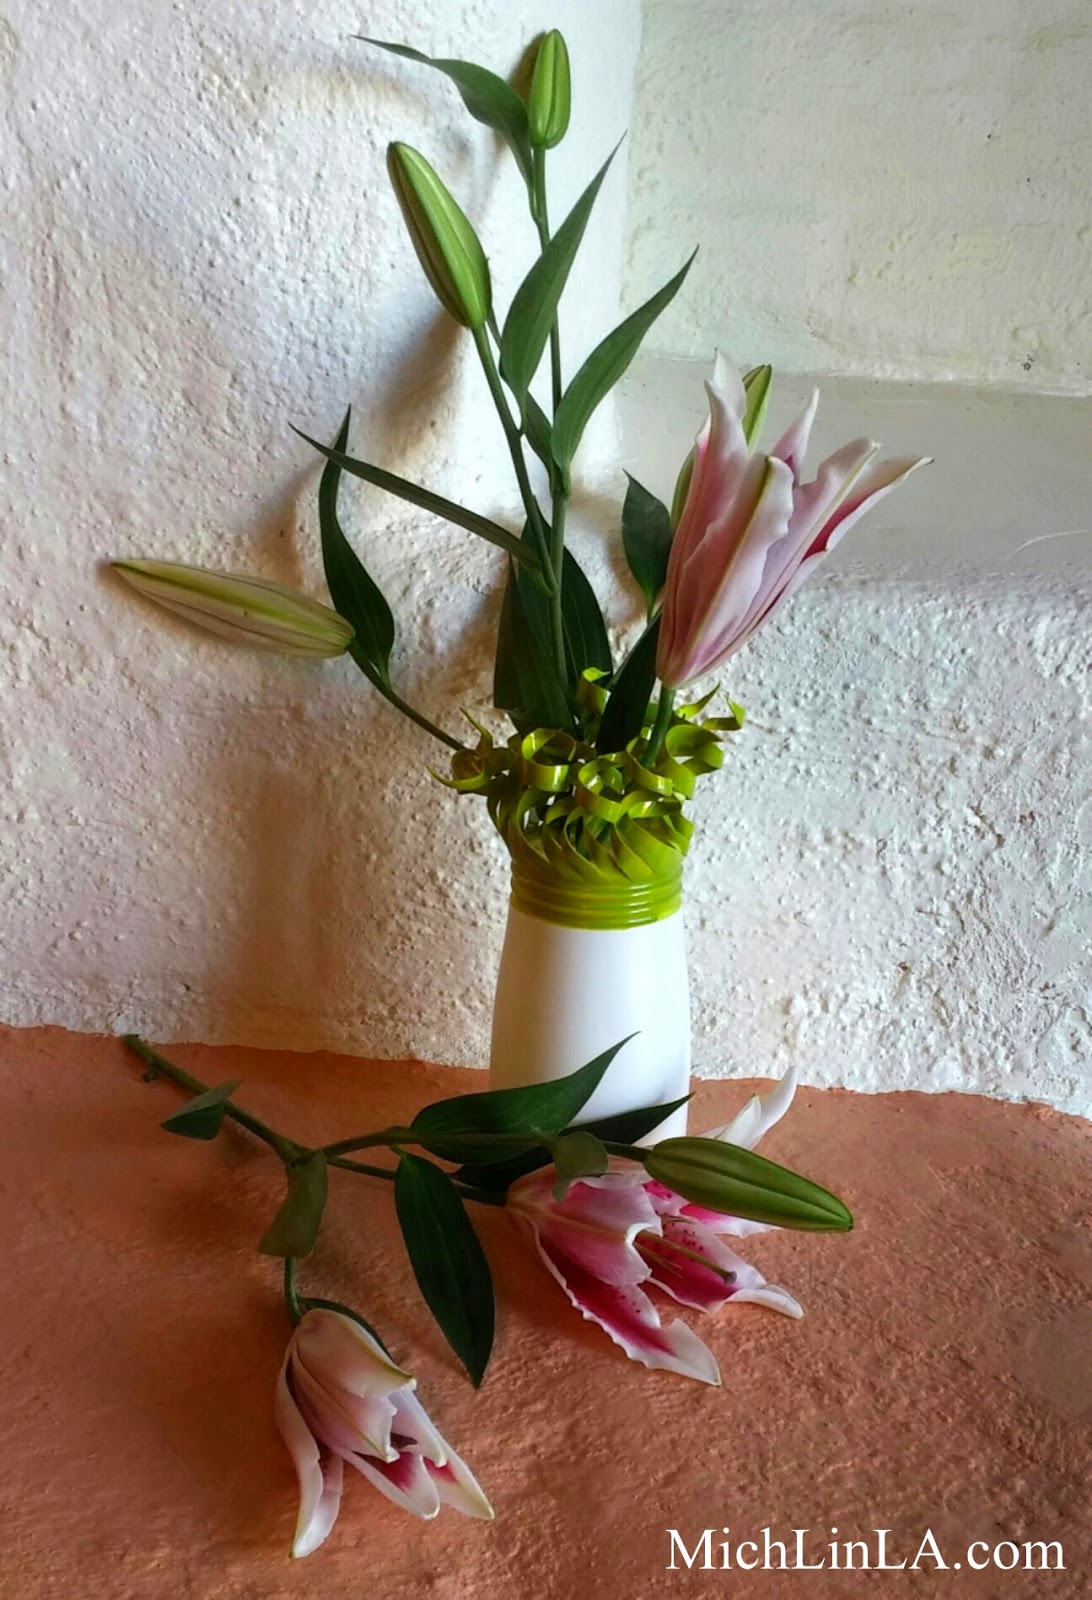
This is my new favorite project. A flower vase completely upcycled from trash, featuring a built-in collar of springy tendrils. Please to check it out!
The tendrils are not only decorative - they also serve as a kind of flower frog. They cluster together to help your flower stems stay where you put 'em. Here they are in closeup:
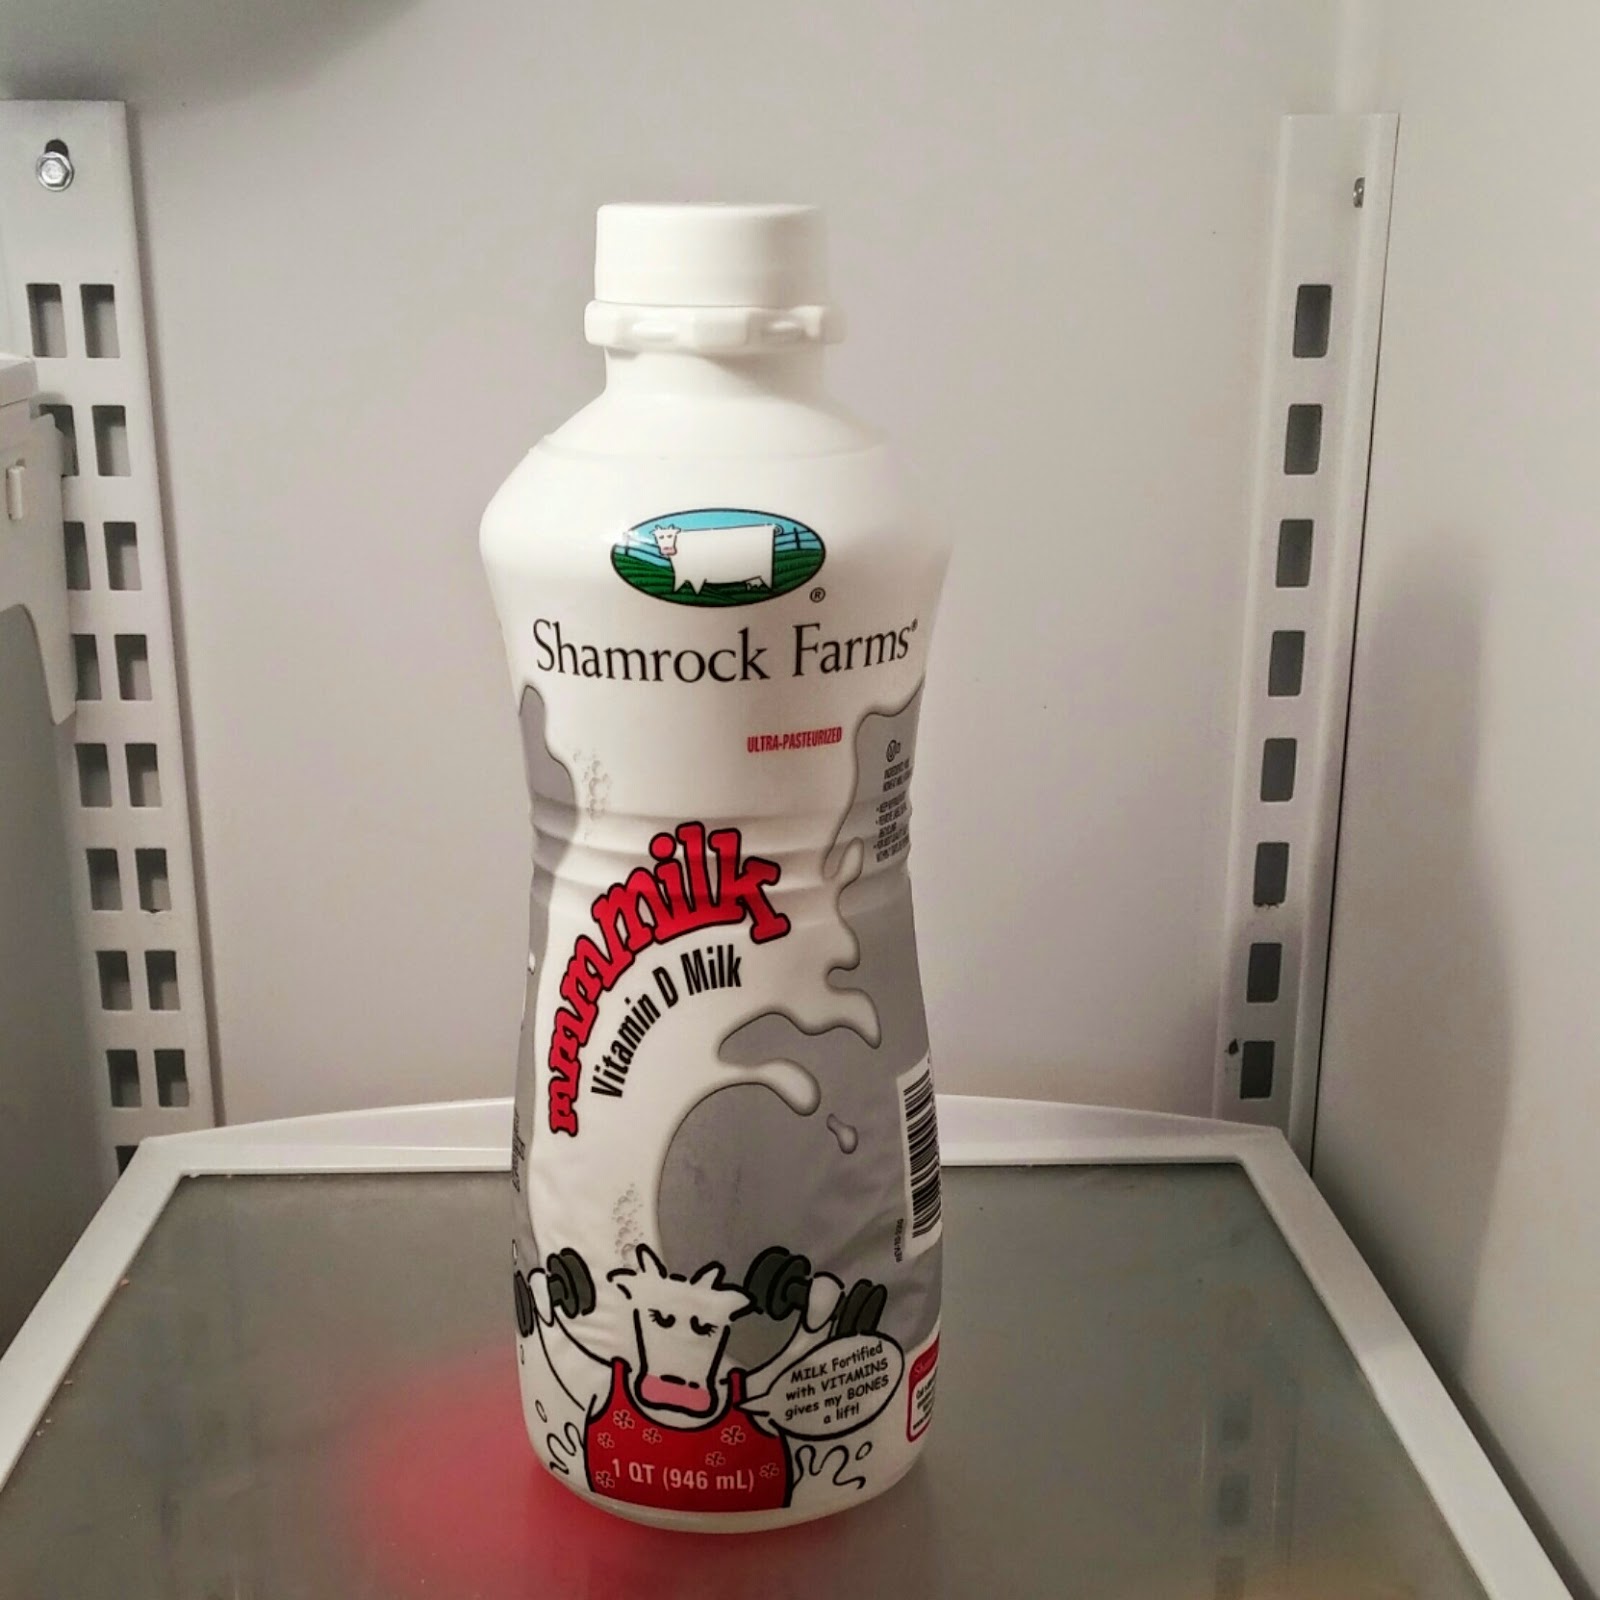
What's it made of, you ask? An empty plastic milk bottle. That's right, it went from this:
To this!
Here, my dears, is the very interesting DIY.
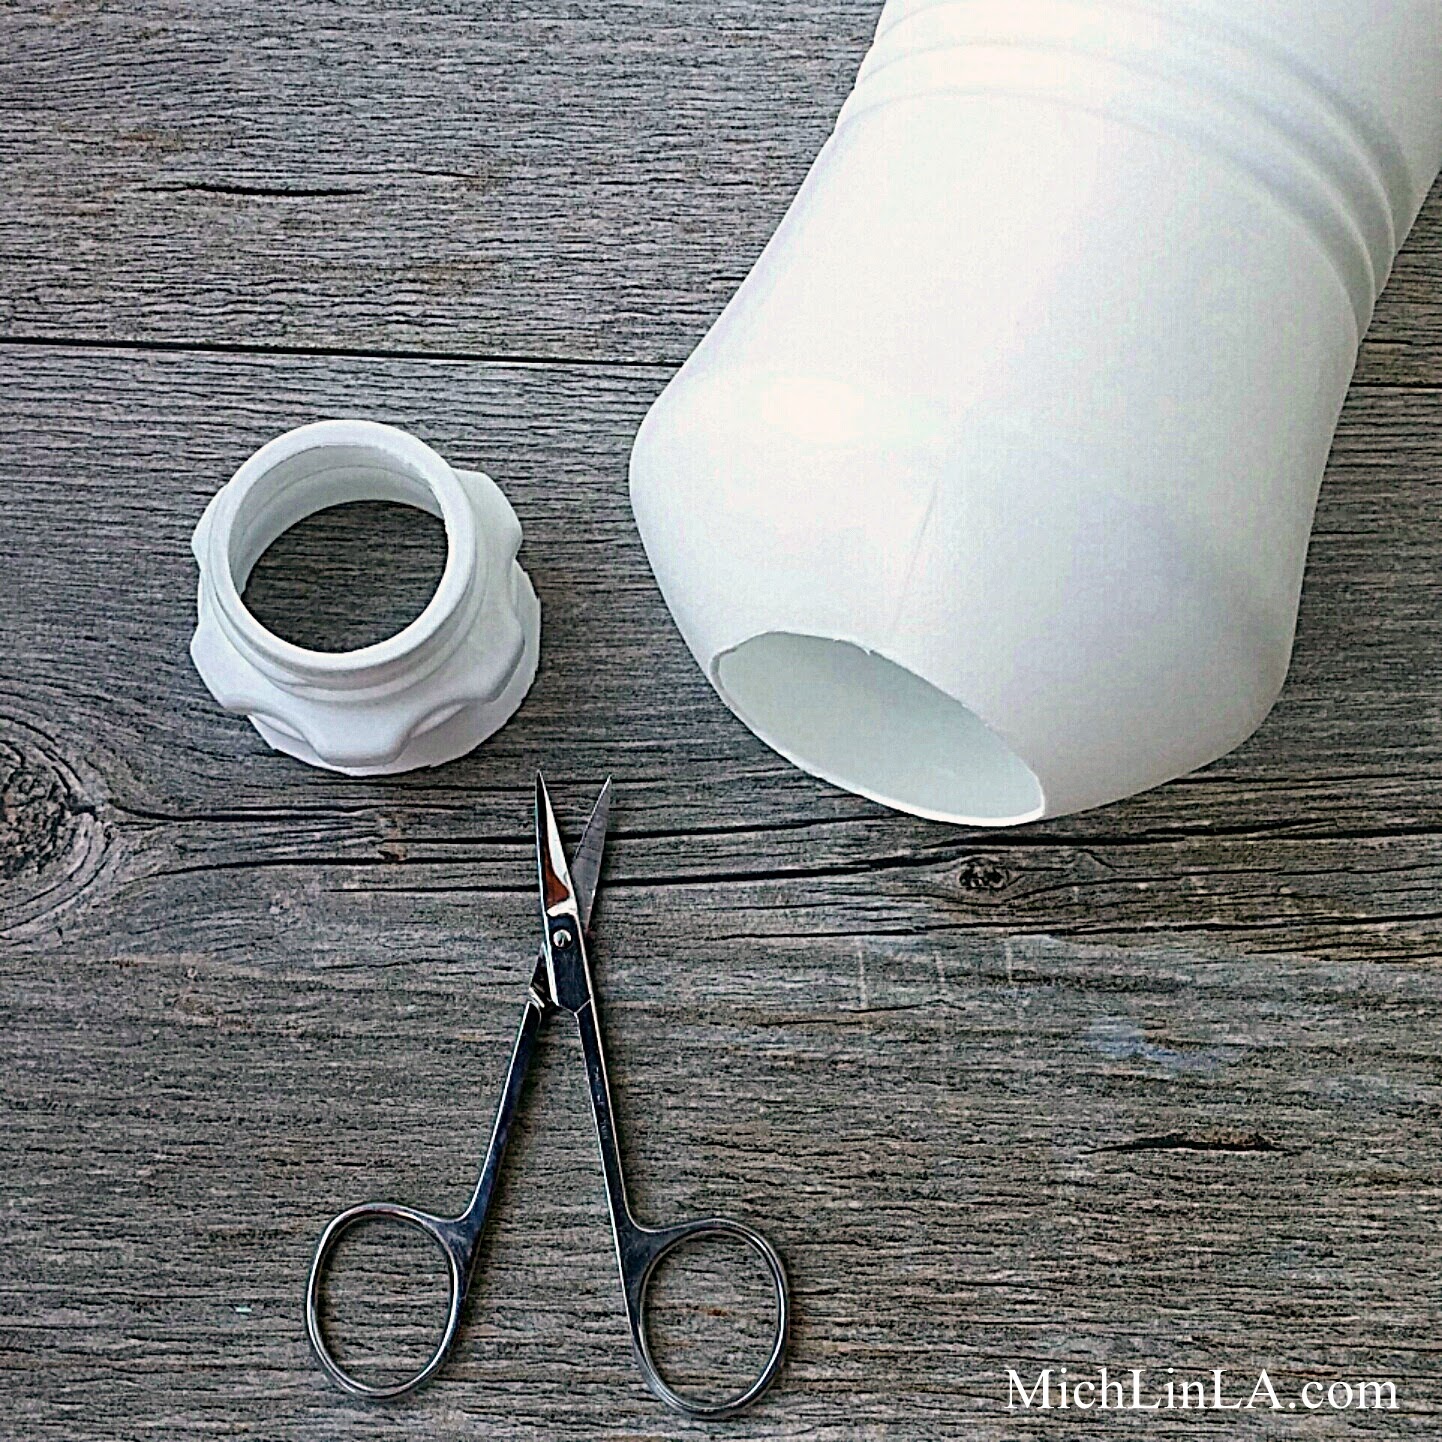
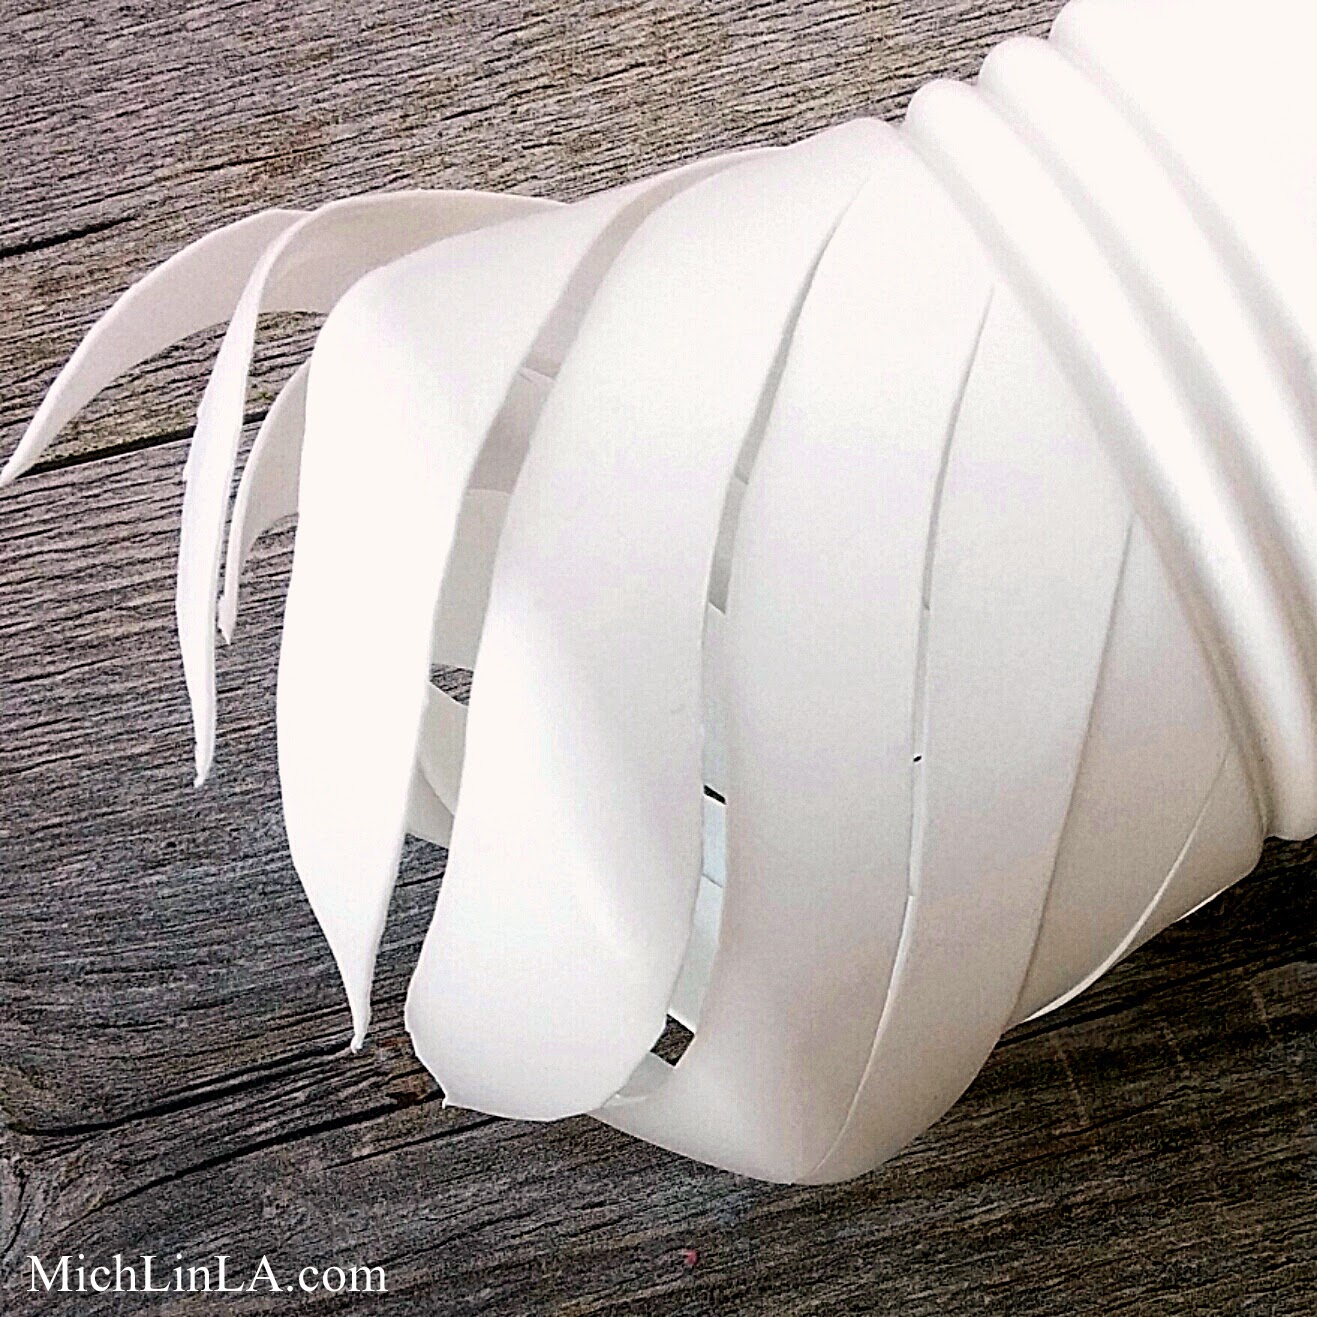
Find a bottle and cut away the neck. You can use most any opaque plastic bottle; doesn't have to be milk.
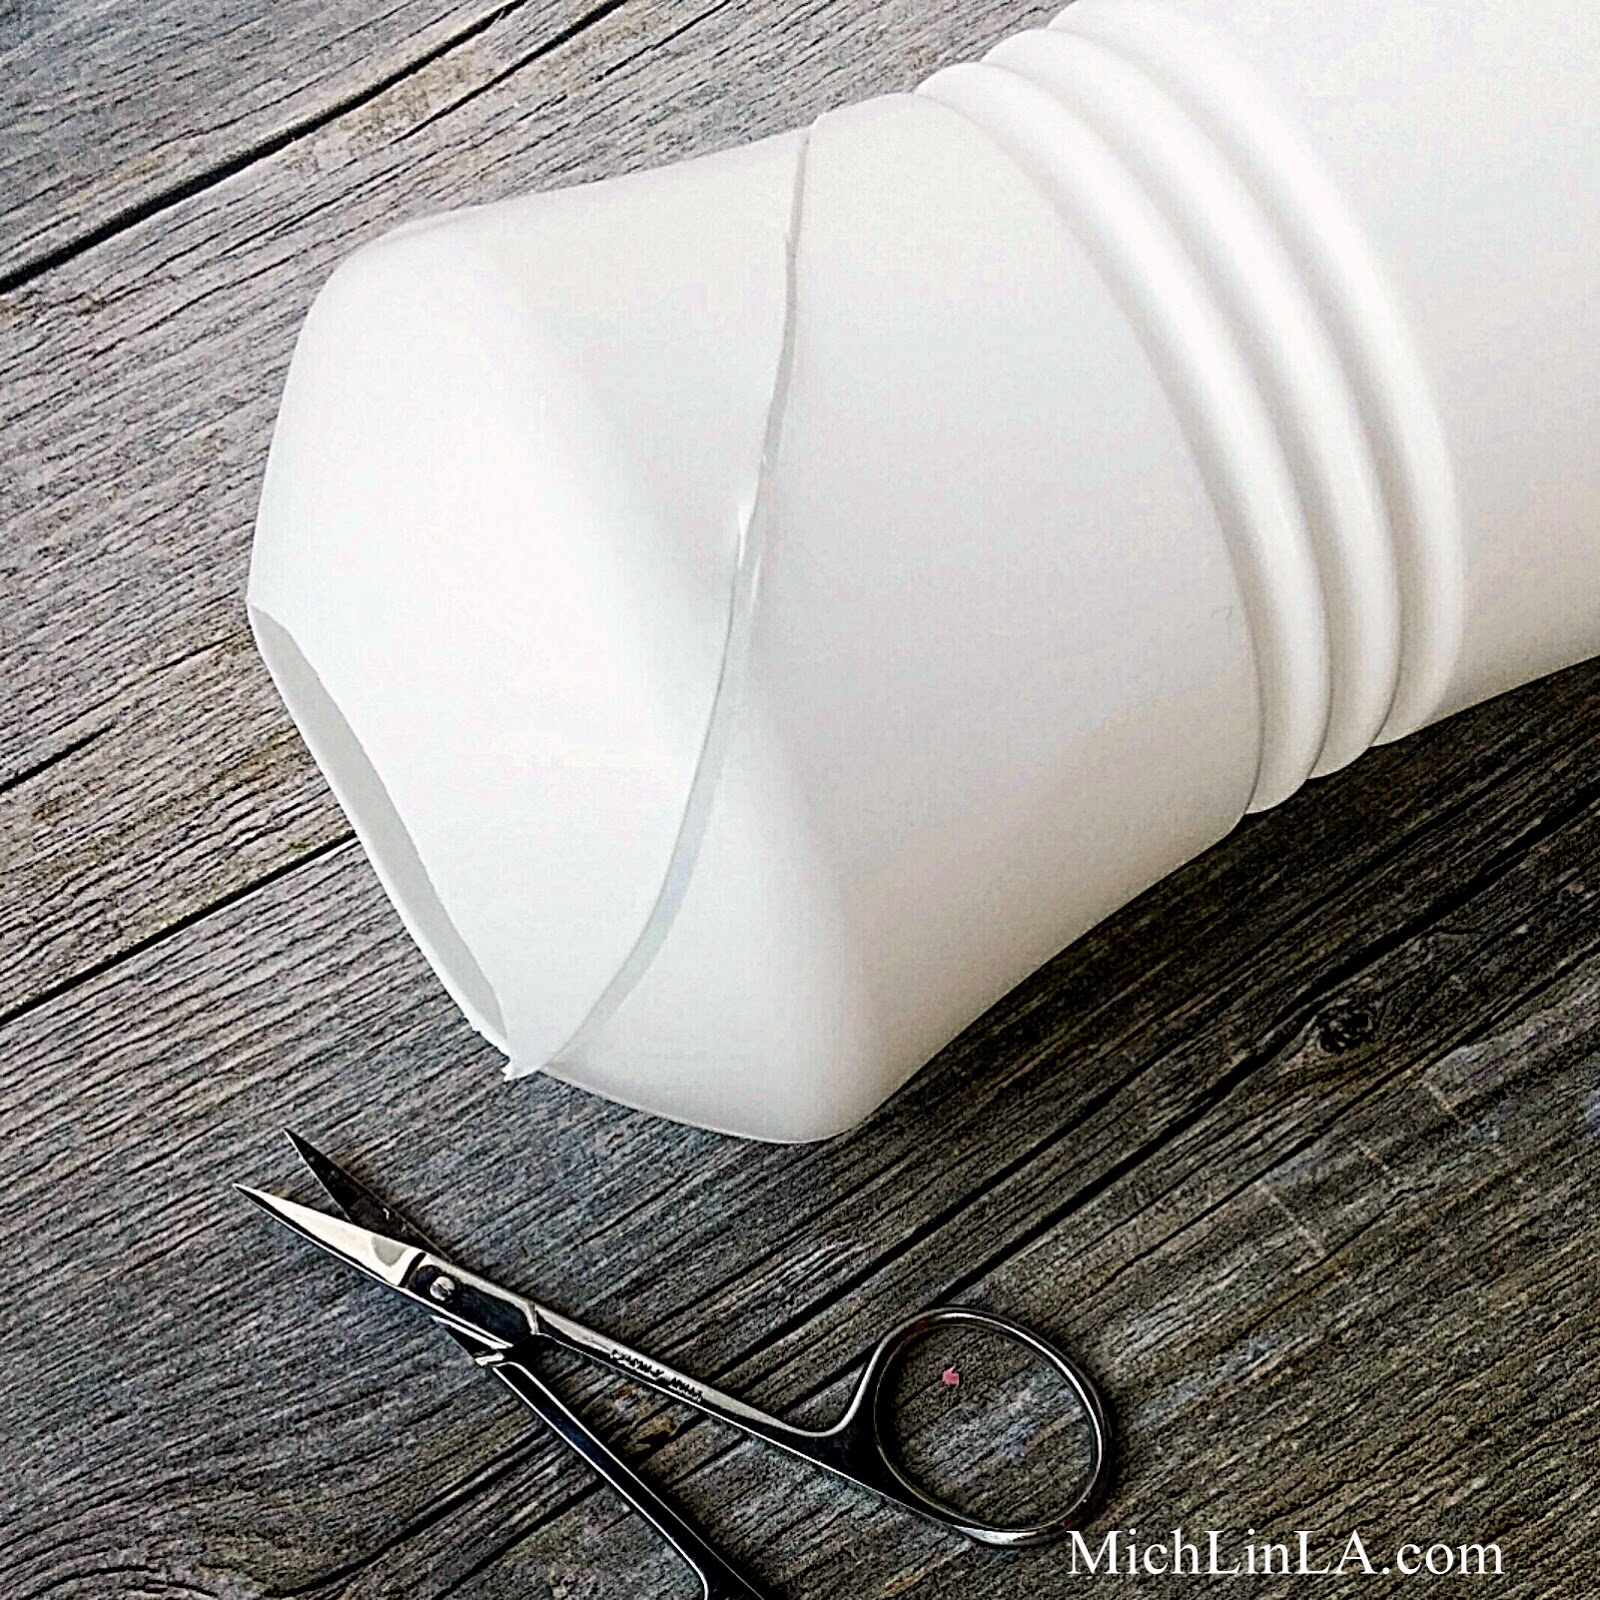
Make a diagonal cut, from the top opening to about 1/3 of the way down (or whichever spot makes sense for the silhouette of your bottle). Because of the bottle's round shape, the diagonal cut will actually be more of a spiral.
Parallel to the first cut, make a whole bunch more, going all the way around. The more cuts you make, the skinnier your tendrils will be.
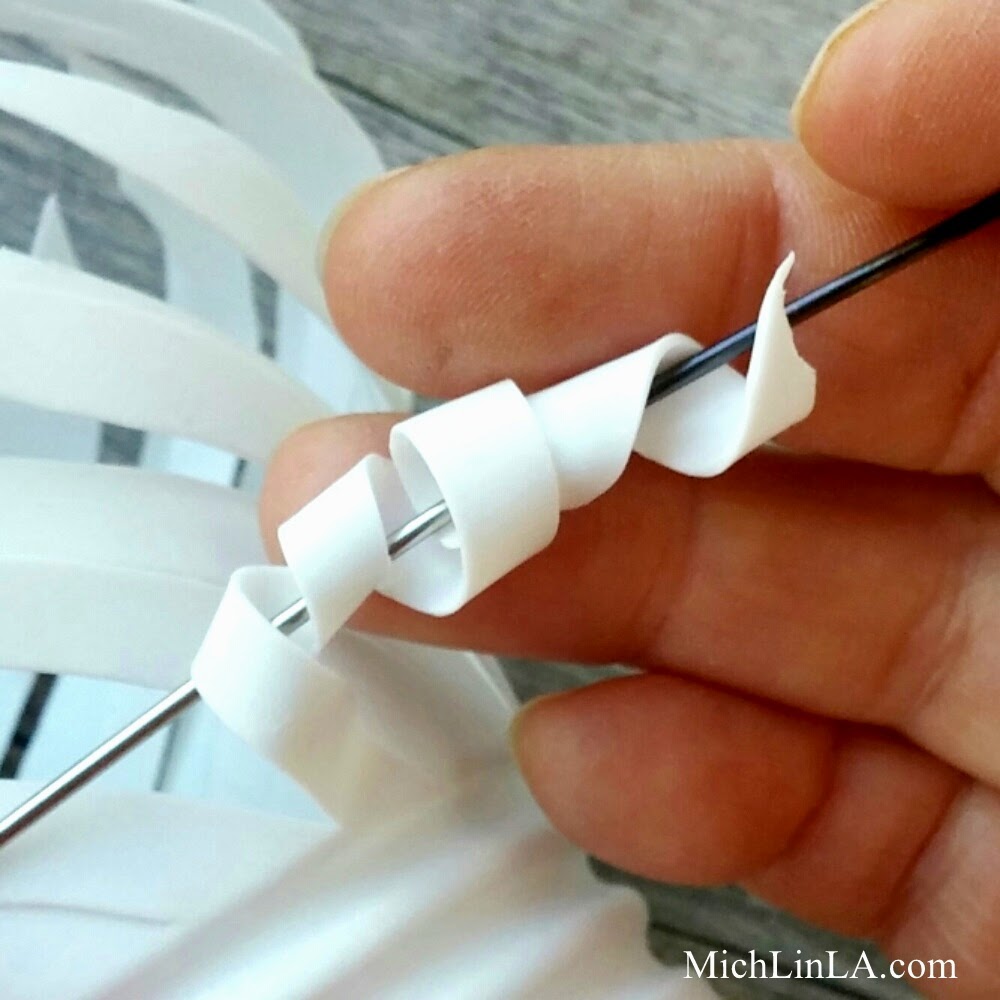
Grab one of the cut strips and wind it tightly around a skewer. Then release and - lookee there! The plastic will hold the curl!
Now, this doesn't seem to work on clear water bottles, at least not the ones I've tried, so stick with opaque plastics and you should be good. (Side note: this is the same method I used on one of my most popular posts, the uber statement jewel Ring On Fire.)
Okay, back to the vase. Keep going until all the strips are curled. This takes a little patience, because all those corkscrewy little things tend to get in each others' way. If you have to say a bad word, go right ahead.
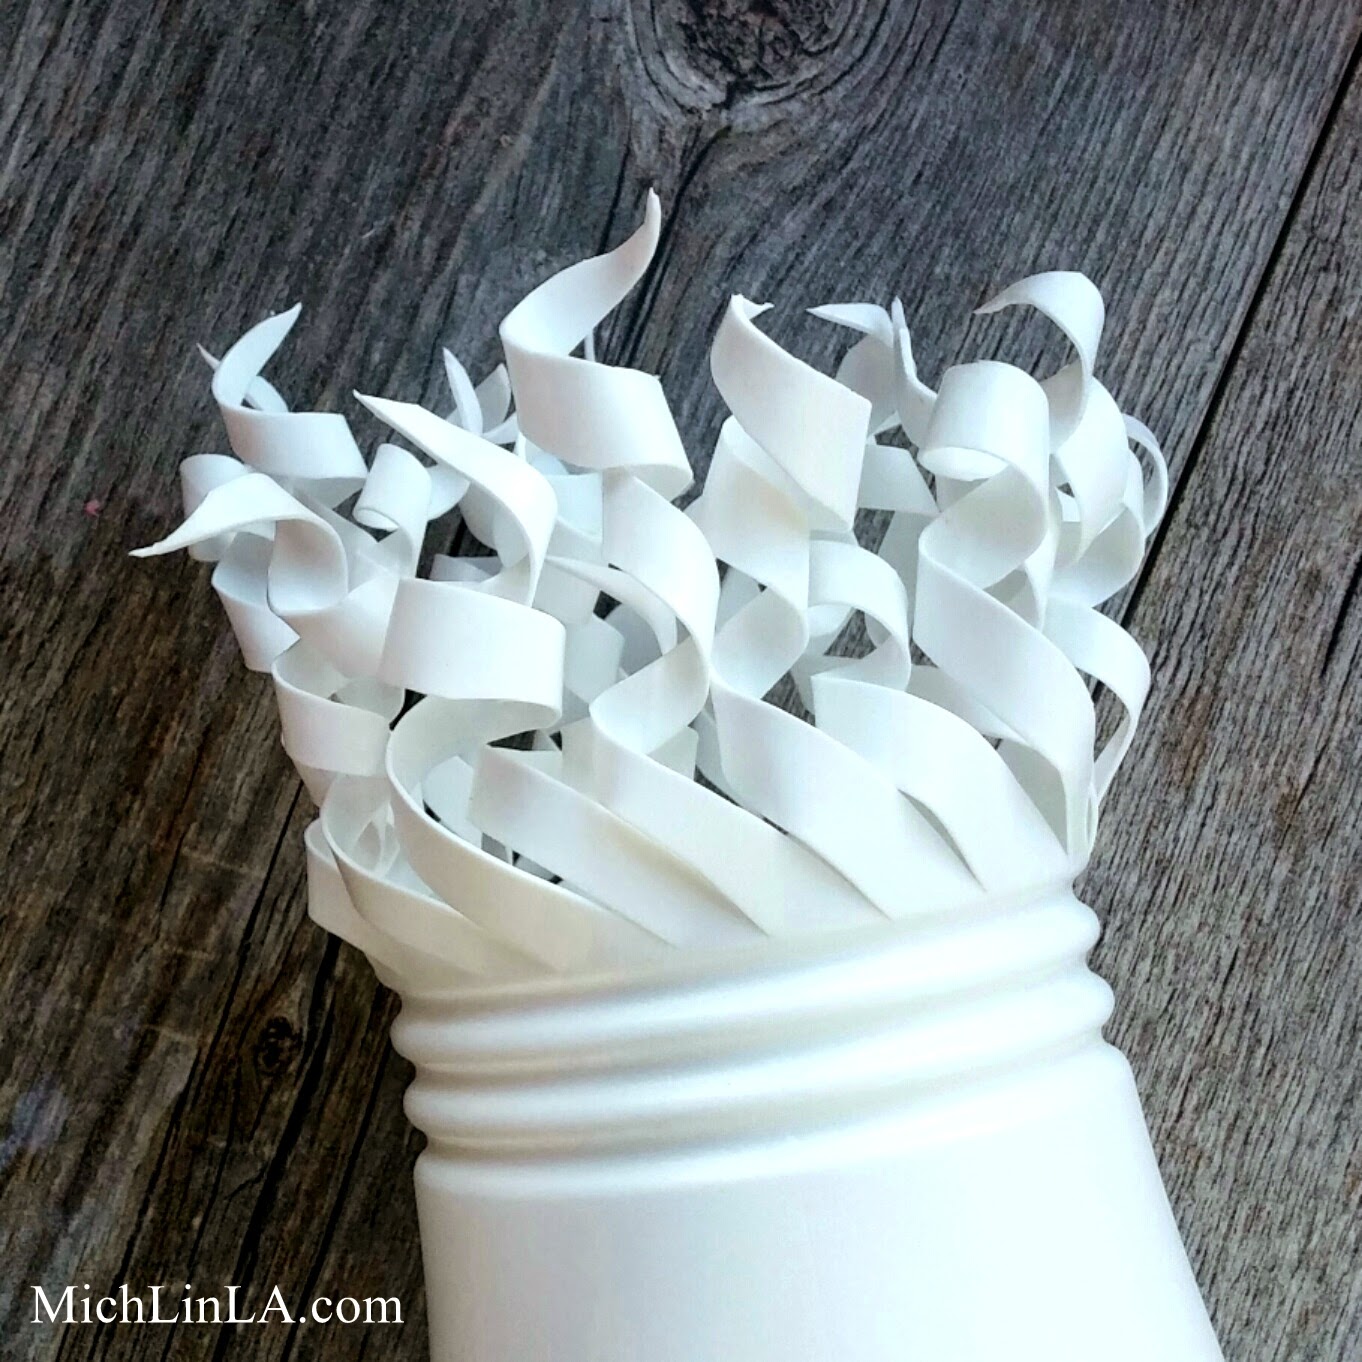
The final result: wowsers!
At this point, your vase is essentially done. Use as-is, or decorate in whatever way might float your boat.
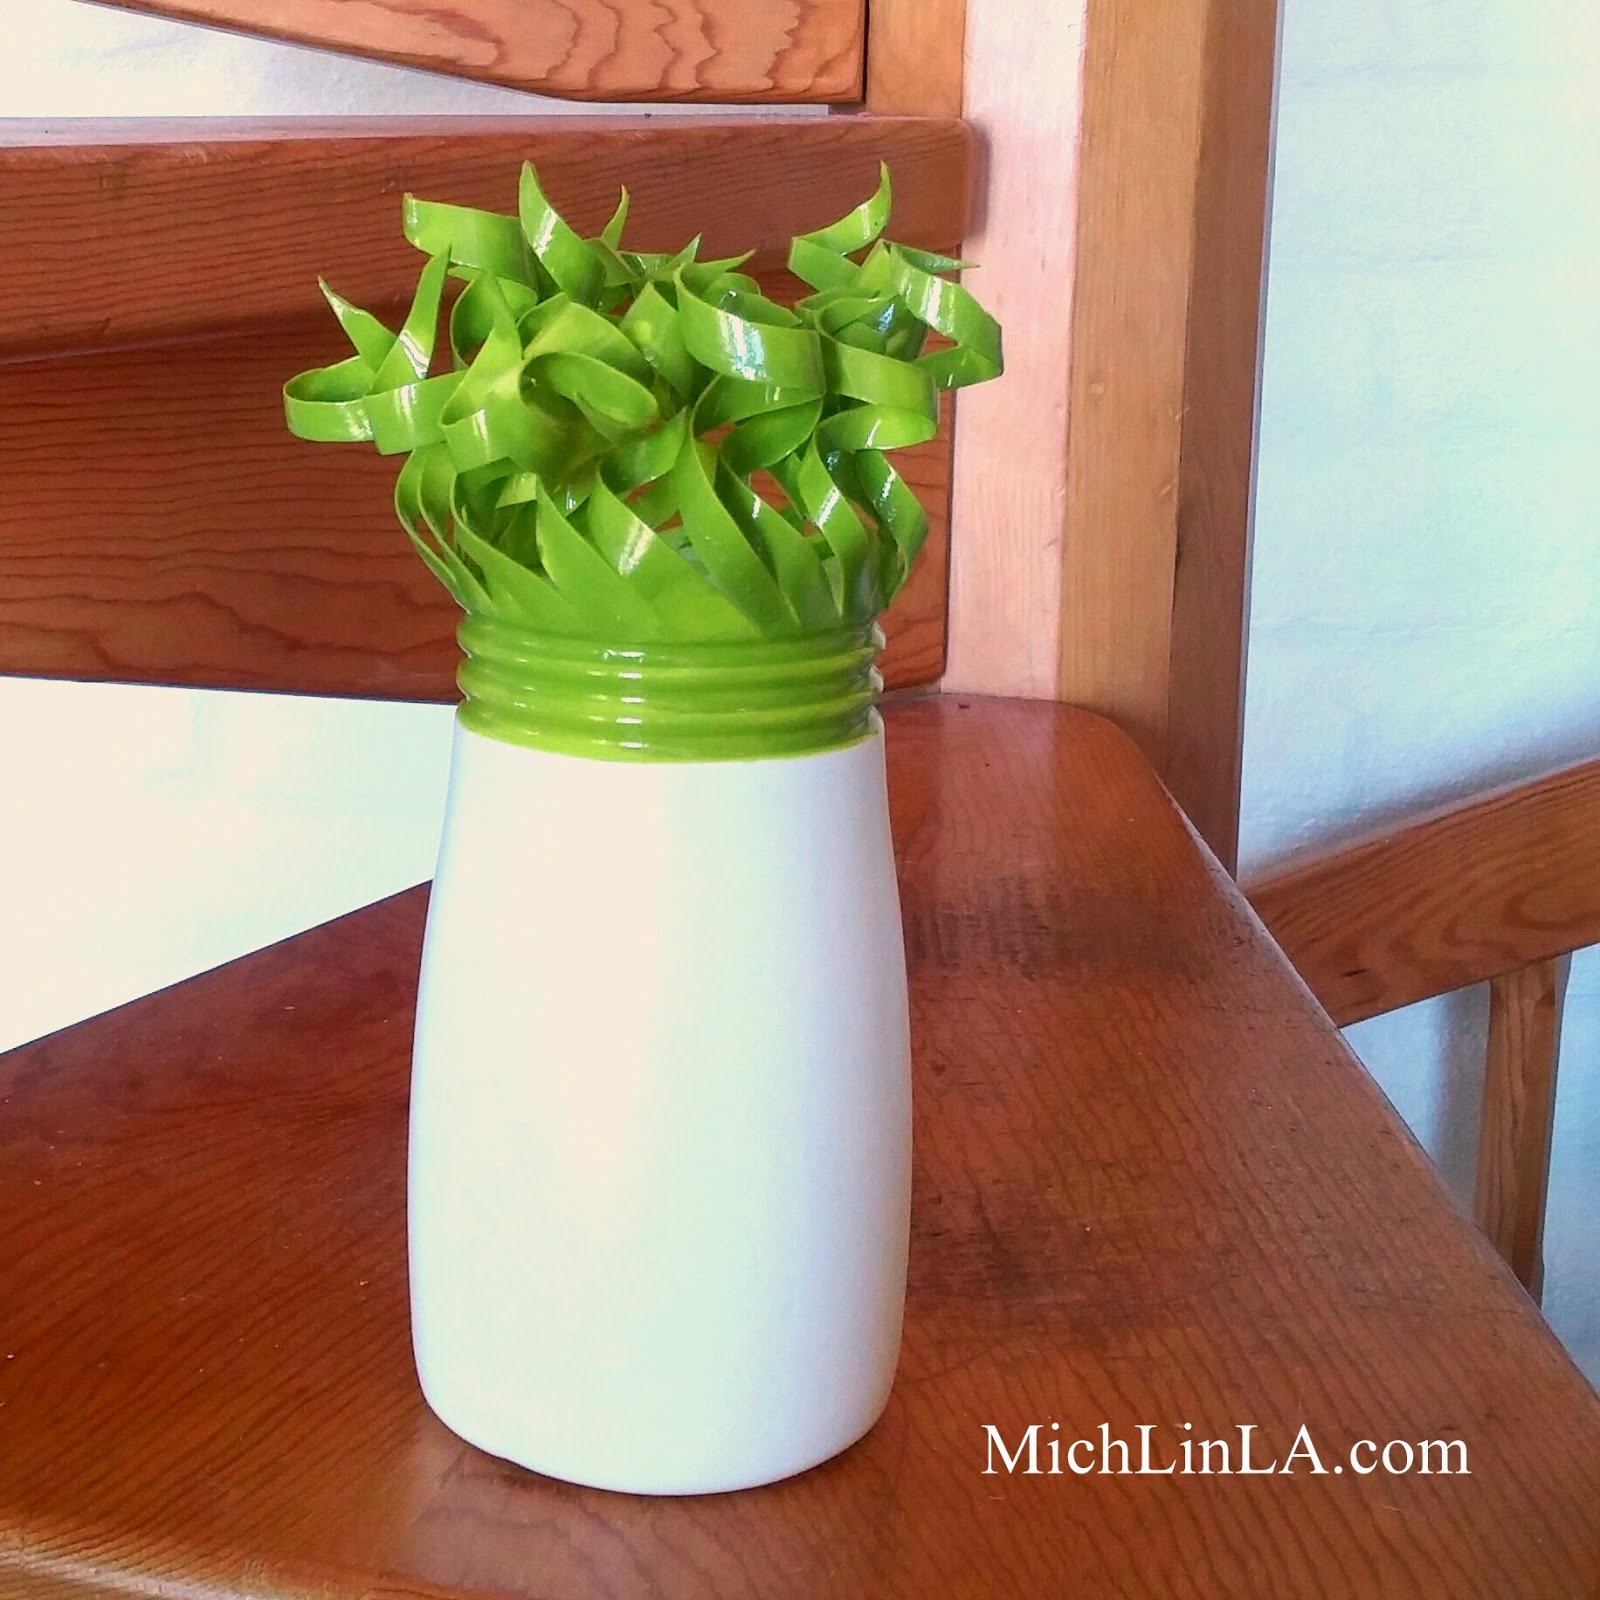
To make my color-blocked tendrils, I masked off the bottom section and simply spray painted the curlicues. It took a hot minute, and the effect just delighted the heck out of me.
Other ideas: gold tendrils above a matte black base? Polkadots or stripes on the white section? Hand paint the tendrils in multiple colors? I can imagine all kinds of fabulous versions.
So who thinks they might give this a whirl? And how would you paint yours?
Oh, wait! Before I go - let's not forget the rest of the bottle. Trying to be eco-conscious here, ya know. So what can be done with the neck and the lid?
Well! In case you missed it, I made something totally and utterly adorable with those - I think you'll be surprised. CLICK HERE to pop over and see.
Thanks for coming by, you guys.


